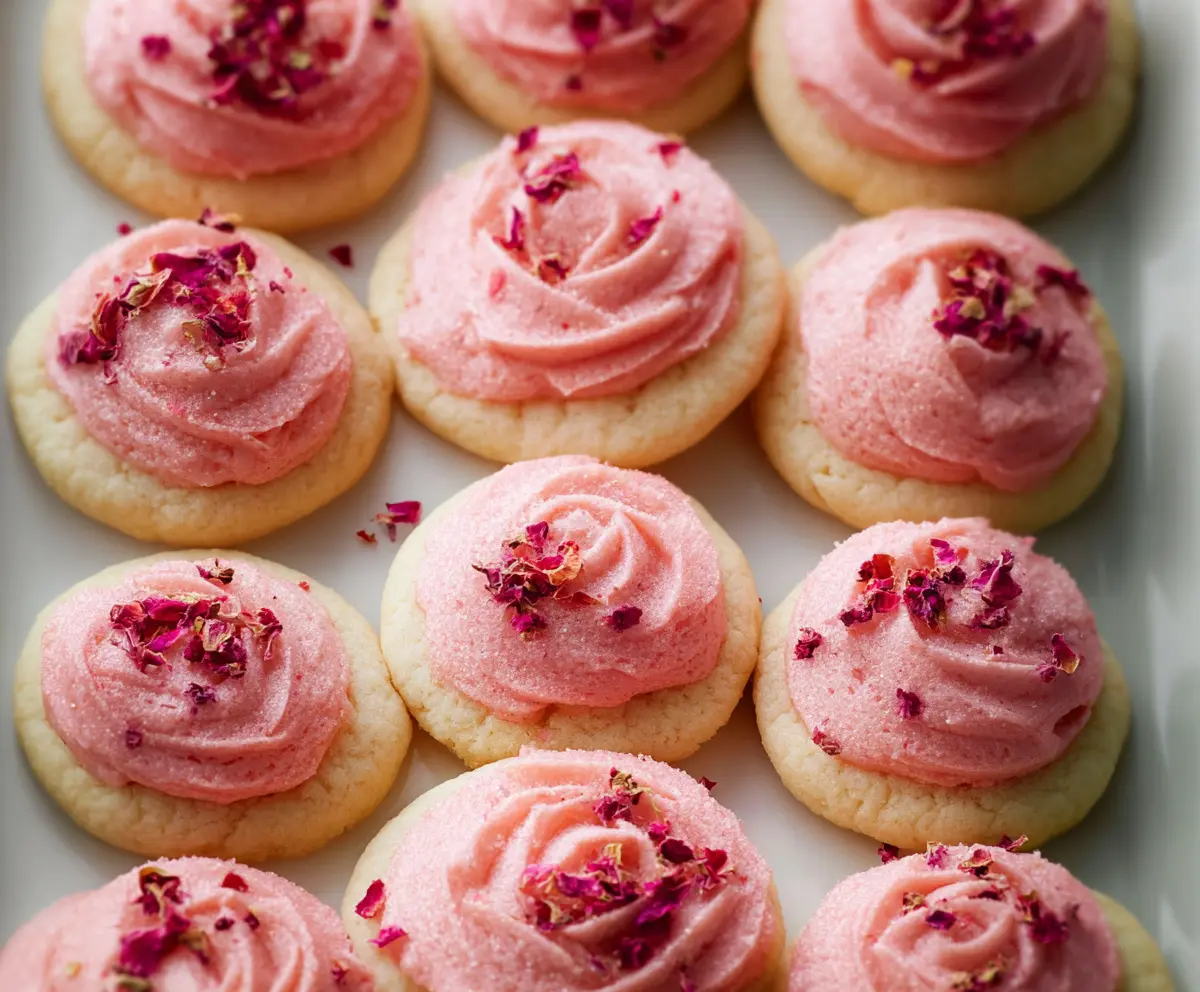
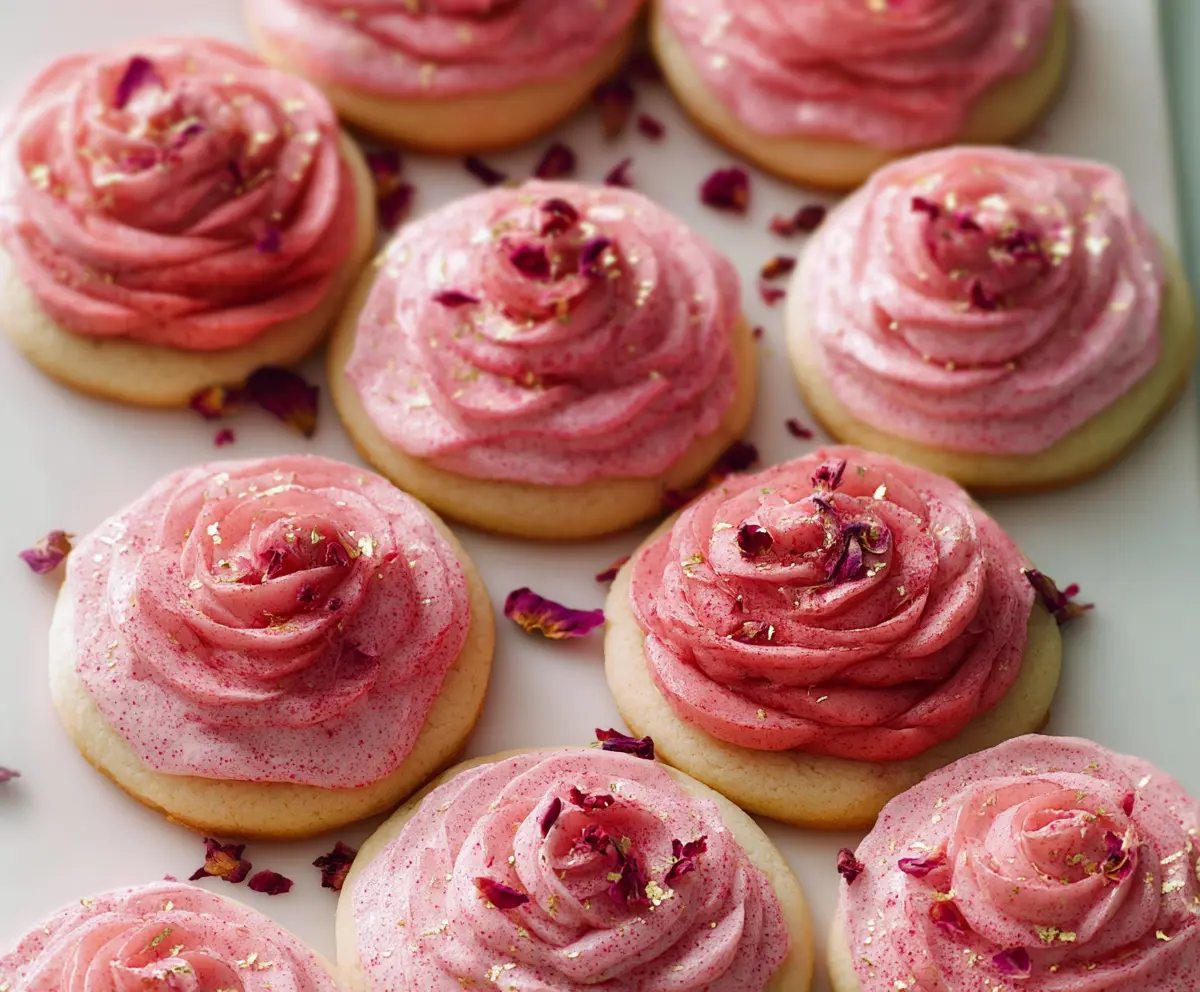
These Raspberry Rose Cookies are a delightful treat! With a lovely pink color and a sweet raspberry flavor, they are perfect for any occasion. Plus, the hint of rose makes them extra special!
While baking these, the smell is simply amazing! I love serving them at tea parties or just enjoying them with a cup of coffee. They bring a little magic to my day! 🌹
Key Ingredients & Substitutions
Butter: I always use unsalted butter for baking. It gives you control over the salt content. If you’re short on butter, you can substitute half with coconut oil for a subtle coconut flavor.
Raspberry Jam: Seedless raspberry jam is the way to go as it creates a smooth filling. If you can’t find it, you can use any sweet fruit jam or even homemade fruit compote for a fresh flavor.
Flour: All-purpose flour works great here, but if you’re looking for a gluten-free option, try using a 1:1 gluten-free flour blend. It works surprisingly well in cookies!
Rose Water: The rose water adds a lovely floral note. If you prefer not to use it, a drop of vanilla extract can be used as a substitute, but you’ll miss that unique rose flavor.
How Do You Get the Perfect Cookie Texture?
Achieving the right texture is crucial for these cookies. Here’s how:
- Make sure your butter is soft but not melted; it should press easily with your finger.
- When creaming, mix the butter and sugar until light and fluffy. This incorporates air, making the cookies light.
- Don’t overmix the dough once you combine the wet and dry ingredients. A light touch keeps them tender.
- Monitor baking time closely. Removing them from the oven just as the edges turn golden ensures a soft center.
With these tips, you’ll have cookies that are not only pretty but also deliciously tender and flavorful!
Raspberry Rose Cookies
Ingredients:
- 1 cup (2 sticks) unsalted butter, softened
- 1 cup granulated sugar
- 1 large egg
- 1 teaspoon vanilla extract
- 2 ½ cups all-purpose flour
- ½ teaspoon baking powder
- ¼ teaspoon salt
- ½ cup raspberry jam (seedless preferred)
- 2 cups powdered sugar
- 3 tablespoons unsalted butter, softened (for frosting)
- 2-3 tablespoons heavy cream or milk
- 2 teaspoons raspberry extract or puree
- 1 teaspoon rose water
- Pink food coloring (optional, to deepen the color)
- Dried edible rose petals, for garnish
- Granulated sugar, for sprinkling on frosting (optional)
How Much Time Will You Need?
This recipe takes about 15 minutes to prepare, and then you’ll need about 10-12 minutes for baking. Don’t forget to let the cookies cool completely before frosting them, which takes about 30 minutes. In total, you should plan for around 1 hour to make these delicious cookies!
Step-by-Step Instructions:
1. Prepare the Cookies:
First, preheat your oven to 350°F (175°C). While that’s heating up, line your baking sheets with parchment paper so the cookies won’t stick.
2. Mix the Dough:
In a large bowl, cream together the softened butter and granulated sugar until the mixture is light and fluffy. This usually takes about 3-4 minutes. Next, beat in the egg and vanilla extract until it’s all well combined.
3. Combine Dry Ingredients:
In another bowl, whisk together the flour, baking powder, and salt. Gradually add this dry mixture to the wet mixture, stirring gently until just combined. Don’t overmix—your dough should be nice and soft.
4. Form and Bake the Cookies:
Roll the dough into 1-inch balls and space them about 2 inches apart on your lined baking sheets. Use your thumb or the back of a small spoon to gently create an indentation in the center of each ball. Then, fill each indentation with about 1/2 teaspoon of raspberry jam.
5. Bake and Cool:
Bake the cookies in the preheated oven for 10-12 minutes, until the edges are lightly golden and the centers are set. Once done, remove them from the oven and let them cool on the baking sheet for about 5 minutes. Transfer the cookies to a wire rack to cool completely.
6. Make the Rose-Raspberry Frosting:
While the cookies are cooling, let’s prepare the frosting! In a medium bowl, beat the softened butter until creamy. Gradually add the powdered sugar and beat until it’s nice and smooth. Then, mix in the raspberry extract or puree, rose water, and 2 tablespoons of heavy cream or milk. Adjust with more cream if needed to reach a nice spreading consistency.
7. Color the Frosting:
If you want to make the frosting a little brighter, add a few drops of pink food coloring and mix until you achieve your desired shade.
8. Frost the Cookies:
Using a piping bag with a star tip or even a small spatula, swirl the frosting onto each cooled cookie in a rose shape. If you like, sprinkle a bit of granulated sugar on top for some extra sparkle!
9. Garnish with Dried Rose Petals:
Finish off by gently placing a few dried edible rose petals on each cookie for a beautiful presentation. Allow the frosting to set slightly before serving.
10. Store and Enjoy:
These cookies can be stored in an airtight container at room temperature for up to 3 days—if they last that long, they’re often gone in no time! Enjoy your elegant and flavorful Raspberry Rose Cookies!
Can I Use Frozen Butter Instead of Fresh?
It’s best to use softened butter for this recipe to achieve the right texture. If you only have frozen butter, you can grate it using a cheese grater and then let it sit at room temperature for about 15-20 minutes to soften before using.
How Can I Make These Cookies Vegan?
You can replace the egg with a flaxseed egg (1 tablespoon ground flaxseed mixed with 2.5 tablespoons water, let it sit for 5 minutes) and use a plant-based butter as a substitute. Ensure that your jam and other ingredients are vegan as well!
What If I Don’t Have Rose Water?
If you don’t have rose water on hand, you can simply omit it or substitute it with an additional teaspoon of vanilla extract. While the unique flavor will change, the cookies will still taste delightful!
How Should I Store Leftover Cookies?
Store any leftover cookies in an airtight container at room temperature for up to 3 days. If you’d like them to last longer, you can keep them in the fridge for up to a week or freeze them for up to a month. Just make sure they’re well sealed to prevent freezer burn!