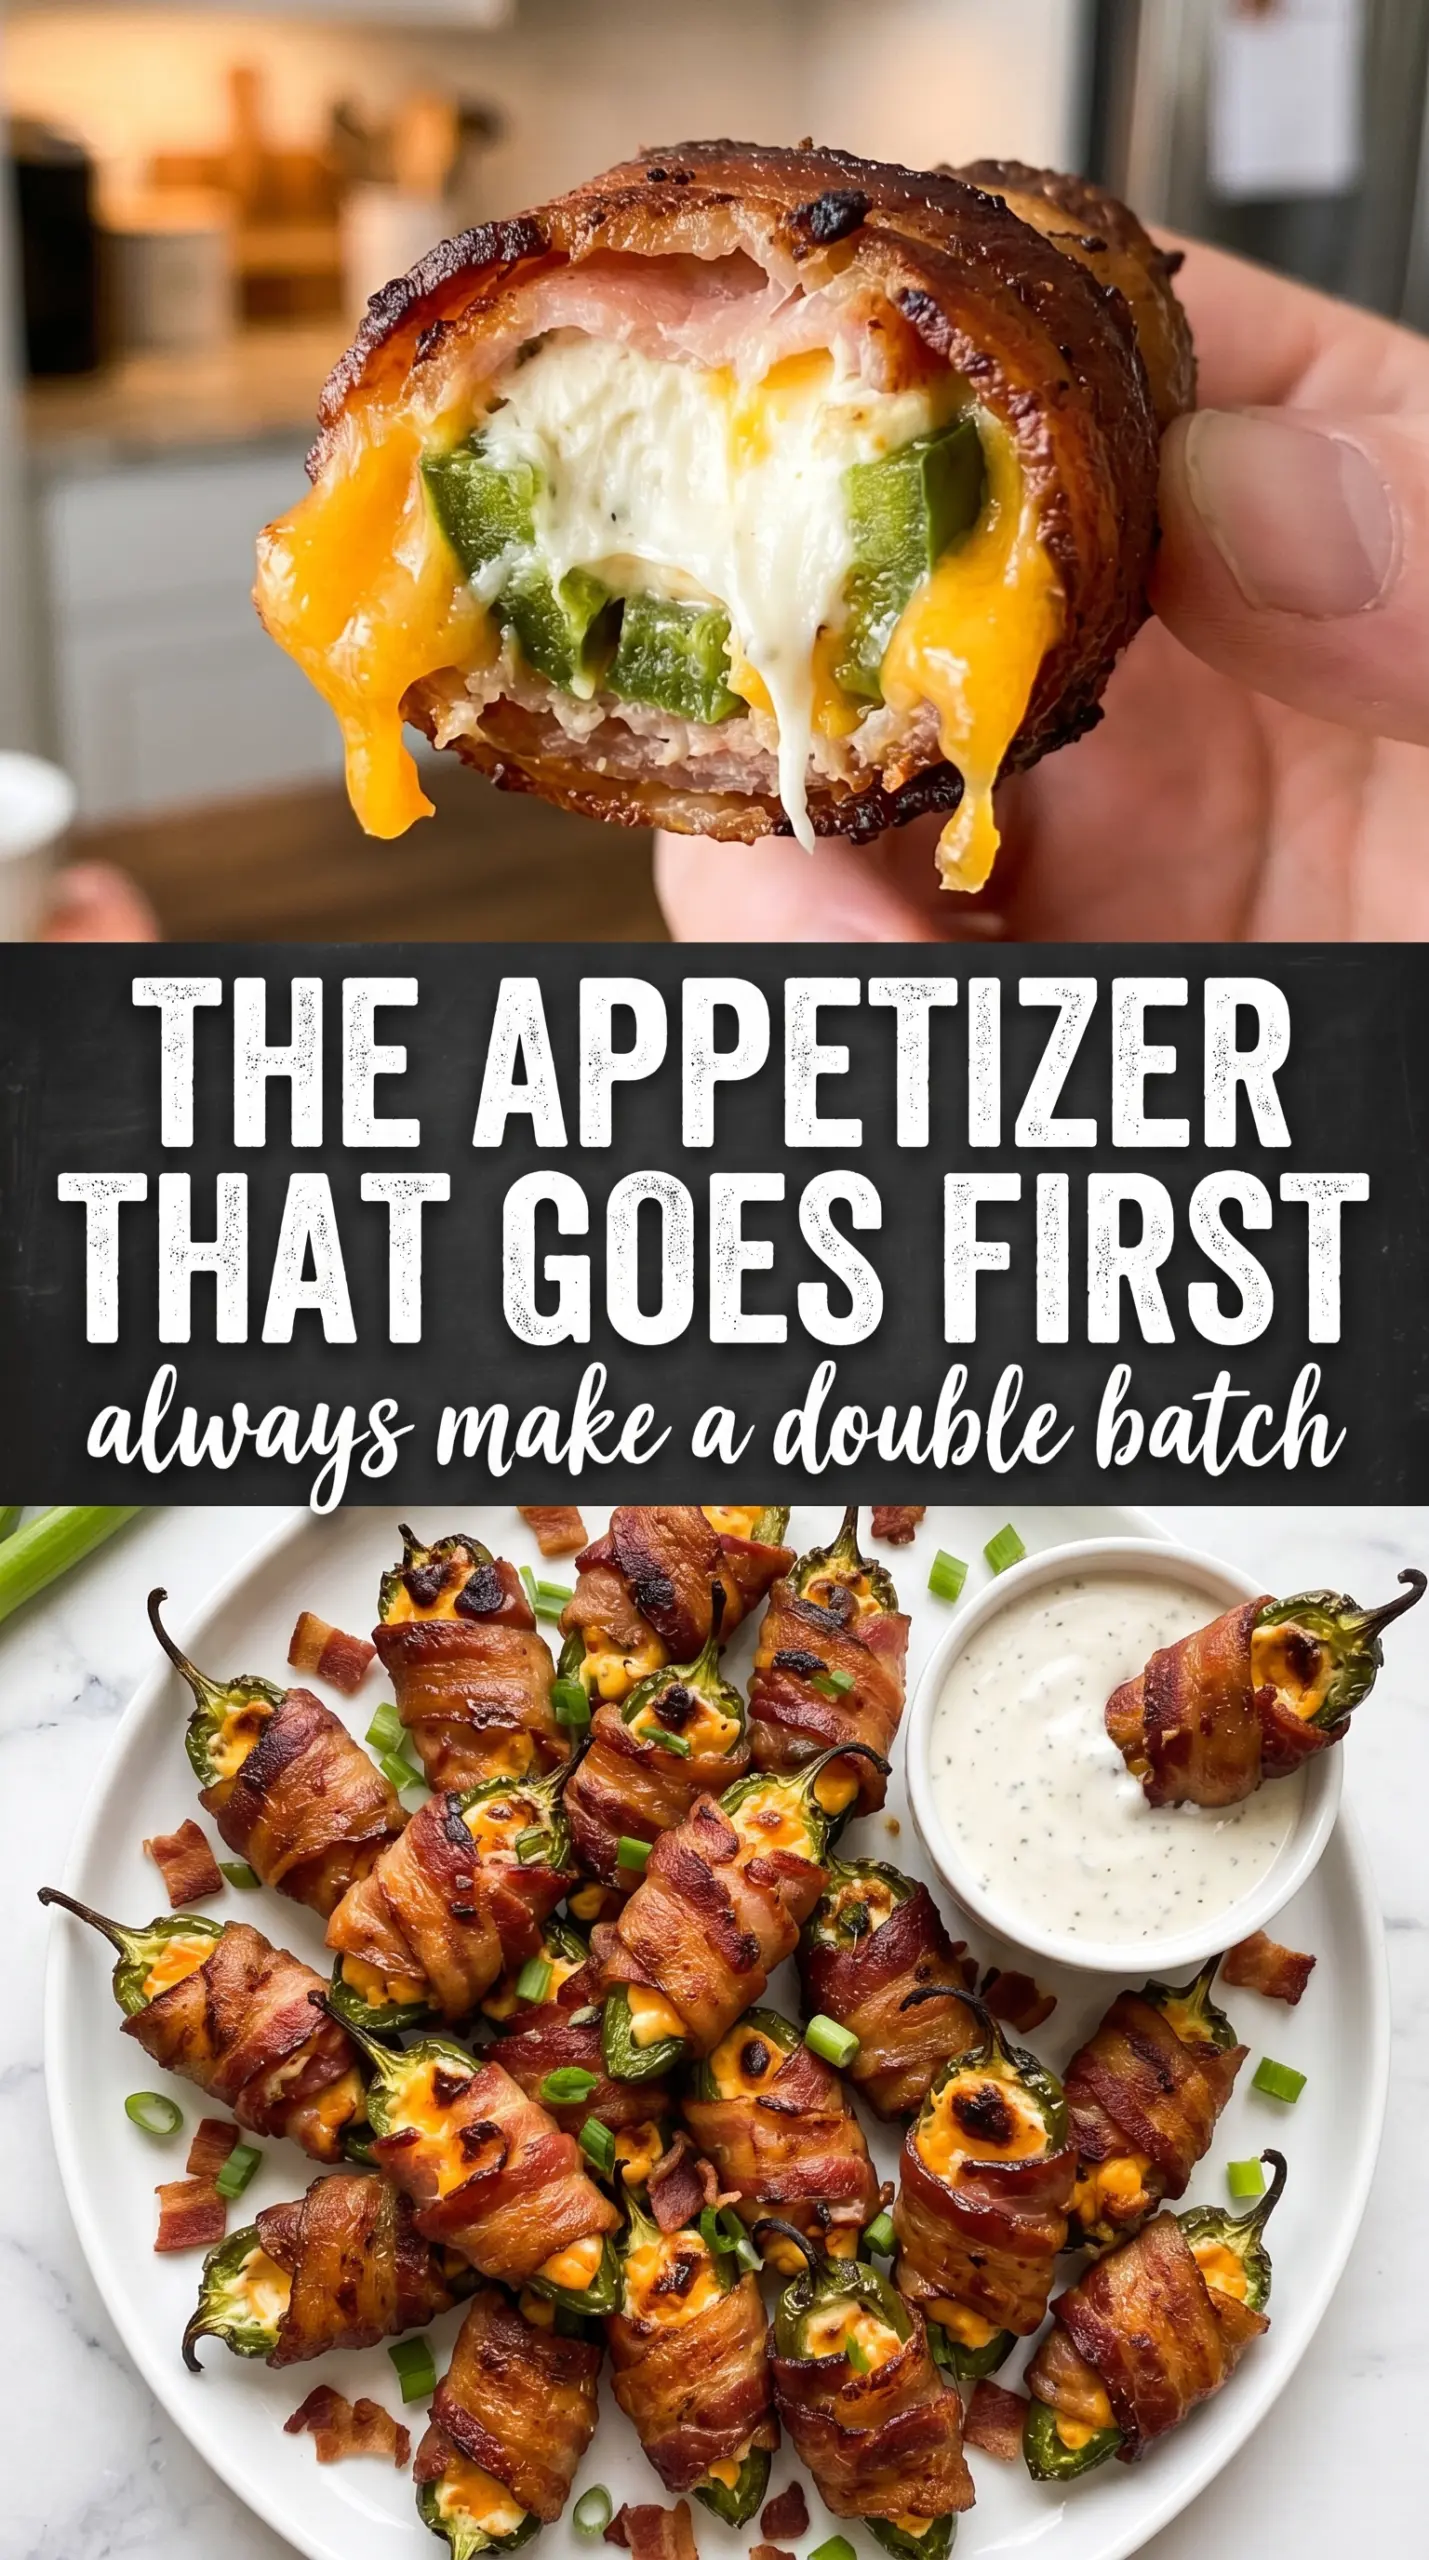
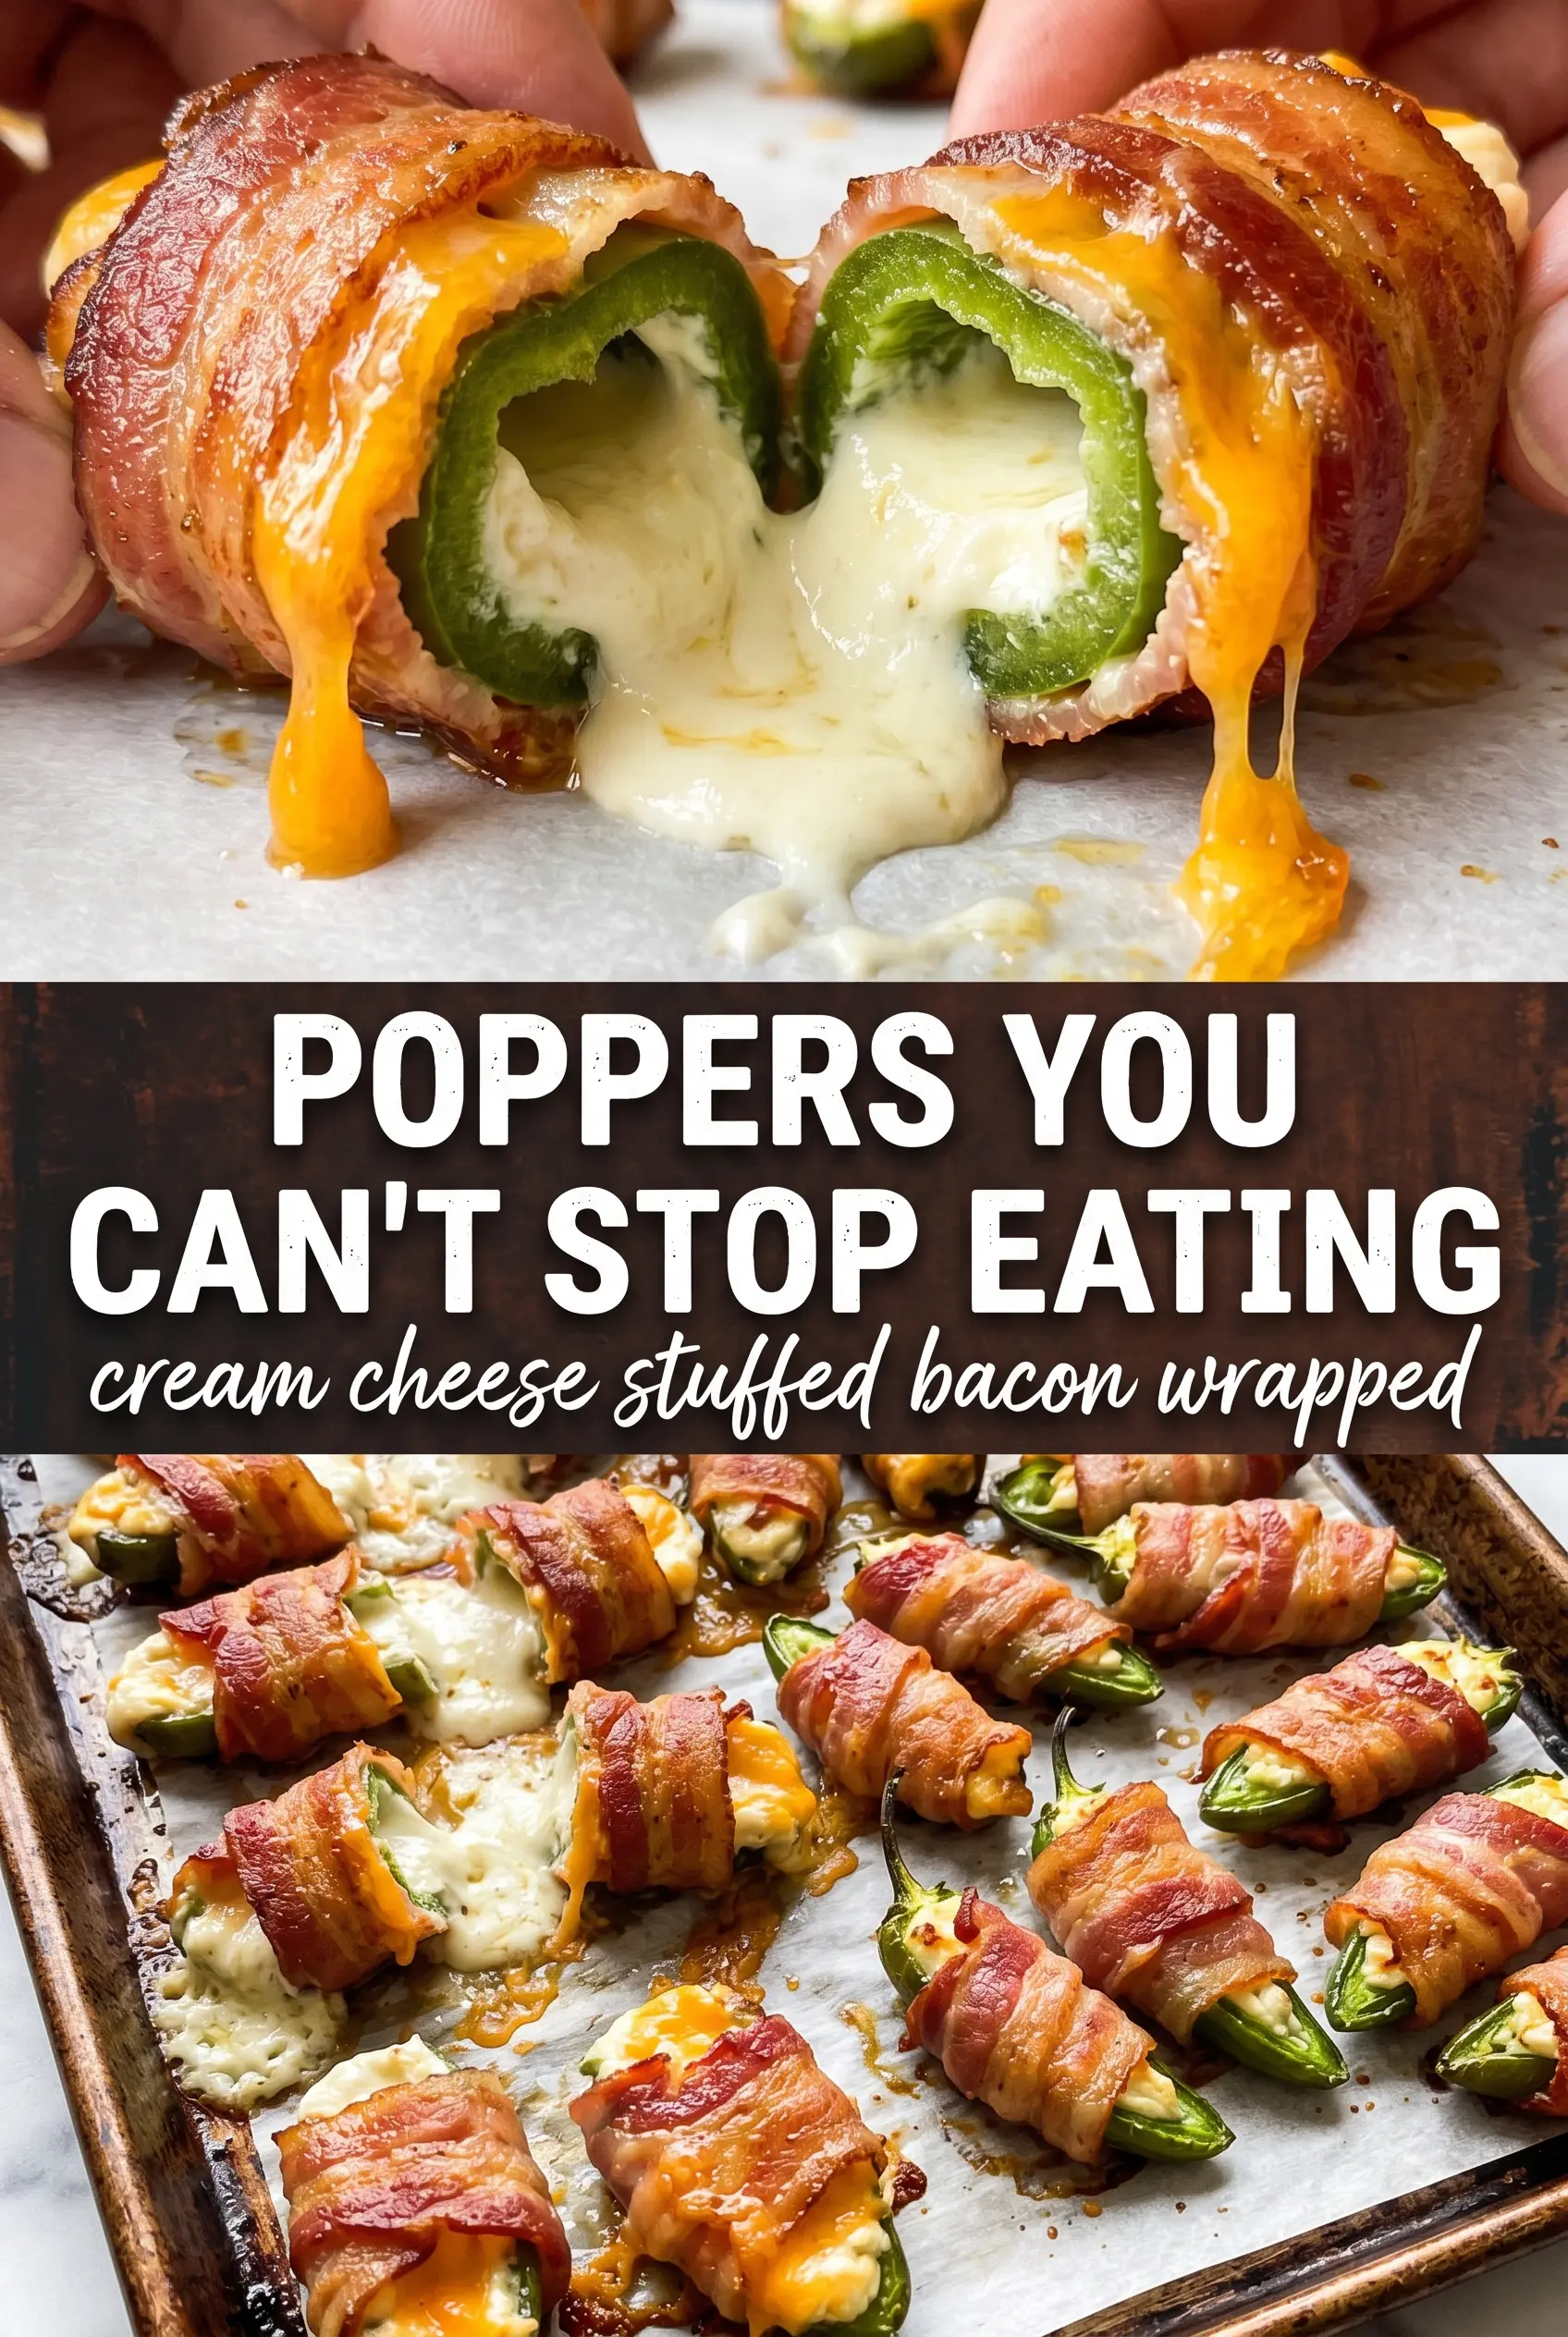
Golden bacon-wrapped jalapeño halves disappear fast for a reason: the bacon turns crisp, the peppers stay just tender enough to hold their shape, and the cream cheese filling melts into a salty, smoky bite with a little heat at the end. These are the kind of appetizer people hover around until the tray is gone.
The trick is keeping the filling thick enough that it stays put while the bacon cooks. Softened cream cheese gives you a smooth base, sharp cheddar adds a little bite, and a wire rack lets the bacon render instead of steaming on a flat pan. Thin-cut bacon matters here too; it crisps in time without overcooking the peppers.
Below you’ll find the small details that make these poppers work, from how tightly to wrap the bacon to when the honey drizzle earns its place. There’s also a smart shortcut for making them ahead so they’re ready when the crowd shows up.
The bacon crisped up all the way around and the filling stayed put instead of melting out onto the pan. I added the honey drizzle at the end and it was the perfect sweet-salty finish.
Bacon jalapeño popper bites with crispy edges and a creamy, cheesy center are the kind of appetizer worth pinning for game day.
The Bacon Wrap That Actually Stays Put
The most common failure with jalapeño poppers is bacon that tightens, shrinks, and slides off before it has a chance to crisp. Thin-cut bacon fixes most of that problem because it cooks through in the same window that the peppers soften and the filling warms up. Thick bacon usually needs longer in the oven, which means the jalapeños can go soft before the outside ever gets crisp.
A wire rack matters more than people think. It lets hot air circulate underneath, so the bacon renders instead of sitting in its own fat. If you skip the rack, the bottoms will soften and the cheese can spread into the pan instead of staying tucked inside the pepper.
- Thin-cut bacon — This is the right choice for even crisping. If you only have regular bacon, par-cook it briefly until some fat has rendered, then cool it enough to handle before wrapping.
- Fresh jalapeños — Look for peppers with smooth, firm skin and enough length to hold a generous filling. Smaller peppers still work, but they bake faster and can turn mushy if you overdo the time.
- Sharp cheddar — It gives the filling a stronger edge than mild cheddar. Pre-shredded works, but freshly shredded melts more smoothly because it doesn’t carry the anti-caking coating.
- Honey — Optional, but worth trying if you like a sweet-spicy finish. A light drizzle after baking balances the salt and heat without making the bacon soggy.
What Each Ingredient Is Actually Doing in This Recipe
- Primary ingredient (the star) — Quality matters most. Choose the best you can find.
- Cooking medium (oil, butter, or broth) — This carries flavors and prevents dryness.
- Seasonings (salt, pepper, spices, herbs) — Layer flavors so nothing overpowers. Build depth gradually.
- Aromatics (garlic, onion, herbs) — Cook with fat to bloom flavors. Become the foundation.
- Supporting ingredients — Complement the main ingredient without overpowering it.
- Sauce or liquid (if applicable) — Brings flavors together. Balance richness with acid.
- Acid (lemon, vinegar, wine, or other) — Brightens and prevents flat-tasting results.
- Final finish (garnish, glaze, or sauce) — Prevents one-dimensional taste and adds visual appeal.
Getting the Filling Smooth Before the Oven Does the Work
Mix the cream cheese, cheddar, garlic powder, and smoked paprika until the filling looks fully blended and a little fluffy. Softened cream cheese is the key here; if it is still cold, you’ll end up with streaks and a filling that tears when you try to spoon it in. I like using a spoon for small batches and a piping bag or zip-top bag with the corner snipped for faster filling.
Fill each jalapeño half generously, but don’t mound it so high that the bacon can’t wrap snugly around the pepper. The filling expands a little as it heats, and overloaded poppers tend to leak. Press the bacon around the pepper firmly enough that it overlaps slightly; that overlap is what helps it stay in place while it shrinks in the oven.
Prepping the Peppers
Slice the jalapeños lengthwise and scrape out the seeds and ribs with a small spoon. The ribs carry most of the heat, so leave a little behind if you want a stronger bite, or remove them completely for a milder appetizer. Wear gloves if your hands are sensitive; jalapeño oil lingers longer than you think and can sting later.
Mixing and Filling
Stir the cheeses with the seasonings until the mixture is uniform and spreadable. A smooth filling is easier to portion and stays inside the pepper instead of clumping on top. Fill each cavity from end to end so the pepper bakes into a full bite, not a hollow shell with cheese just on one side.
Wrapping and Baking
Wrap each pepper with a half-strip of bacon and secure it with a toothpick so the seam stays tucked underneath. Set them on the rack with a little space between each one, then bake at 400°F until the bacon is crisp and the filling is bubbling at the edges. If the bacon is browned but not crisp enough, give it another few minutes rather than pulling it early; underdone bacon is the one thing that will make these fall flat.
Three Ways to Change the Heat, the Richness, or the Crowd Size
Milder Popper Bites
Remove every seed and rib, then soak the halved peppers in cold water for 10 minutes before filling them. That takes the edge off the heat without changing the structure of the recipe, so you still get the same creamy center and crisp bacon.
Dairy-Free Version
Use a thick dairy-free cream cheese and a shred-style plant-based cheddar that melts well. The texture will be a little softer and less tangy, so add a pinch more garlic powder and a touch more smoked paprika to keep the filling from tasting flat.
Make-Ahead Party Tray
Assemble the poppers up to 24 hours ahead, cover them, and refrigerate them on the rack-lined pan. Bake straight from the fridge and add a couple extra minutes if needed, since cold filling slows down the center and the bacon needs that little bit of extra time to crisp.
No Toothpicks Needed
If you want to skip the toothpicks, wrap the bacon seam-side down and place the poppers close enough that they support one another. This works best if your bacon is cut thin and wrapped tightly, but toothpicks still give you the most reliable hold for serving.
Storage and Reheating
- Refrigerator: Store leftovers in an airtight container for up to 4 days. The bacon softens a bit after chilling, but the flavor stays good.
- Freezer: Freeze after baking on a sheet pan, then transfer to a freezer bag for up to 2 months. Thaw overnight in the refrigerator before reheating so the bacon doesn’t turn rubbery.
- Reheating: Warm in a 375°F oven or air fryer until hot and the bacon firms back up. Microwaving makes the bacon chewy and can split the filling, so skip it if you want the best texture.
Answers to the Questions Worth Asking
Bacon Jalapeño Popper Bites
Ingredients
Equipment
Method
- Preheat the oven to 400°F and line a baking sheet with a wire rack. This lets hot air circulate so the bacon crisps as the filling bubbles.
- Mix together cream cheese, shredded cheddar, garlic powder, and smoked paprika until fully combined. Stir until no streaks remain and the mixture looks smooth and thick.
- Fill each jalapeño half generously with the cream cheese mixture using a spoon or piping bag. Aim for mounded filling that will rise as it bakes.
- Wrap each filled jalapeño half tightly with a half-strip of bacon and secure with a toothpick. Position the bacon so it clings snugly over the filling.
- Arrange the poppers on the wire rack in a single layer. Keep them spaced so bacon fat can render and crisp evenly.
- Bake at 400°F for 18–22 minutes until the bacon is crispy and the filling is bubbling. Look for golden edges and a visible melt at the top.
- Drizzle with honey if desired and serve hot. Serve right away while the cream cheese is still glossy and molten.