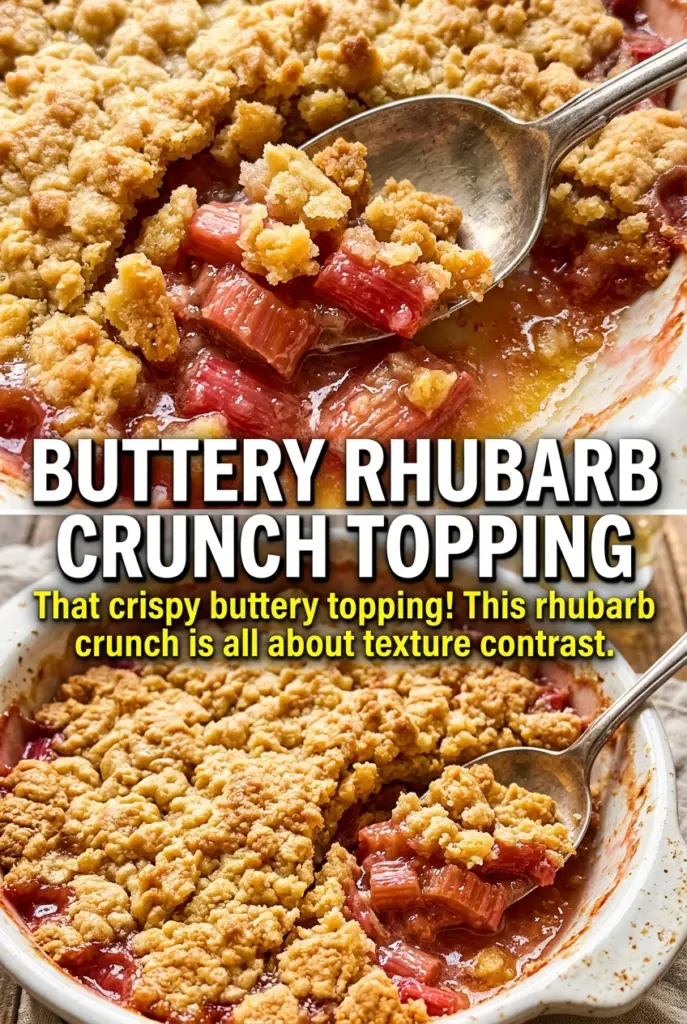
Sweet-tart rhubarb tucked under a thick, craggy oat topping is the kind of dessert that disappears fast. The fruit turns soft and jammy in the oven, but it still keeps enough structure to give you those bright little bites that cut through the buttery brown sugar crust. When it comes out right, every spoonful has contrast: tender filling, crisp edges, and a deep golden top that stays crunchy long enough to matter.
The trick here is keeping the topping thick instead of sandy and thin. Melted butter helps the oats and flour clump into uneven little nuggets, which bake into the best kind of crunchy rubble. The filling also gets a little flour, which keeps the juices from running all over the pan and turning the whole dessert soupy. If your rhubarb is especially tart, the sugar balances it without muting that clean, sharp flavor that makes rhubarb worth baking in the first place.
Below you’ll find the one detail that keeps the topping crisp, the ingredient notes that actually matter, and a few smart swaps if you need to work around what you have on hand.
The topping baked up thick and crunchy instead of sinking into the rhubarb, and the filling set just enough after cooling. I served it warm with vanilla ice cream and every spoonful had that perfect sweet-tart balance.
Like this rhubarb crunch? Save it for the days when you want a thick oat topping and a bright, jammy fruit filling.
The Reason the Topping Stays Crunchy Instead of Turning Soft
Rhubarb throws off a lot of moisture as it bakes, and that is usually what ruins a crunch dessert. If the topping is too fine or too dry, it absorbs the fruit juices and turns pasty before it ever has a chance to brown. This version avoids that by using melted butter to create clumps, then spreading the topping thickly enough that the upper layer can brown while the lower layer protects the fruit.
The other part that matters is the flour in the filling. It doesn’t make the fruit thick and gluey; it gives the juices enough body to settle into a spoonable sauce instead of flooding the pan. Letting the dessert cool for 10 minutes matters too. Straight from the oven, the filling is still loose and the topping hasn’t finished setting.
What the Rhubarb, Oats, and Butter Are Doing Here
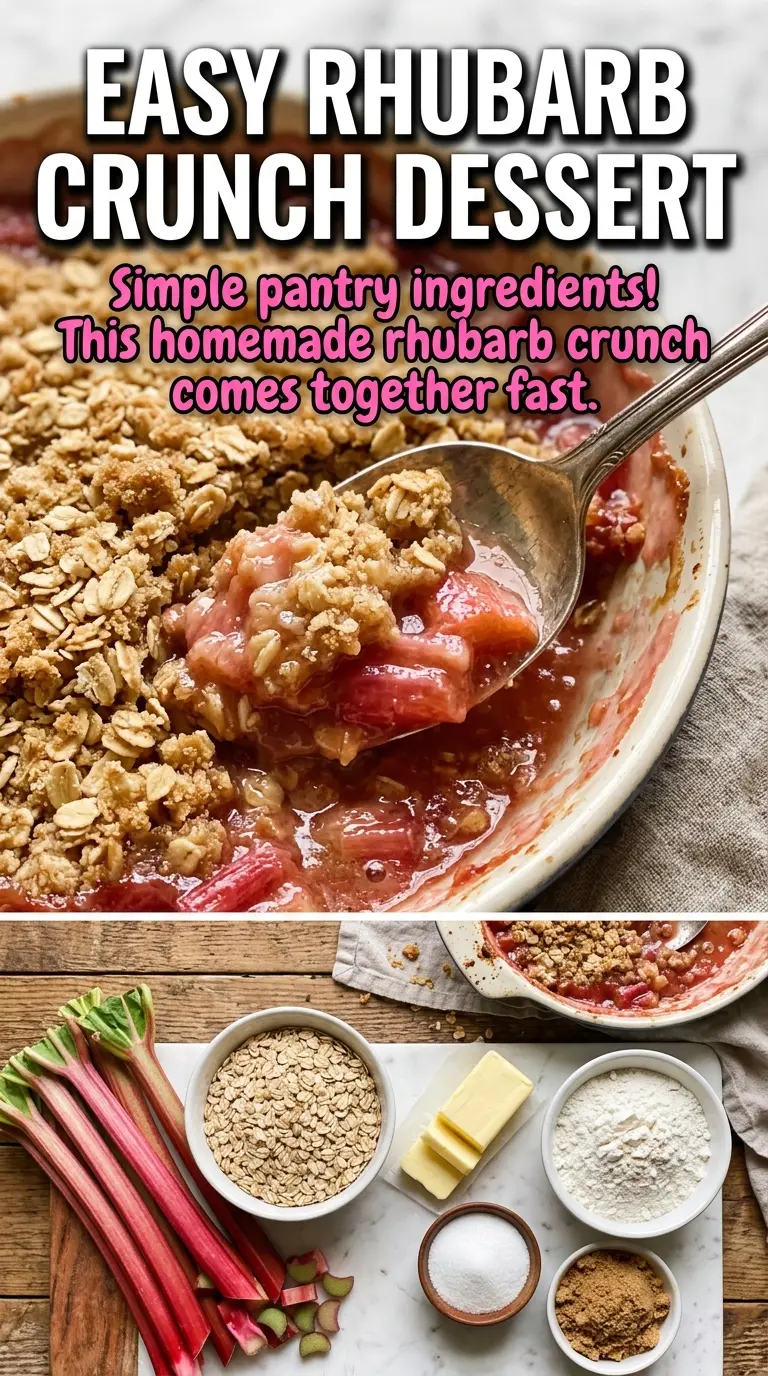
- Rhubarb — Fresh rhubarb gives the filling its sharp, clean flavor and soft texture. Trim away any tough ends and dice it evenly so it bakes at the same rate; large pieces can stay stringy while the smaller ones collapse.
- Brown sugar — This does more than sweeten. It adds a deeper caramel note that rounds out rhubarb’s tartness and helps the topping brown beautifully.
- Old-fashioned oats — These are what give the dessert its signature crunch. Quick oats will work in a pinch, but the texture will be finer and less crisp.
- Butter, melted — Melted butter coats the dry ingredients and helps them form the clumpy topping you want. Softened butter won’t give the same craggy texture.
- Flour in both layers — The flour in the filling thickens the fruit juices, while the flour in the topping helps it bake into a sturdy crust instead of a loose streusel.
Building the Crunch Without Overbaking the Fruit
Mixing the Filling
Toss the diced rhubarb with sugar, flour, and vanilla until every piece looks lightly coated, then spread it into the buttered dish in an even layer. The sugar pulls out juices quickly, so don’t let the mixture sit too long before baking or the fruit will start pooling in the bowl. You want the filling to look wet but not soupy before it goes in the oven.
Making the Topping
Stir the oats, flour, brown sugar, cinnamon, and salt into the melted butter until the mixture looks shaggy and clumped. If it looks dry and sandy, add a touch more butter; if it turns greasy, it was mixed too fast or the butter was too hot. The best texture is uneven, with some smaller crumbs and some larger clods that will bake into crunchy ridges.
Baking Until Deep Gold
Scatter the topping thickly over the rhubarb and bake until the top is deep golden and the fruit is bubbling at the edges. If the topping is browning too quickly before the filling has thickened, lay a loose piece of foil over the top for the last stretch of baking. Pull it when the edges are actively bubbling and the center of the topping looks crisp, not pale.
Letting It Set
Give the pan 10 minutes to cool before serving. That brief rest lets the juices thicken enough to spoon cleanly instead of running everywhere. Warm is the goal here, not piping hot, because the flavor settles and the topping holds onto its crunch better after a short rest.
Three Practical Ways to Work This Into Your Kitchen
Make it gluten-free with a cup-for-cup flour blend
Swap the all-purpose flour in both the filling and topping with a good 1:1 gluten-free blend. The texture will still be crisp, but the topping may bake a little more delicately, so watch for color at the edges and don’t rely only on the timer.
Use frozen rhubarb when fresh isn’t around
Frozen rhubarb works, but don’t thaw it first or you’ll lose too much juice before it even hits the oven. Toss it with the sugar and flour straight from frozen and expect to bake a few extra minutes until the filling bubbles well in the center.
Make it dairy-free with plant butter
Use a solid plant-based butter stick rather than a tub spread so the topping still bakes up crunchy. The flavor will be slightly less rich, but the texture holds up well if the butter alternative is one that behaves like real butter when melted.
Scale it up for a crowd without changing the method
You can double this in a larger baking dish or make two pans side by side. Keep the topping layer thick and don’t pack it down, or the center will steam instead of crisping the way it should.
Storage and Reheating
- Refrigerator: Store covered for up to 4 days. The topping softens a bit in the fridge, but the flavor stays good.
- Freezer: It freezes fairly well after baking and cooling completely. Wrap tightly and freeze for up to 2 months; thaw overnight in the fridge before reheating.
- Reheating: Warm individual portions in a 325°F oven until the top crisps back up. The microwave will heat the fruit, but it also turns the topping soft, which is the main thing you’re trying to avoid.
Answers to the Questions Worth Asking

Homemade Rhubarb Crunch
Ingredients
Equipment
Method
- Preheat the oven to 350°F and butter a 9x13-inch baking dish. Grease the entire base and sides so the rhubarb crunch releases cleanly.
- Combine fresh rhubarb, sugar, all-purpose flour, and vanilla extract, then spread the mixture in the prepared baking dish. Level it into an even layer so the topping bakes uniformly.
- Mix old-fashioned oats, all-purpose flour, brown sugar, melted butter, cinnamon, and salt until well combined. The mixture should look evenly coated and crumbly.
- Spread the topping thickly and evenly over the rhubarb. Press lightly so it forms a connected crunchy layer during baking.
- Bake for 40-45 minutes at 350°F until the topping is deep golden and crispy. Look for crisp edges and a browned top, with bubbling rhubarb visible near the sides.
- Cool for 10 minutes before serving warm. This short rest helps the filling set and prevents the crunchy topping from sliding.