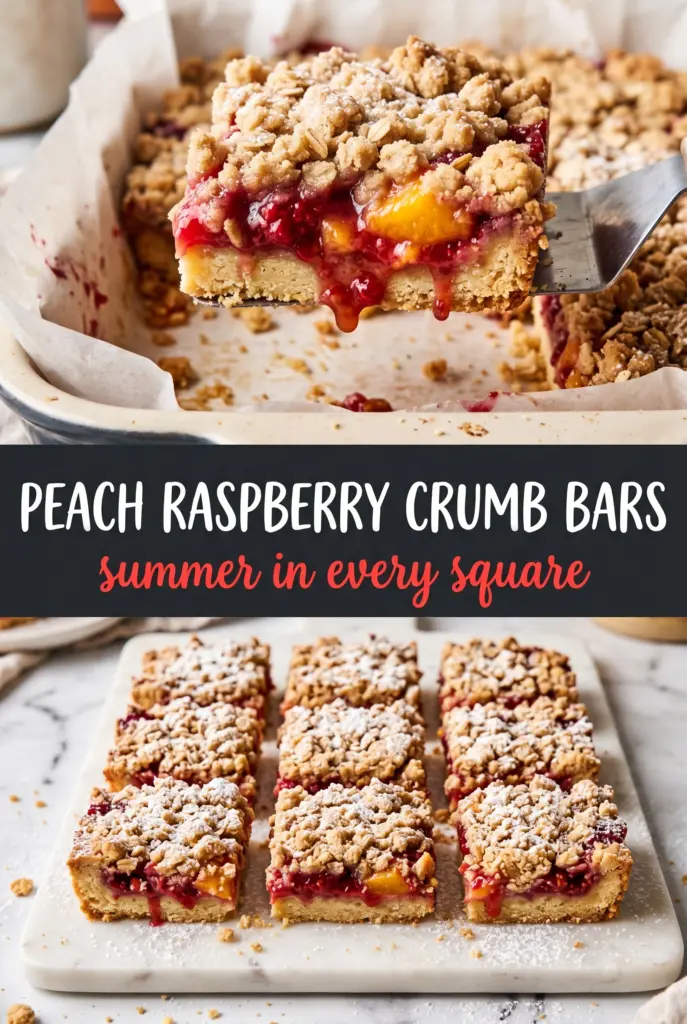
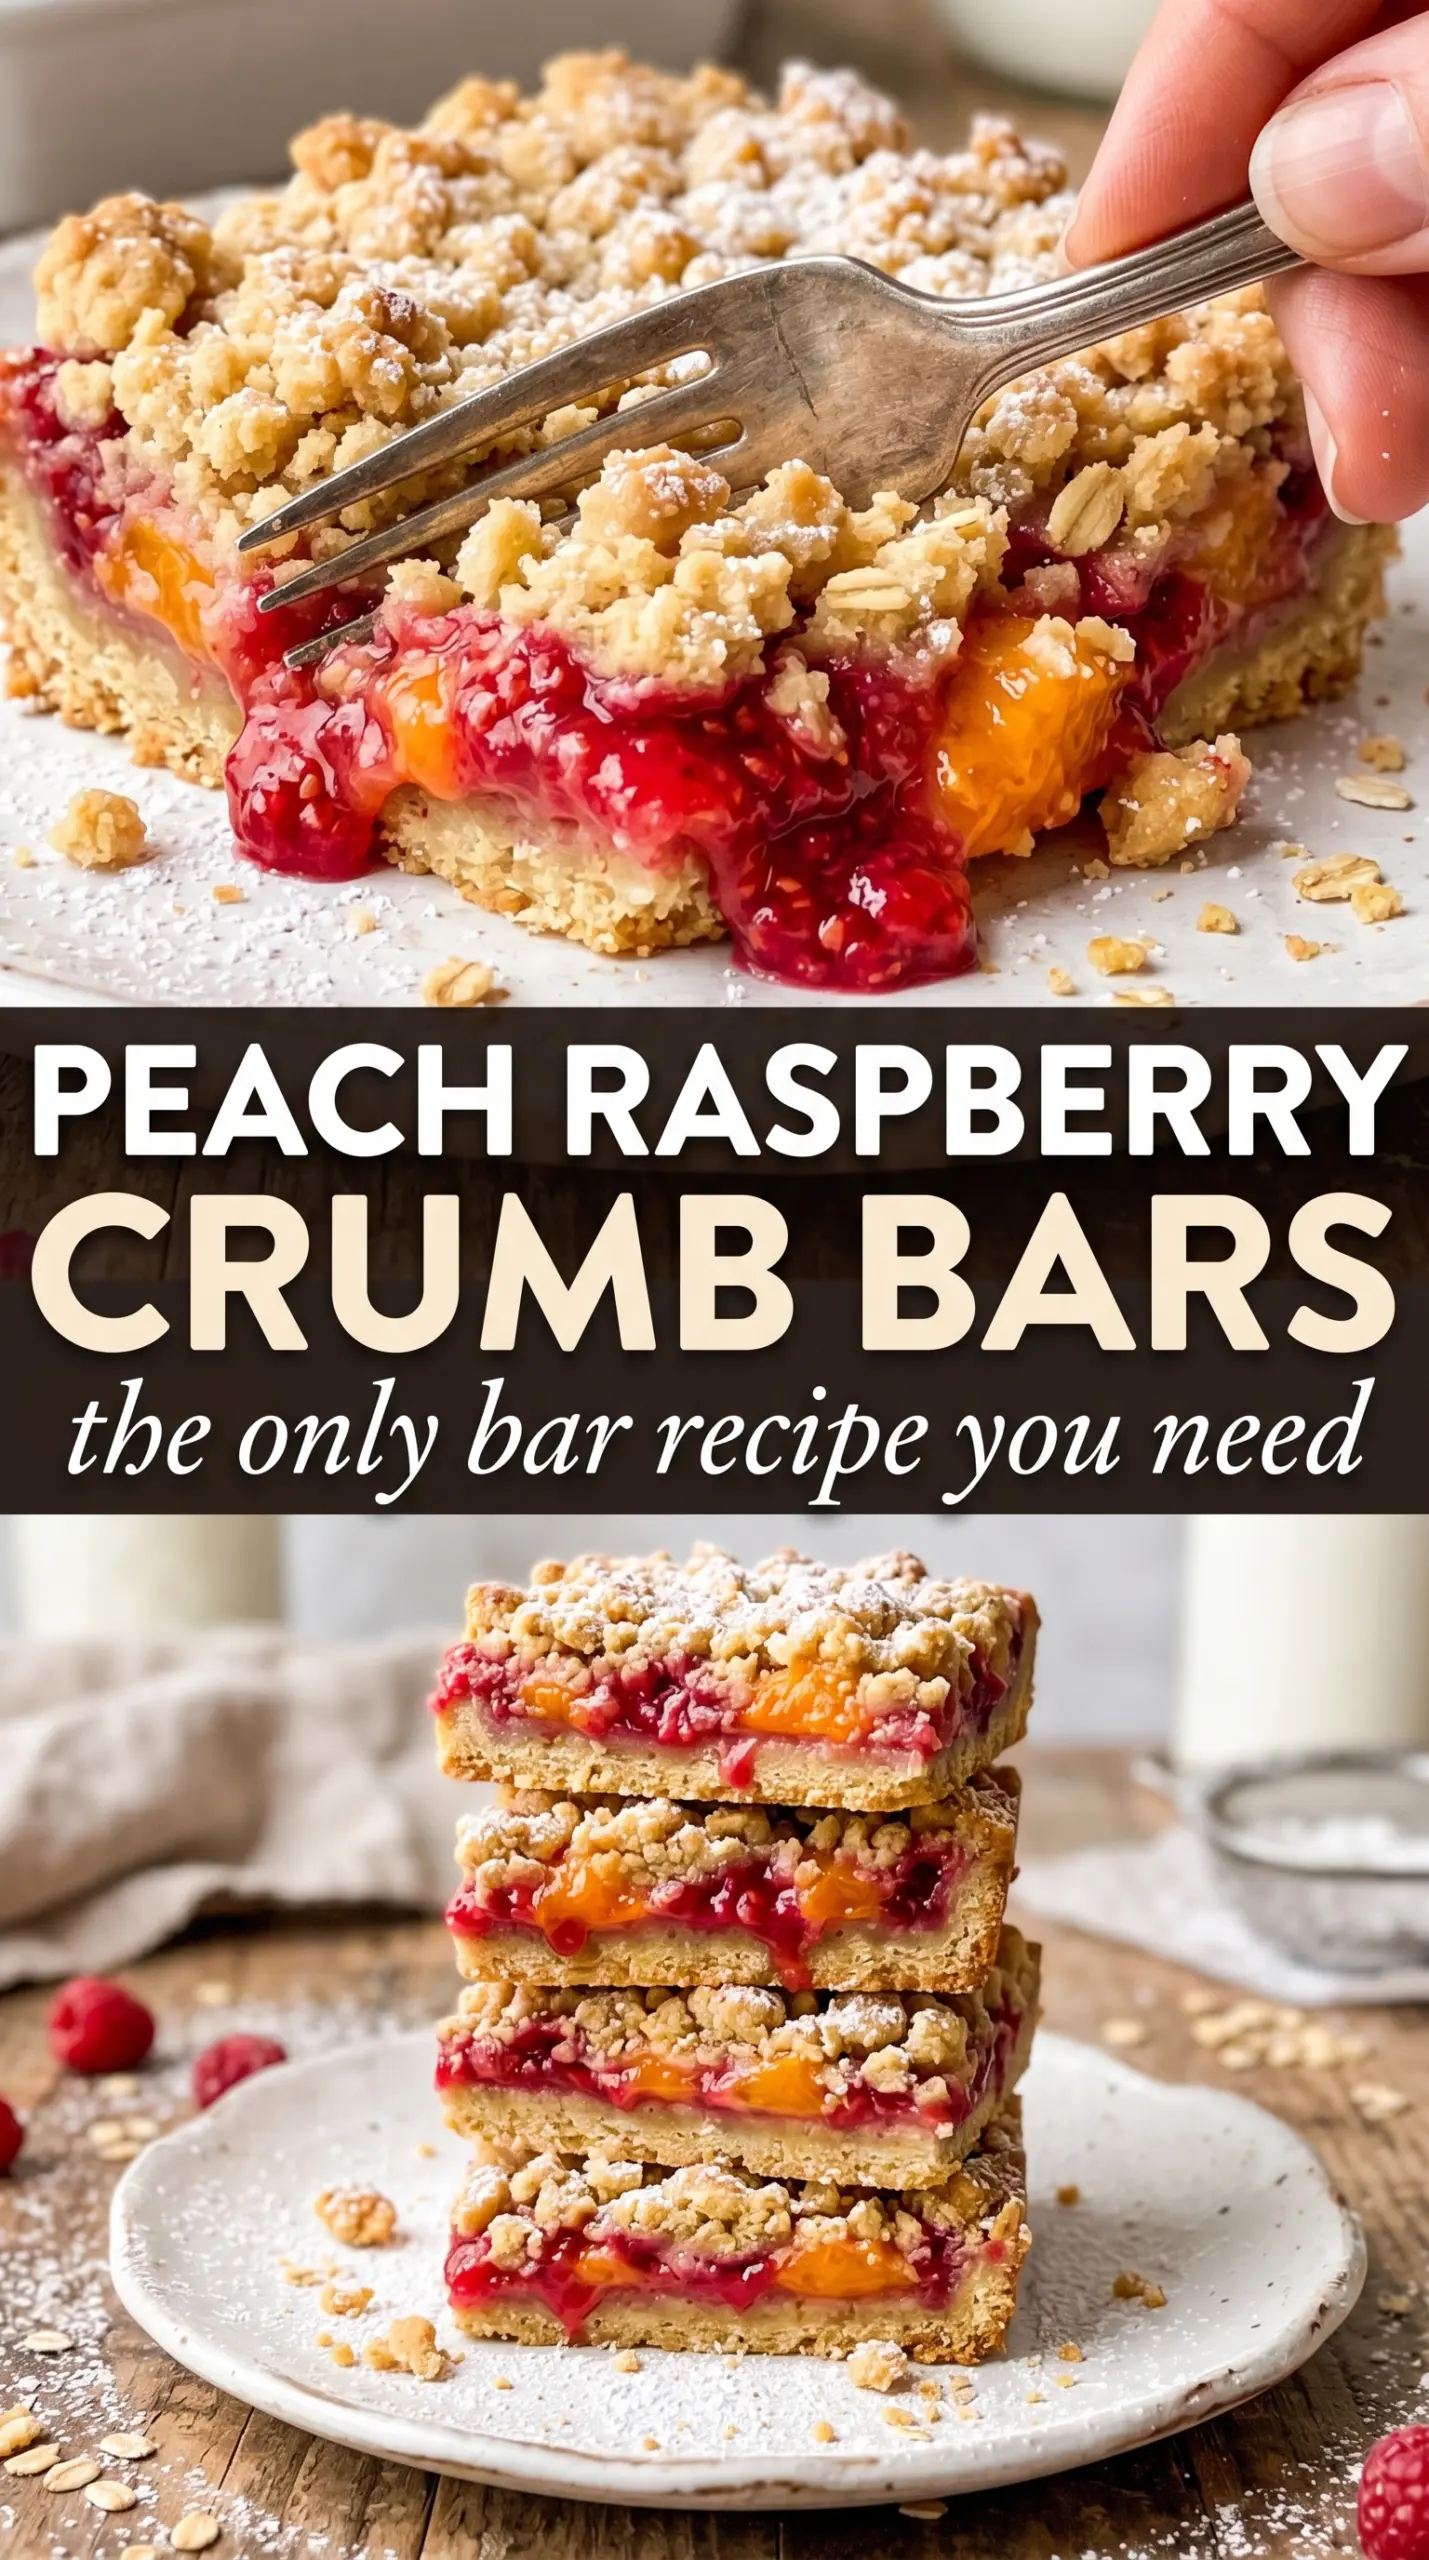
Buttery shortbread and jammy fruit are what make these peach raspberry crumb bars worth baking on repeat. The base bakes up tender but sturdy enough to hold a thick layer of juicy peaches and raspberries, and the crumble on top turns sandy and golden instead of dry or bready. Every square gives you that clean snap through the topping, then a soft, ruby-amber center that tastes like peak fruit season packed into a hand-held dessert.
The part that matters most here is balance. Peaches bring sweetness and body, while raspberries add sharpness and enough pectin-like structure to keep the filling from running all over the pan. Cornstarch takes care of the extra juice, but only if the bars bake until the filling is bubbling at the edges. Cut them early and the center will still be loose; let them cool all the way and the layers set into neat, sliceable bars.
Below you’ll find the small details that keep the crust from getting sandy instead of cohesive, plus the easiest way to adapt these bars if your peaches are a little underwhelming or your raspberries are especially tart.
The crumble baked up perfectly sandy and the fruit layer set once it cooled, so the bars cut clean instead of oozing everywhere. My kids kept grabbing “just one more” from the pan.
Save these peach raspberry crumb bars for when you want a buttery fruit dessert with a crisp crumb topping and clean slices.
The Trick to Bars That Slice Clean Instead of Slumping
The biggest mistake with fruit crumb bars is rushing the cool-down. The filling needs time to settle as the cornstarch finishes thickening and the butter in the crust firms back up. If you cut into them while they’re still warm, the layers slide and the fruit floods the edges.
The other thing that matters is how firmly you press the base into the pan. This isn’t a loose crumble situation on the bottom. You want a packed layer that bakes into a true shortbread foundation, or the bars will fall apart when you lift them out.
These bars also reward a little restraint with the topping. Scatter the remaining crumble in uneven clumps and you’ll get those golden ridges that toast up beautifully in the oven. A flat, packed layer on top traps steam and gives you a softer finish instead of that crisp, sandy bite.
What Each Ingredient Is Actually Doing in These Crumb Bars
- All-purpose flour — This gives the bars structure without turning them tough. There’s enough fat and sugar in the dough that a standard all-purpose flour works better than anything with a lower protein count.
- Granulated sugar — Sugar sweetens the crust and helps it bake into a crisp, lightly caramelized base. In the filling, it pulls juice out of the fruit so the cornstarch can thicken it into a jammy layer instead of a watery one.
- Cold unsalted butter — Cold butter is what creates that sandy, shortbread-like texture. If the butter softens too much before baking, the crumble gets paste-like and loses the layered texture that makes these bars worth making.
- Egg — The egg binds the crumble just enough so the base holds together when sliced. Without it, the crust can be too loose and the bars may fall apart at the pan edge.
- Peaches — Fresh peaches give you body and sweetness. If yours are firm and a little under-ripe, dice them a bit smaller so they soften fully by the time the topping browns.
- Raspberries — Raspberries bring brightness and color, and they break down into little pockets of tart juice as they bake. Frozen raspberries can work, but don’t thaw them first or the filling can get too loose.
- Cornstarch — This is the ingredient that keeps the fruit layer from turning soupy. It needs the filling to bubble in the oven before it fully thickens, which is why you don’t want to pull the bars the minute the top looks done.
- Lemon juice — A small amount sharpens the fruit and keeps the peaches from tasting flat. It also helps the filling taste more like fruit and less like sweetened jam.
Building the Layers Without Losing the Texture
Mixing the Crumble
Combine the dry ingredients first, then cut in the cold butter and egg until the mixture looks like damp sand with some larger clumps. Those uneven pieces are what give you the crisp, craggy top after baking. If everything turns into a smooth dough, the topping will bake up dense instead of crumbly.
Pressing the Base
Take about two-thirds of the crumble mixture and press it firmly into the parchment-lined pan. Use the bottom of a measuring cup to pack it into an even layer, especially into the corners where loose crumbs tend to collect. A packed base bakes into a sturdy bar; a loose base turns into a layer that shatters when you cut it.
Layering the Fruit
Toss the peaches and raspberries with sugar, cornstarch, and lemon juice, then spread the filling evenly over the crust. Don’t dump it in one pile and chase it around the pan, or you’ll tear up the base underneath. Once the fruit is in place, scatter the remaining crumble over the top so some filling still peeks through.
Baking Until the Edges Bubble
Bake until the topping is deep golden and you can see the filling actively bubbling at the edges. That bubbling is your signal that the cornstarch has activated and the bars will set properly as they cool. If the top browns before the filling bubbles, tent loosely with foil and keep baking until you get both cues.
How to Adapt These Bars When Your Fruit or Pantry Changes
Gluten-Free Crumb Bars
Use a cup-for-cup gluten-free flour blend in place of the all-purpose flour. The bars will still hold together, though the crumb may be a touch more delicate, so let them cool completely before slicing and lifting from the pan.
All-Peach, No Raspberry
If you only have peaches, add an extra teaspoon of lemon juice and a small handful of diced strawberries or a spoonful of raspberry jam if you want a little tartness. Without the raspberries, the filling gets sweeter and softer, so the extra acid keeps the bars from tasting one-note.
Frozen Fruit Version
Frozen peaches and raspberries can work in a pinch, but use them straight from the freezer. Thawed fruit leaks too much liquid into the filling, which can make the bars soft in the center even after cooling.
Storage and Reheating
- Refrigerator: Store in an airtight container for up to 5 days. The crust softens a little after day one, but the bars still hold their shape well.
- Freezer: These freeze well. Wrap individual bars tightly and freeze for up to 2 months, then thaw in the refrigerator so the fruit layer doesn’t turn watery.
- Reheating: Serve at room temperature for the best texture. If you want a slightly warmer bar, give it 10 to 15 seconds in the microwave, not longer, or the filling will turn loose.
Answers to the Questions Worth Asking

Peach Raspberry Crumb Bars
Ingredients
Equipment
Method
- Preheat the oven to 375F and line a 9x13 pan with parchment paper, leaving overhang for lifting. Set aside while you mix the crumbs.
- Combine all-purpose flour, granulated sugar, baking powder, and salt in a bowl. Add cold unsalted butter cubed and the egg, then mix until the mixture looks crumbly with no large wet patches (about 1-2 minutes).
- Press two-thirds of the crumble mixture firmly into the prepared pan to form an even base. Press with your fingertips or the bottom of a measuring cup until compact and flat (visual cue: no loose crumbs).
- Toss diced fresh peaches and fresh raspberries with the remaining granulated sugar, cornstarch, and lemon juice. Spread the fruit evenly over the base to the edges, so filling reaches near the pan corners (visual cue: a level fruit layer).
- Scatter the remaining crumble evenly over the fruit filling in an even sandy layer. Cover most of the fruit while still allowing a few spots to peek through.
- Bake at 375F for 35-40 minutes, until the topping is golden and the filling is bubbling at the edges. Rotate the pan once halfway through if your oven browns unevenly (visual cue: amber juices around the perimeter).
- Cool completely in the pan before lifting out and cutting into bars. Wait until the center feels set and the topping looks dry, not glossy, to get clean slices.