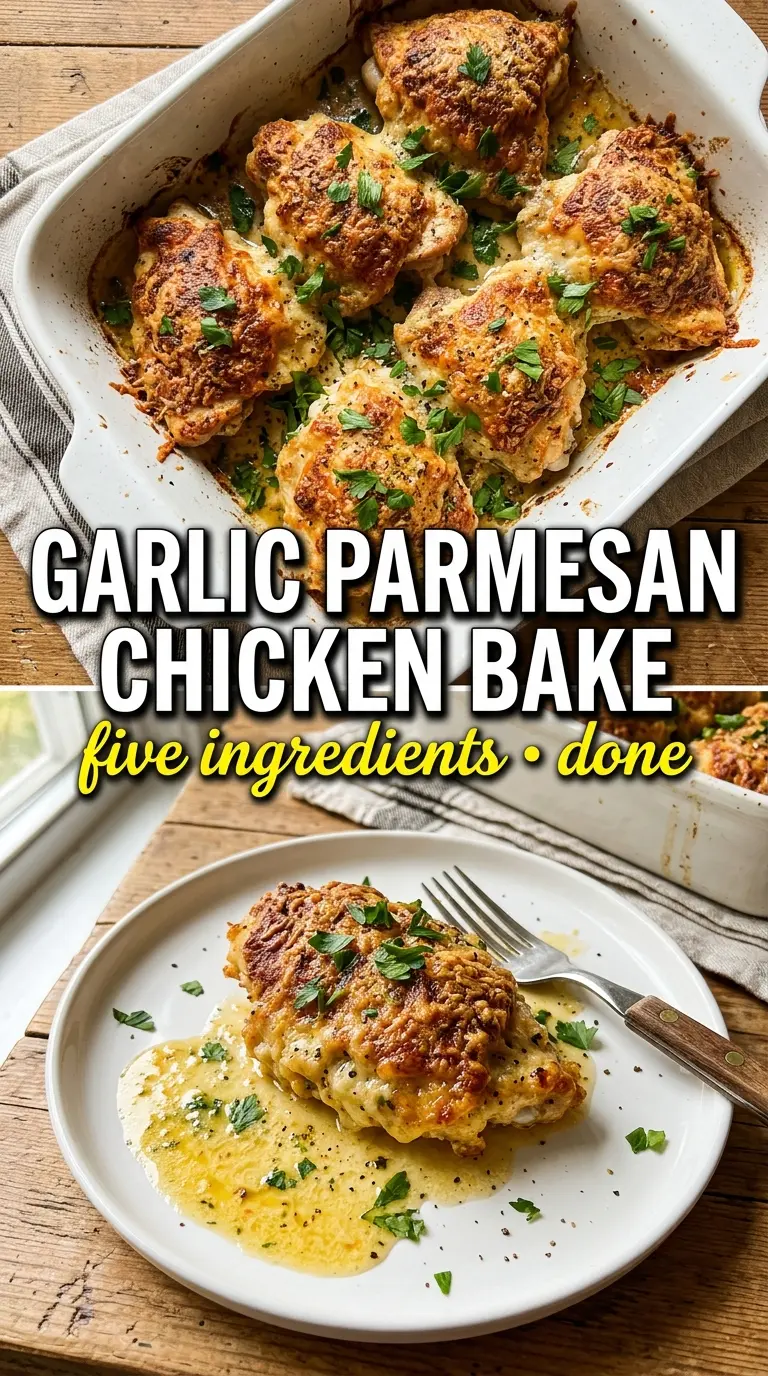
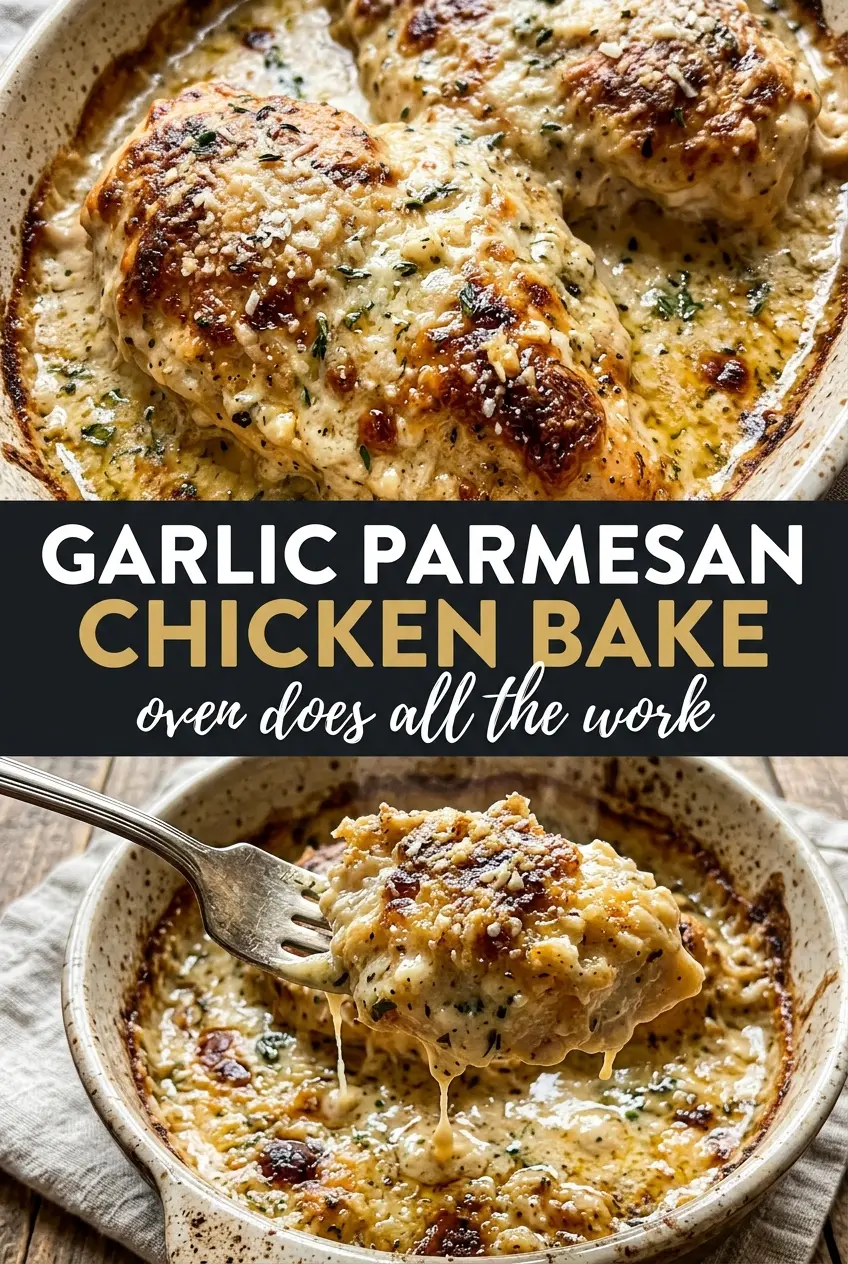
Golden, crackled Parmesan on top and juicy chicken underneath is the kind of dinner that earns a permanent spot in the rotation. The crust turns deeply savory in the oven, with the garlic butter soaking into the chicken just enough to keep every bite tender while the topping bakes into a crisp, browned shell.
What makes this version work is the layering. The butter and garlic go on first so the seasoning has something to cling to, then the Parmesan-panko mixture gets pressed on firmly instead of sprinkled loosely. That little bit of pressure helps the crust stay put and gives you those browned edges that taste like the best part of a baked casserole dish.
You’ll find the timing, the one step that keeps the crust from sliding off, and a few smart ways to adapt this without losing that golden finish. It’s straightforward cooking, but the details matter here.
The Parmesan crust got crisp and browned instead of sliding off, and the chicken stayed juicy all the way through. I served it with lemon wedges like suggested, and that bright finish kept the whole dish from feeling heavy.
Save this Garlic Parmesan Chicken Bake for a crisp, golden chicken dinner with a buttery Parmesan crust.
The Reason the Parmesan Crust Stays Crisp Instead of Turning Soggy
The topping only stays crackled when the chicken surface is dry enough for the butter to cling and the breadcrumb-Parmesan mix can bake instead of steam. If the chicken goes into a wet pan or the topping is packed on loosely, the crust softens before it browns. Pressing the mixture firmly onto the buttered chicken matters more than people think. It gives the Parmesan a chance to fuse into a real crust.
The other thing that helps is using a hot oven and a shallow baking dish. You want the edges of the topping to catch first, because that’s where the best texture starts. If the chicken breasts are very thick, pound them lightly so they cook through before the crust over-browns.
What Each Ingredient Is Actually Doing in This Dish
- Chicken breasts — Boneless, skinless breasts keep the cook time short and give the topping a wide surface to cling to. If yours are thick on one end and thin on the other, pound them to an even thickness so the bake finishes evenly.
- Butter — This is the glue for the garlic and seasoning, and it helps the crust brown. Olive oil works in a pinch, but you’ll lose some of the rich, toasted flavor that makes this dish stand out.
- Freshly grated Parmesan — Freshly grated cheese melts and browns better than the shelf-stable kind, which can stay sandy and cling less well. If you swap it, use another hard grating cheese with low moisture, not pre-shredded soft cheese.
- Panko breadcrumbs — Panko keeps the topping lighter and crisper than regular breadcrumbs. If you need gluten-free, use gluten-free panko; the texture stays closest to the original.
- Garlic, Italian seasoning, parsley, and smoked paprika — These build the savory edge and keep the topping from tasting flat. The paprika doesn’t make it smoky in a loud way; it just deepens the color and rounds out the crust.
The 30 Minutes That Matter Most in the Oven
Season the Chicken First
Season both sides of the chicken with salt, pepper, and garlic powder before anything else touches the pan. That base layer matters because the topping covers the surface completely, and the chicken itself still needs to be seasoned all the way through. Place the breasts in a greased 9×13 dish with a little space around each one so the heat can move evenly. If they’re crowded, the bottom tends to steam.
Build the Garlic Butter Layer
Mix the melted butter with the minced garlic, then brush it generously over each breast. The butter should look glossy and stay in place instead of pooling in the dish; if there’s too much liquid, the crust can slide. This step is where the flavor starts, so don’t rush it. A thin, even layer beats a thick puddle every time.
Press on the Parmesan Crust
Combine the Parmesan, panko, Italian seasoning, parsley, and smoked paprika, then press that mixture firmly over the buttered chicken. Don’t just scatter it on top. Pressing helps the butter absorb into the crumbs and keeps the cheese from flaking off halfway through baking. Use your fingers to compact it lightly until the chicken looks fully coated.
Bake Until the Top Is Deeply Golden
Bake at 400°F for 25 to 30 minutes, depending on the thickness of the chicken. You’re looking for a crust that is browned in patches and crisp at the edges, with the chicken reaching 165°F in the thickest part. If the topping is browning too fast before the center is done, tent it loosely with foil for the last few minutes. Let the chicken rest briefly before serving so the juices stay in the meat instead of running out onto the board.
How to Adapt This for Different Kitchens and Different Diners
Make It Gluten-Free Without Losing the Crunch
Swap the panko for gluten-free panko and keep the rest of the method the same. The crust will still bake up crisp because the Parmesan does most of the work, and the panko just gives it lift. Regular gluten-free breadcrumbs work too, but they usually bake up denser and a little less crackly.
Use Chicken Thighs for a Richer, Juicier Result
Boneless, skinless thighs work well if you want a darker, juicier bite. They may need a few extra minutes in the oven, and the crust can brown a touch faster because thighs release more fat. Check for 165°F at the thickest point and watch the top closely near the end.
Make It Dairy-Light, Not Dairy-Free
If you want to cut back a little, use a mix of butter and olive oil, but keep the Parmesan in place. The texture won’t be quite as rich, and the crust will brown a little less deeply, but it still works. A fully dairy-free version needs a different topping formula, because the Parmesan is doing too much structural work to replace casually.
Storage and Reheating
- Refrigerator: Store leftovers in an airtight container for up to 3 days. The crust softens a bit, but the chicken stays useful for lunches or another quick dinner.
- Freezer: Freeze only if you need to. The topping loses some crispness after thawing, though the flavor still holds. Wrap portions tightly and freeze for up to 2 months.
- Reheating: Reheat uncovered in a 350°F oven until hot through, about 10 to 15 minutes, so the topping has a chance to re-crisp. The common mistake is microwaving it until the crust turns chewy and the chicken dries out at the edges.
Answers to the Questions Worth Asking
Garlic Parmesan Chicken Bake
Ingredients
Equipment
Method
- Preheat the oven to 400°F and grease a 9x13 baking dish.
- Season the chicken breasts with salt, pepper, and garlic powder, then place them in the prepared dish.
- Mix the melted butter with the minced garlic, then brush generously over each chicken breast.
- Combine the Parmesan, panko, Italian seasoning, dried parsley, and smoked paprika, then press firmly over the buttered chicken to coat.
- Bake for 25-30 minutes at 400°F until the Parmesan crust is deeply golden and the cheese is browned and fragrant.
- Bake until the internal temperature reaches 165°F, then garnish with fresh parsley and serve with lemon wedges.