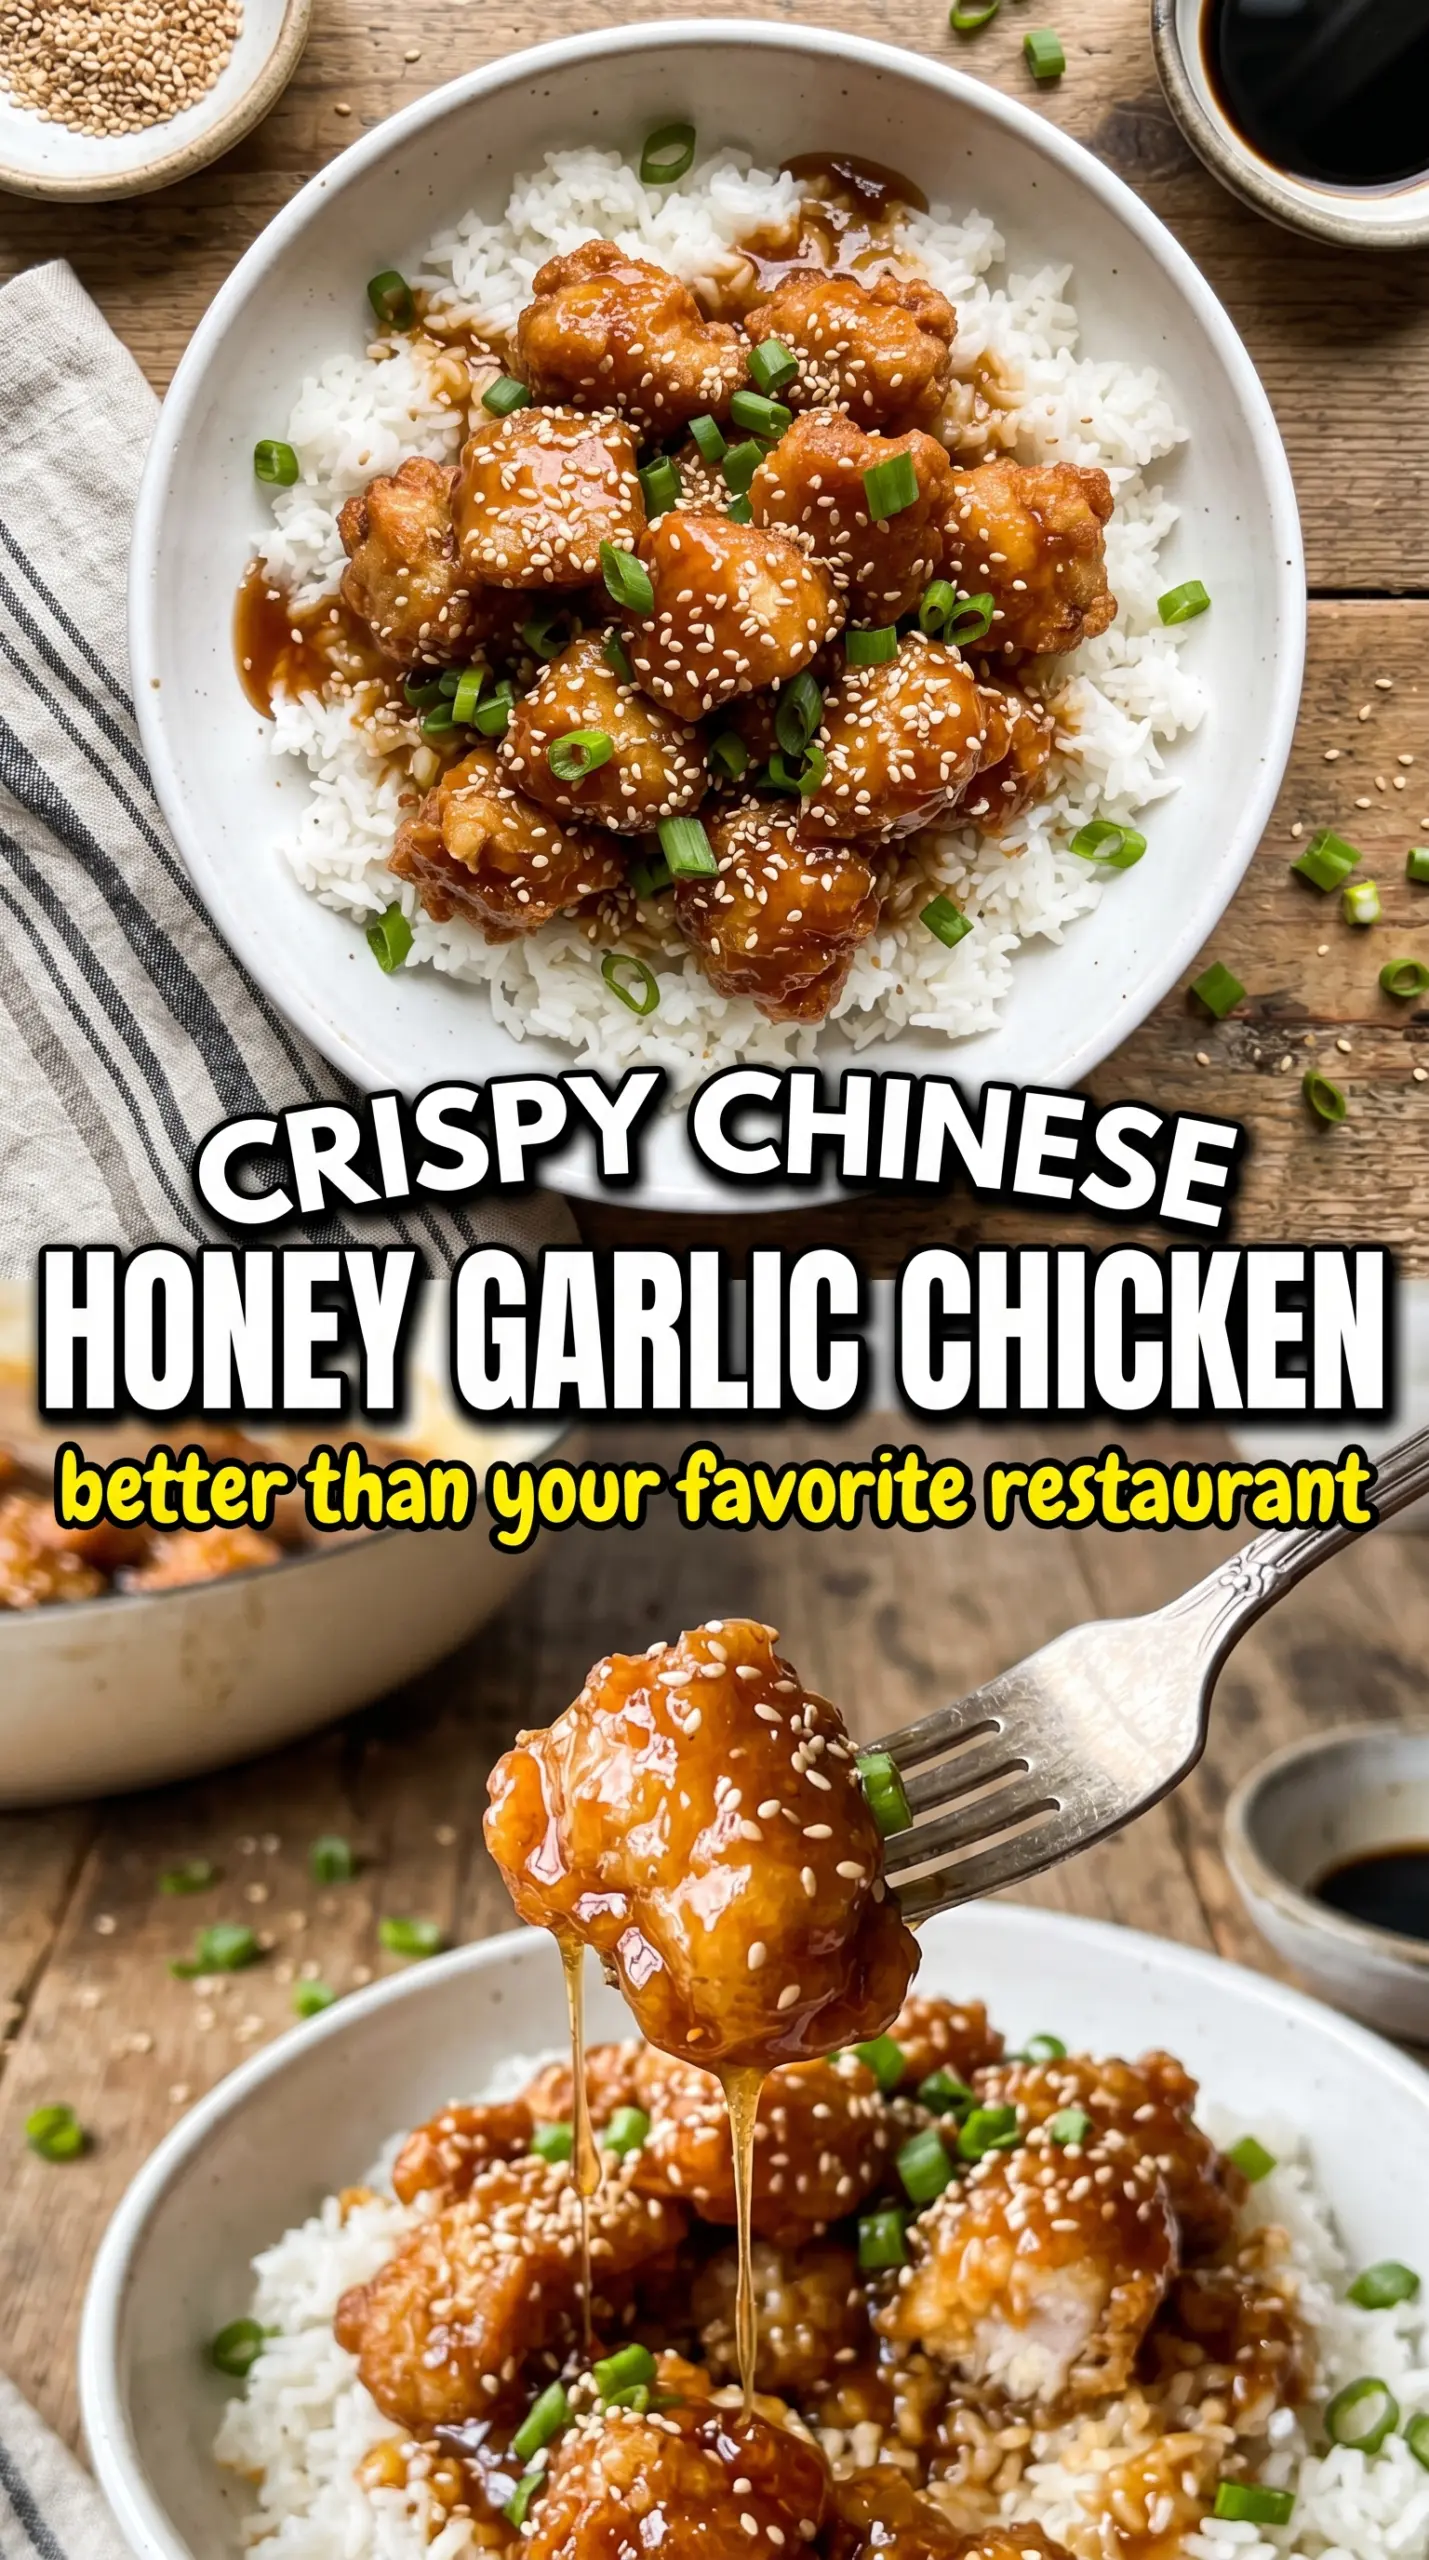
Shatteringly crisp chicken coated in a sticky honey garlic glaze is the kind of dinner that disappears fast. The coating stays crunchy under the sauce long enough for you to get that first bite with a little crackle, then the glaze hits with sweet, garlicky, salty depth and clings in all the right places. Served over rice, it has that takeout-style comfort that makes a regular weeknight feel a little more worth sitting down for.
The trick here is balancing two things that usually fight each other: a strong, dry coating and a sauce that’s thick enough to stick without turning the chicken soggy. Cornstarch in the dredge helps the crust fry up light and crisp, while the flour gives it enough body to hold on. The sauce gets simmered just long enough for the cornstarch slurry to tighten it into a glossy glaze, then the sesame oil goes in off the heat so its flavor stays clean and nutty instead of disappearing.
Below, I’m walking through the exact fry-and-sauce timing that keeps the chicken crisp as long as possible, plus the swaps that still work if you need to adjust the dish for what you have on hand.
The chicken stayed crisp even after tossing it in the sauce, and the honey garlic glaze thickened into that shiny takeout-style coating I was hoping for. My husband kept eating straight from the pan.
Save this crispy Chinese honey garlic chicken for the nights when you want takeout-style crunch with a sticky amber glaze.
The Crunch Secret: Why the Sauce Waits Until the Chicken Is Done
With fried chicken, the biggest mistake is building the sauce too early and letting the coating sit in it while you finish everything else. That’s when the crust softens and the whole dish loses the contrast that makes it worth frying in the first place. Here, the chicken gets cooked, drained, and tossed only at the very end, after the sauce has already thickened into a clingy glaze.
The other part that matters is the cornstarch slurry. If you add it to a sauce that isn’t simmering, it stays milky and loose. If you boil it too hard, it can tighten up past the point of gloss and turn a little gluey. A gentle simmer for a couple of minutes gives you that deep amber finish that coats each piece without puddling in the bowl.
- Cornstarch — This does the heavy lifting in the coating and the sauce. In the dredge, it helps create that crisp shell; in the sauce, it thickens quickly without needing a long reduction.
- Boneless skinless chicken thighs — Thighs stay juicier than breasts during frying, which matters because the chicken cooks in hot oil before the sauce ever touches it. You can use breast meat, but cut it a little larger so it doesn’t dry out before the coating is set.
- Rice vinegar — This keeps the honey from reading flat or cloying. If you don’t have it, apple cider vinegar works, but use a little less because it tastes sharper.
- Sesame oil — Add it off the heat. It’s here for aroma, not frying, and cooking it hard will dull the nutty finish that makes the sauce taste complete.
Getting the Coating Crispy Before the Glaze Goes On
Mix the Dry Coat First
Whisk the cornstarch, flour, garlic powder, salt, and white pepper together before any chicken touches the bowl. You want the seasoning distributed evenly so the crust tastes good on its own, not just where the sauce lands later. If the mix has clumps, those spots fry up unevenly and can leave little dry flour patches on the finished chicken.
Egg, Then Dredge
Dip each piece of chicken into the beaten egg, then into the flour mixture until it’s well coated. The egg gives the dry ingredients something to grab, and pressing the pieces lightly into the bowl helps the coating cling instead of flaking off in the oil. If the chicken looks gummy, it usually means too much egg is clinging to the surface; let the excess drip off before dredging.
Fry in Hot, Steady Oil
Bring the oil to 375°F and keep the batches small. Crowding the pan drops the temperature fast, and that’s how you end up with greasy chicken instead of a crisp crust. Fry for 5 to 6 minutes until the pieces are deep golden and sound a little less noisy when you stir them; that quieter sizzle is a good sign the exterior has set.
Build the Glaze Separately
Combine the honey, soy sauce, garlic, and rice vinegar in a saucepan and bring it to a simmer before adding the slurry. The garlic should soften and smell round, not raw and sharp, before the sauce thickens. Stir in the cornstarch mixture and cook just until the sauce turns glossy and coats a spoon; once it reaches that point, pull it from the heat and stir in the sesame oil.
How to Adjust This Honey Garlic Chicken Without Breaking the Balance
Make it gluten-free
Swap the all-purpose flour for a gluten-free all-purpose blend and use tamari instead of soy sauce. The crust stays crisp because the cornstarch still does the main work, and the sauce keeps the same glossy finish without the wheat.
Use chicken breast for a leaner version
Chicken breast works, but it needs a little more care because it dries out faster than thighs. Cut it into slightly larger pieces and pull it as soon as it’s cooked through so it stays tender under the sauce.
Bake or air fry instead of deep frying
You’ll lose some of the shatteringly crisp texture, but the flavor still works. Bake on a well-oiled sheet pan or air fry in a single layer until deeply golden, then toss immediately with the hot sauce so the coating doesn’t dry out before serving.
Storage and Reheating
- Refrigerator: Store leftovers in an airtight container for up to 3 days. The coating softens as it sits, but the flavor holds up well.
- Freezer: The sauced chicken doesn’t freeze well because the crust loses its texture after thawing. If you want to prep ahead, freeze the fried chicken and sauce separately, then combine after reheating.
- Reheating: Reheat the chicken in a 375°F oven or air fryer until hot and crisp again, then warm the sauce separately and toss together right before serving. Microwaving turns the coating soft fast, which is the main thing to avoid here.
Answers to the Questions Worth Asking

Crispy Chinese Honey Garlic Chicken
Ingredients
Equipment
Method
- Whisk together cornstarch, all-purpose flour, garlic powder, salt, and white pepper until evenly combined and dry-looking. Add the beaten large egg to a separate bowl so you can dip quickly.
- Dip the boneless skinless chicken thighs in the beaten large egg, letting excess drip back. Dredge the egg-coated chicken in the flour-cornstarch mixture until each piece is well coated with a light, dry layer.
- Heat 2 inches of vegetable oil to 375°F in a Dutch oven until it shimmers and maintains temperature. Line a sheet pan for draining.
- Fry the chicken in batches for 5-6 minutes until deep golden and cooked through, turning once if needed for even color. Drain on the sheet pan, watching for bubbling to subside and crisp edges to set.
- In a saucepan, combine honey, soy sauce, garlic, and rice vinegar, then bring to a simmer while stirring. Keep it at a steady simmer until the mixture smells fragrant and looks slightly reduced.
- Stir in the cornstarch slurry (cornstarch mixed with 2 tablespoons water) and cook for 2-3 minutes until the sauce turns glossy and thick enough to coat a spoon. The visual cue is slow dripping and a sheen that looks lacquer-like.
- Remove the saucepan from heat and stir in sesame oil. The sauce should look darker and smoother immediately after adding.
- Toss the crispy chicken in the honey garlic sauce until fully coated, working quickly so the crust stays crisp. Stop when the sauce clings in a shiny, amber layer without pooling heavily.
- Serve the honey garlic chicken over steamed rice with sesame seeds and green onions. Add the garnish so it scatters on top rather than sinking.
Notes
What Each Ingredient Is Doing in This Dish
- Boneless skinless chicken thighs — These are the best choice for frying because they stay juicy under the high heat. If you swap in chicken breast, cut the pieces slightly larger and keep a close eye on them so they don’t dry out.
- Cornstarch and flour — This combo gives you a crust that’s crisp but not heavy. Cornstarch brings the crunch; flour gives the coating enough structure to cling.
- Garlic powder, salt, and white pepper — The seasoning in the coating matters because the sauce alone won’t carry all the flavor. White pepper gives that classic takeout-style background warmth, but black pepper works in a pinch.
- Honey, soy sauce, garlic, rice vinegar, and sesame oil — This is the whole character of the dish: sweet, salty, sharp, and nutty. The vinegar keeps the honey in check, and the sesame oil should go in at the end so it stays aromatic.
The 20 Minutes That Actually Matter
Dredging the Chicken
Coat the chicken thoroughly so every piece has a dry, even surface before it hits the oil. Any wet spots turn soft first and can leave bare patches after frying. Work in batches if needed so the pieces don’t clump together in the coating bowl.
Frying Until Deep Golden
Set the chicken into the oil carefully and let the pieces fry without constant stirring for the first minute or two. That gives the coating time to set instead of tearing off. When the pieces are a deep golden color and the bubbling has settled a little, they’re close to done.
Tossing at the Very End
Move the fried chicken straight into a large bowl and pour the sauce over it while it’s hot. Toss quickly so every piece gets coated, then serve immediately over rice with sesame seeds and green onions. If it sits too long in the bowl, steam from the sauce will soften the crust, and that’s the one thing this dish can’t afford.