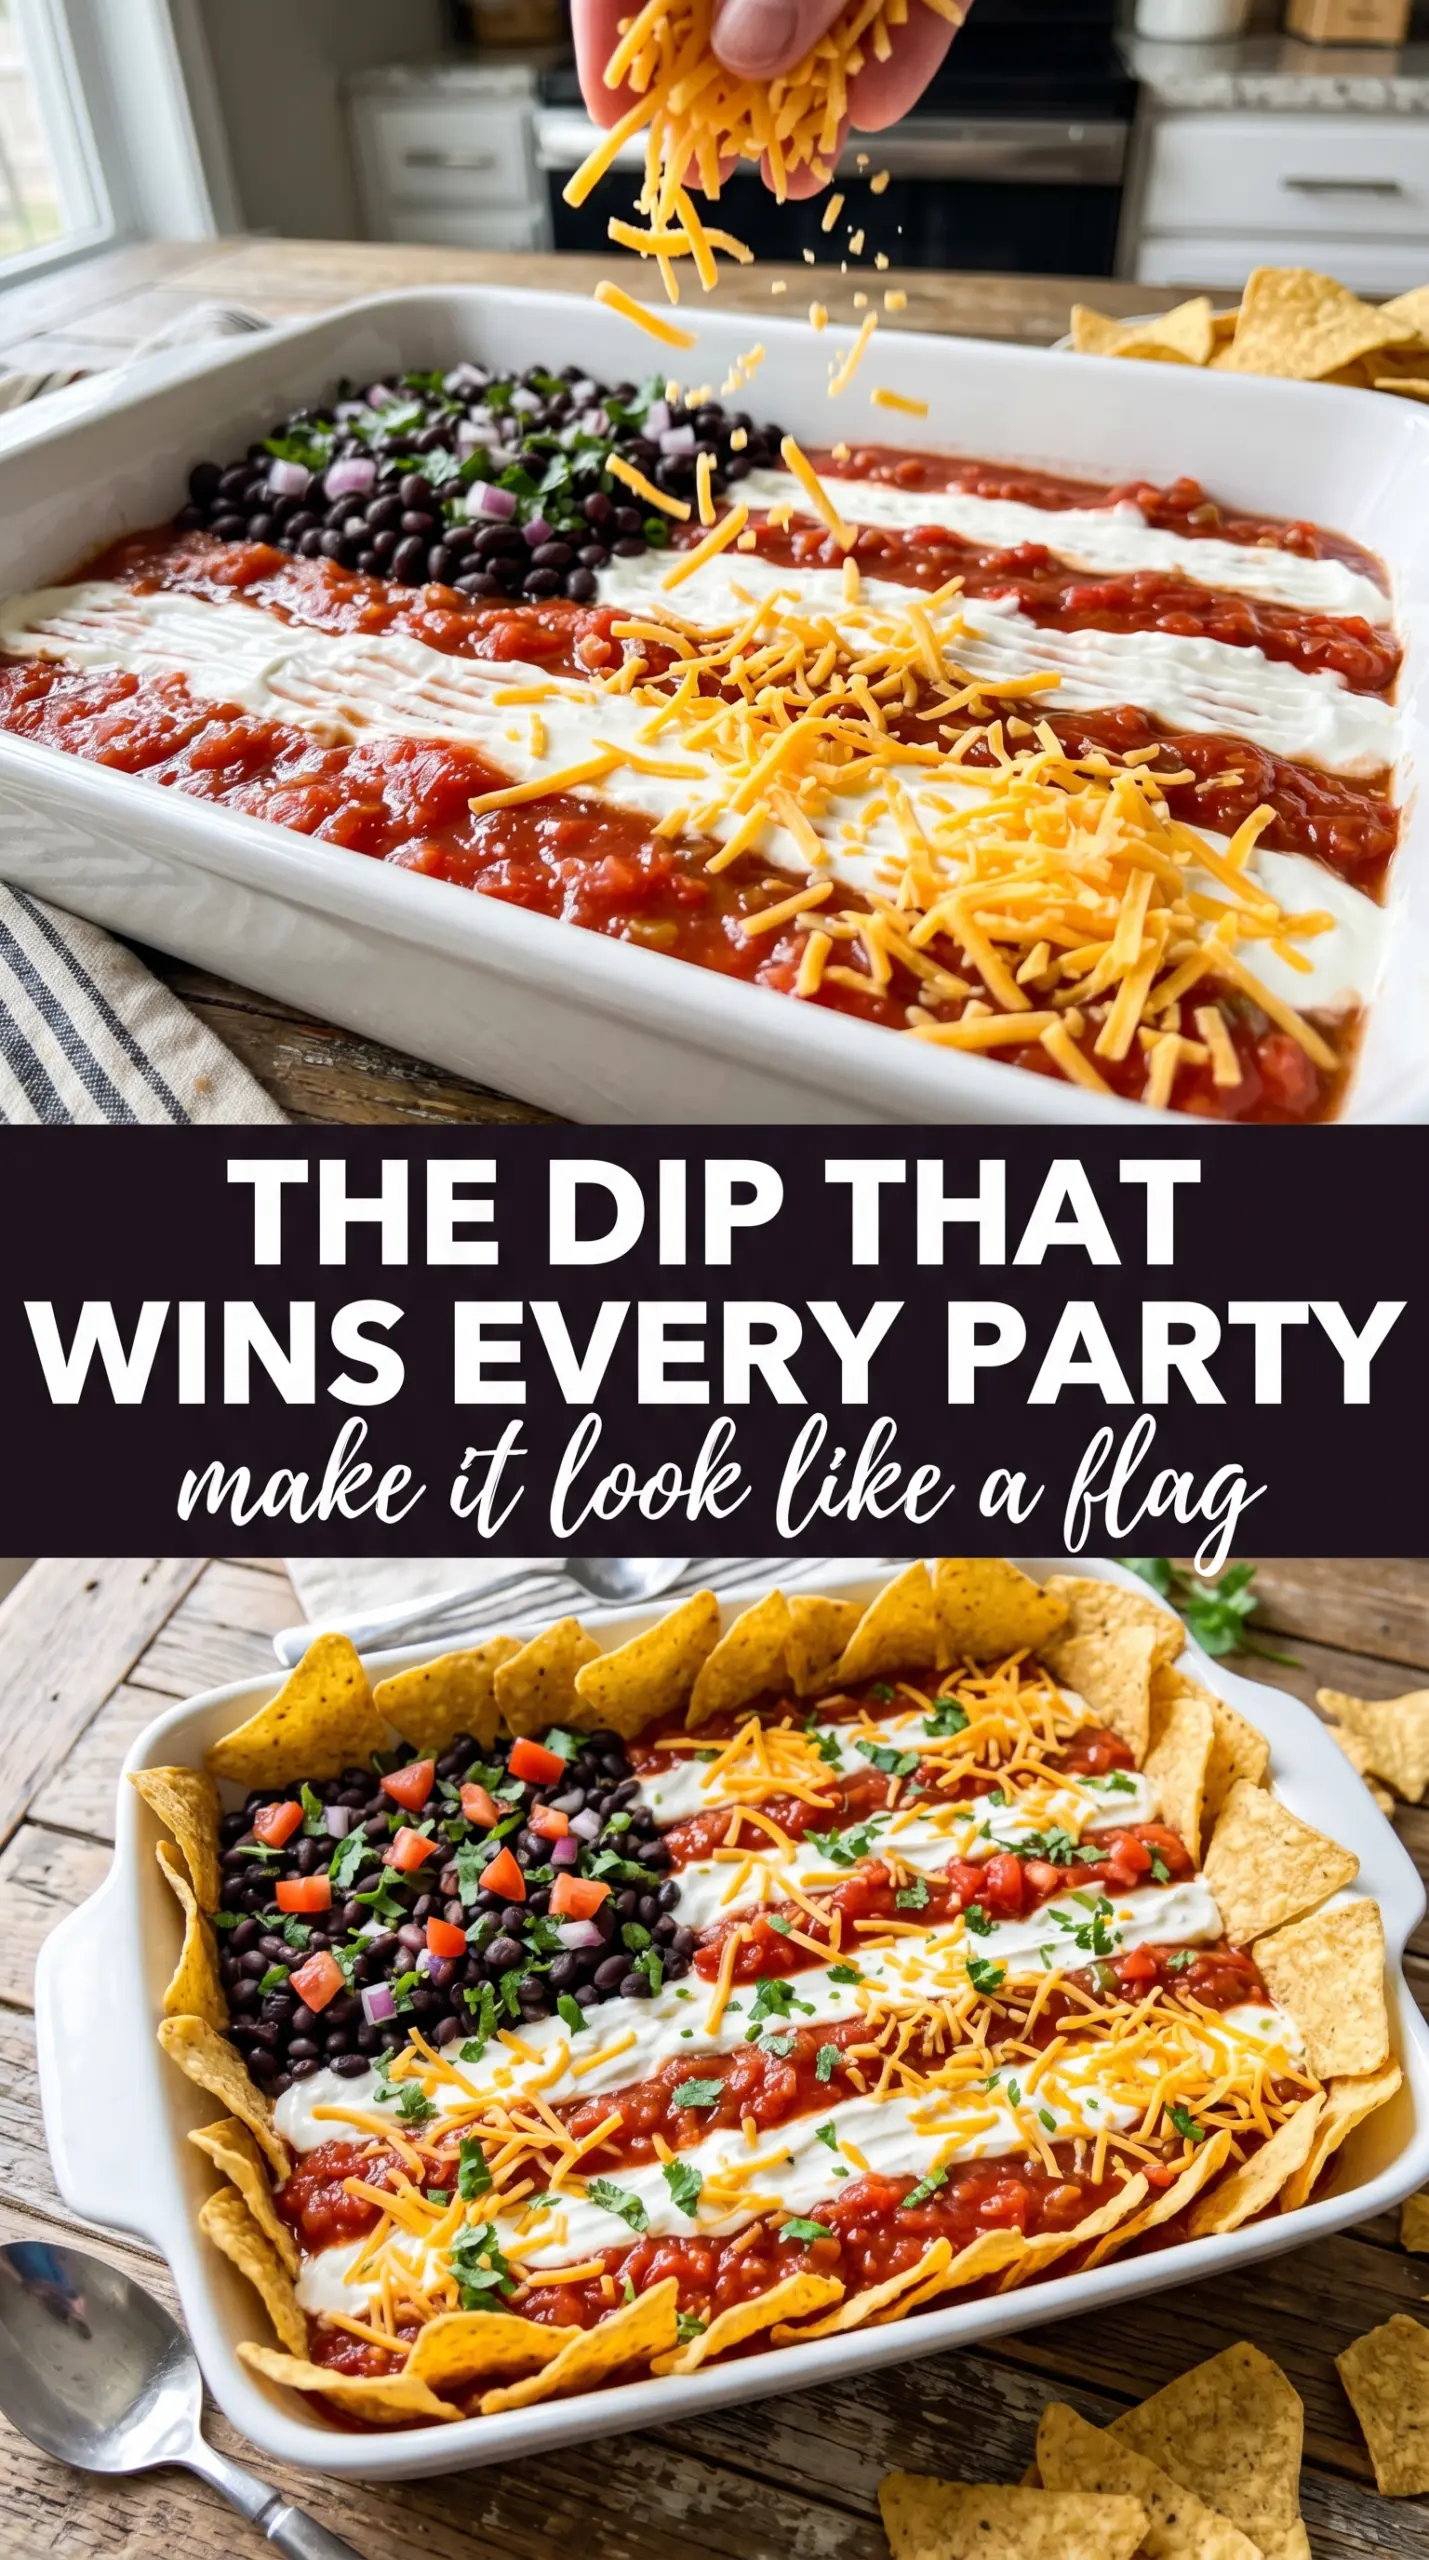
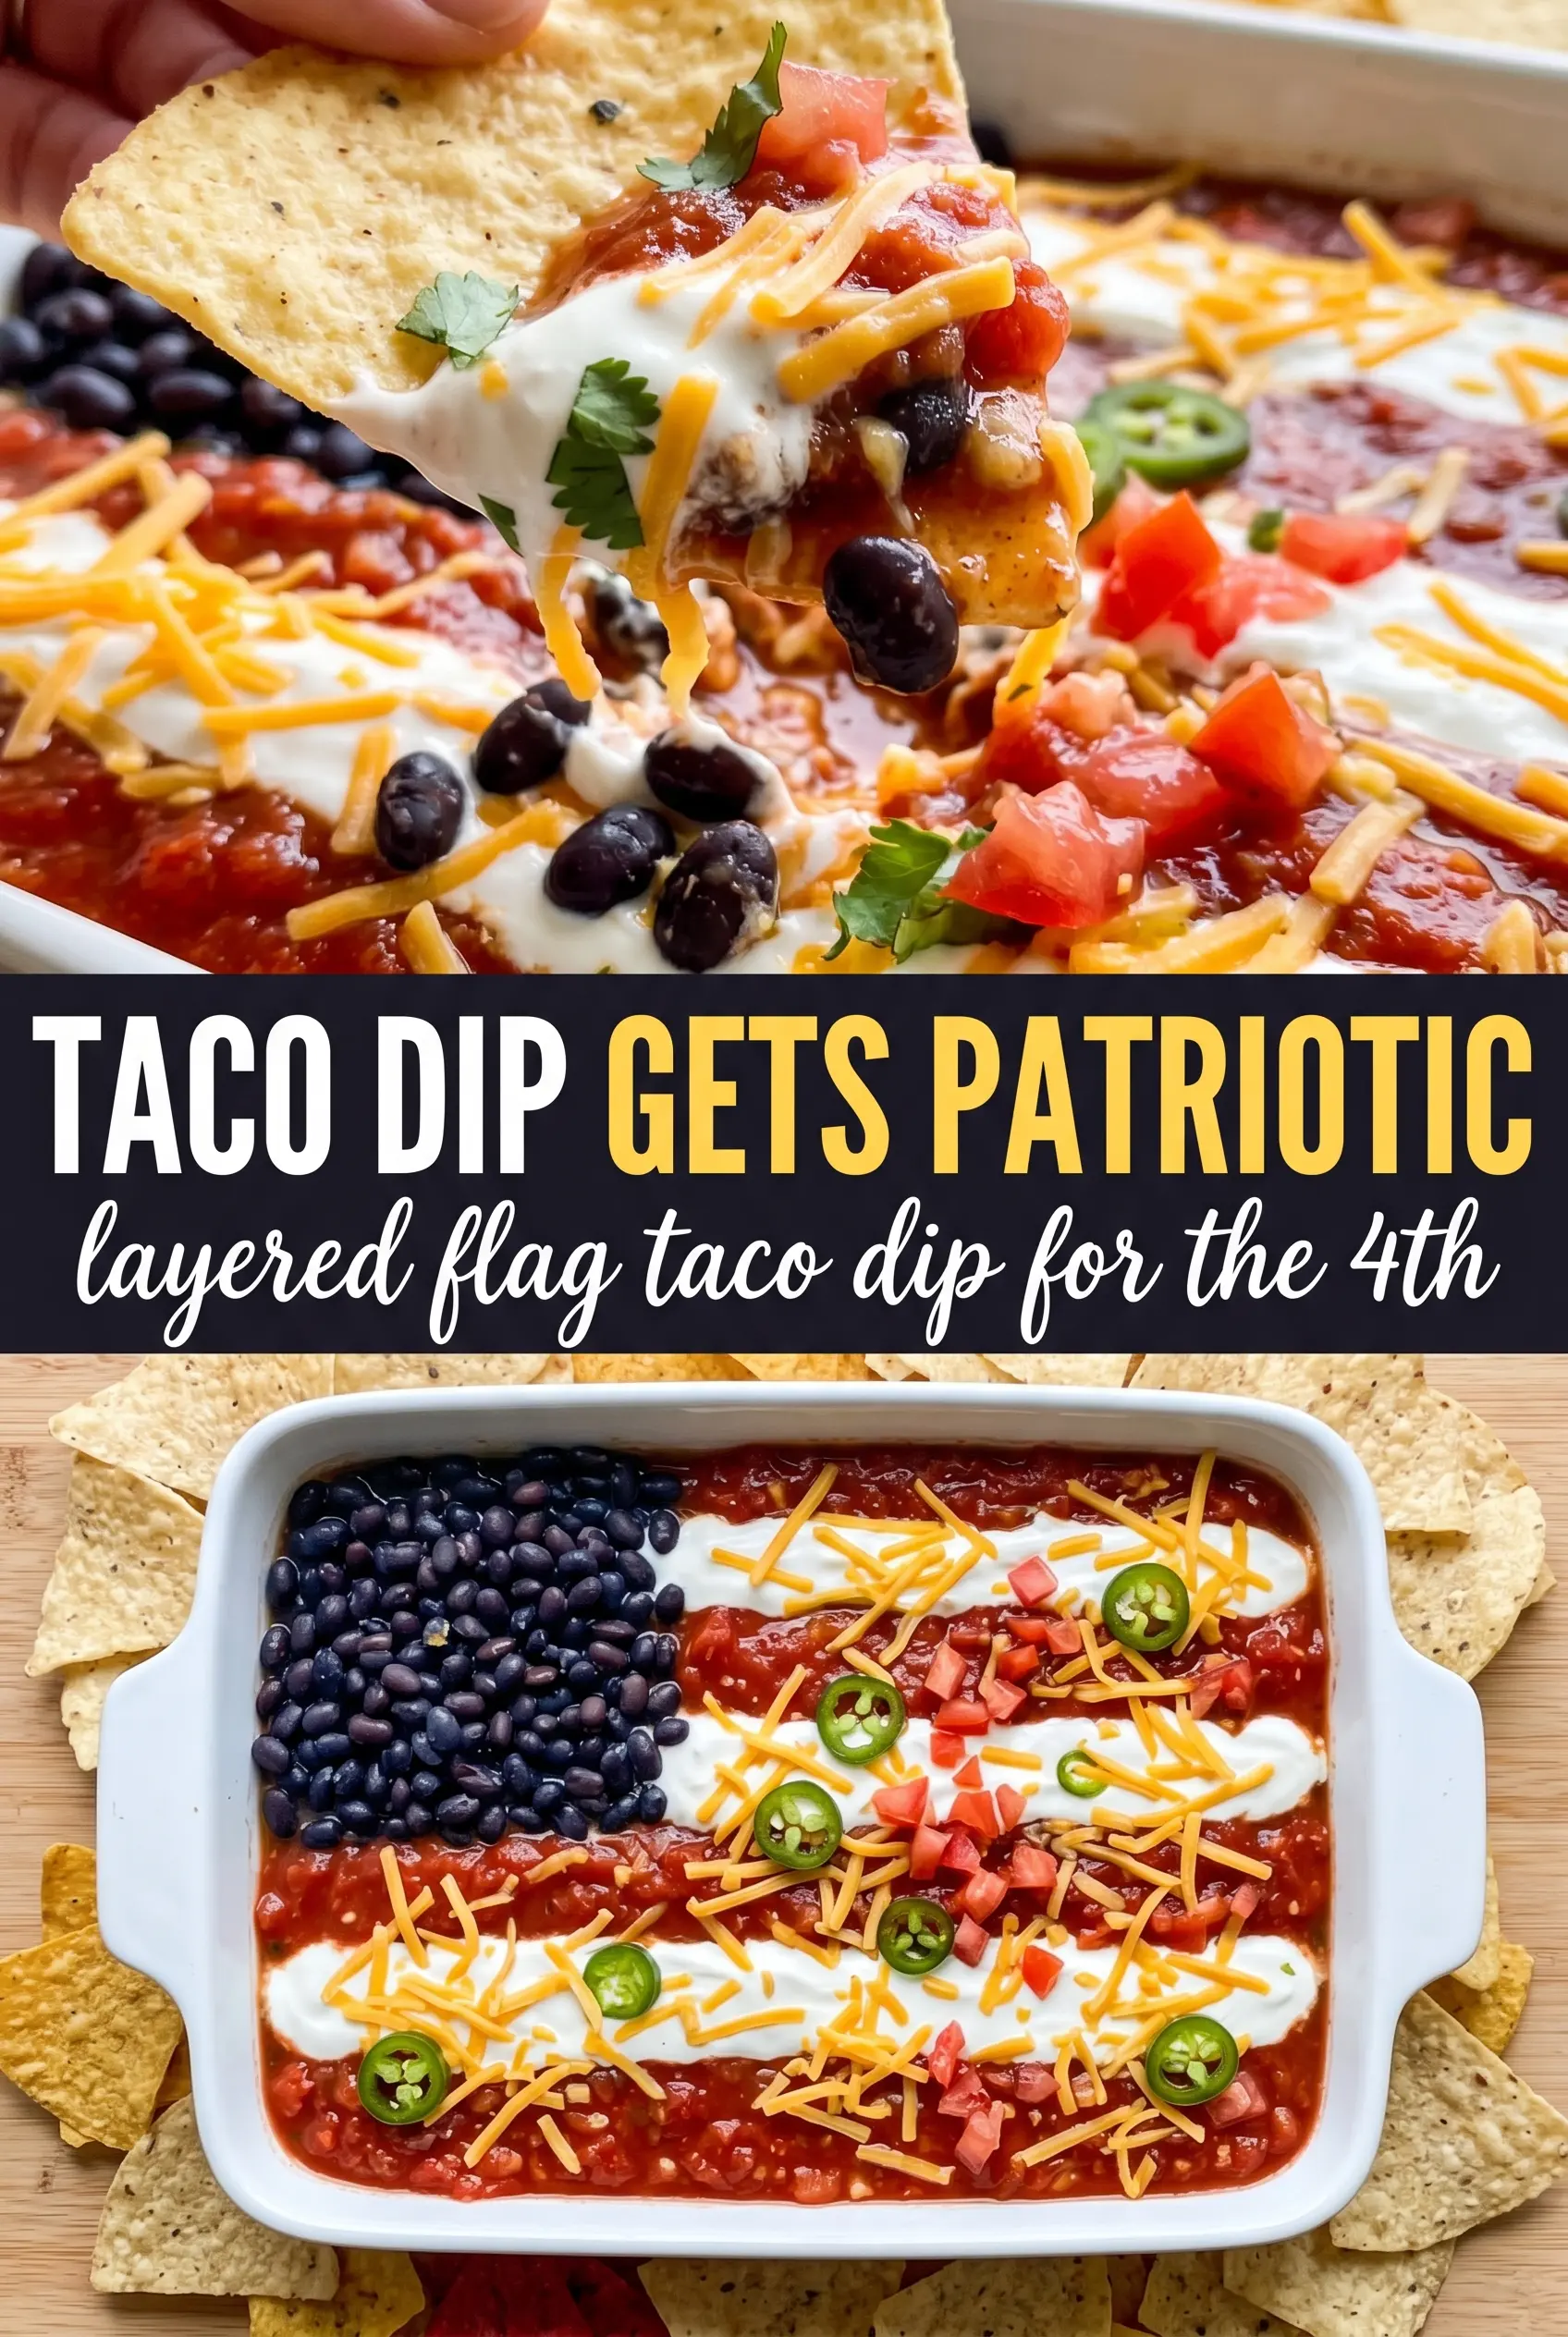
American Flag Taco Dip is the kind of party dish that disappears from the tray before the drinks are even poured. You get the familiar comfort of a layered taco dip, but the top turns into the whole event: neat sour cream stripes, a dark blue corner of olives, and bright red rows that make the dish look festive without needing any fancy decorating skill. It’s bold, creamy, salty, and built for scooping.
The trick is in the layers. The beans anchor everything, the seasoned cream cheese gives the dip structure, and the guacamole adds that fresh, cool middle layer that keeps the whole thing from tasting heavy. Chilling it for a short stretch matters more than people think because it firms up the layers just enough for clean chips-and-dip scoops and sharper flag lines on top.
Below, I’ll walk through the few details that make the design hold its shape, how to keep the top neat instead of muddy, and a couple of ways to adapt it if you need to work around ingredients in your fridge.
The layers stayed clean and the sour cream stripes held their shape after chilling. I used pico instead of salsa and it still looked amazing on the table.
Like this patriotic layered dip? Save American Flag Taco Dip for your next 4th of July spread or potluck table.
The Part That Keeps the Flag From Sliding Into a Mess
The biggest mistake with a layered taco dip is building it too loose. If the bean layer is thin or the cream cheese is still cold and lumpy, the top layers slump together and the flag design loses its shape before it even reaches the table. This version stays neat because the base is thick, the cream cheese is softened until smooth, and the whole dish gets time to chill before serving.
That chilling time is not cosmetic. It firms the layers just enough so the chips can cut through without dragging half the top across the dish. It also helps the taco seasoning settle into the cream cheese, which gives the middle layer a stronger, more even flavor instead of pockets of dry spice.
- Refried beans — These are the backbone. Use a sturdy, thicker style if you can, because watery beans make the whole dish slide. If your beans look loose, stir them well and spread them in a thin, even layer rather than trying to pile them up.
- Cream cheese — Soften it fully before mixing or you’ll end up with little cold lumps that tear the bean layer when you spread it. This is the one ingredient worth waiting on.
- Taco seasoning — A packet gives you the salt, spice, and cumin in the right balance. If you use homemade seasoning, keep it on the milder side so it doesn’t fight the salsa and olives.
- Guacamole — It adds freshness and helps separate the creamy layers. Store-bought works, but the smoother it is, the easier it is to spread without catching the layer underneath.
- Sour cream — This is what makes the stripes look clean. A piping bag gives the sharpest lines, but a zip-top bag with the corner snipped works just fine if you chill the dip after piping.
What Each Ingredient Is Actually Doing in This Recipe
- Primary ingredient (the star) — Quality matters most. Choose the best you can find.
- Cooking medium (oil, butter, or broth) — This carries flavors and prevents dryness.
- Seasonings (salt, pepper, spices, herbs) — Layer flavors so nothing overpowers. Build depth gradually.
- Aromatics (garlic, onion, herbs) — Cook with fat to bloom flavors. Become the foundation.
- Supporting ingredients — Complement the main ingredient without overpowering it.
- Sauce or liquid (if applicable) — Brings flavors together. Balance richness with acid.
- Acid (lemon, vinegar, wine, or other) — Brightens and prevents flat-tasting results.
- Final finish (garnish, glaze, or sauce) — Prevents one-dimensional taste and adds visual appeal.
How to Build the Flag So the Design Stays Crisp
The Bean Base
Spread the refried beans in a tight, even layer across the bottom of your rectangular dish. If the beans are stiff, stir in just a spoonful or two of water or salsa to loosen them enough to spread, but don’t thin them so much that they stop acting like a base. Press them all the way to the corners so the top layers don’t slip into empty space later.
The Cream Cheese Layer
Mix the softened cream cheese with the taco seasoning until it’s completely smooth, then spread it gently over the beans. If the cream cheese is even a little cold, it will pull the bean layer up with it and leave streaks underneath. An offset spatula or the back of a spoon helps here because you want to glide, not drag.
Stacking the Top Layers
Spread the guacamole over the seasoned cream cheese, then add the shredded cheese in a thin, even blanket. The guacamole works best as a barrier between the creamy middle and the wetter toppings above it. If you pile the cheese too thick, the stripes on top look fuzzy instead of clean, so keep it light and even.
Drawing the Flag
Pipe the sour cream into horizontal stripes, then add the salsa or diced red tomatoes in the spaces between them. Use the back of a spoon to coax each stripe into place only if needed; overworking it makes the top look muddy fast. For the blue corner, press the olives together tightly in the upper left so it reads as a solid rectangle, not scattered garnish.
The Chill Before Serving
Scatter the green onions over the finished dip, then chill it for 30 minutes before serving. That short rest is what helps the design set, especially the sour cream stripes and the olive corner. Serve it cold with sturdy tortilla chips, because thin chips break before they can get through all those layers.
How to Adapt This for Different Crowds and Different Fridges
Dairy-Free Version
Use a dairy-free cream cheese and a dairy-free sour cream substitute, then choose a shredded vegan cheese that melts softly rather than drying out. The texture will still work, but the top may be a little less sharp after chilling, so keep the layering extra even.
Make It Spicier
Swap chunky salsa for a hotter version or stir chopped jalapeños into the bean layer. That gives the dip more heat without changing the flag design on top, which is the safest place to keep the visual simple.
Lower-Carb Serving Style
Skip the tortilla chips and serve it with cucumber rounds, bell pepper strips, and celery. The dip itself is still rich and hearty, so the fresh vegetables balance it out without changing the layered structure.
Storage and Reheating
- Refrigerator: Cover and refrigerate for up to 3 days. The top will soften a bit, but the flavor stays strong.
- Freezer: I don’t recommend freezing this dip. The sour cream, guacamole, and cream cheese all change texture after thawing and the layers turn watery.
- Reheating: This dip is meant to be served cold, not reheated. If it has been sitting out too long, pop it back in the fridge for 20 to 30 minutes to firm up before serving again.
Questions I Get Asked About This Recipe
American Flag Taco Dip
Ingredients
Equipment
Method
- Spread refried beans in an even layer across the bottom of a large rectangular baking dish or serving tray.
- Mix cream cheese with taco seasoning until smooth, then spread evenly over the bean layer.
- Spread guacamole over the cream cheese layer, then top with the shredded cheese blend.
- Spoon sour cream into a piping bag or zip-lock bag with a corner snipped and pipe horizontal white stripes across the top of the dip.
- Add rows of salsa or diced red tomato between the sour cream stripes to create the red stripe effect.
- In the upper left corner, arrange sliced black olives tightly to form the blue canton rectangle.
- Scatter green onions across the top of the dip.
- Chill the dip for 30 minutes, until set and easy to serve, then serve with tortilla chips.