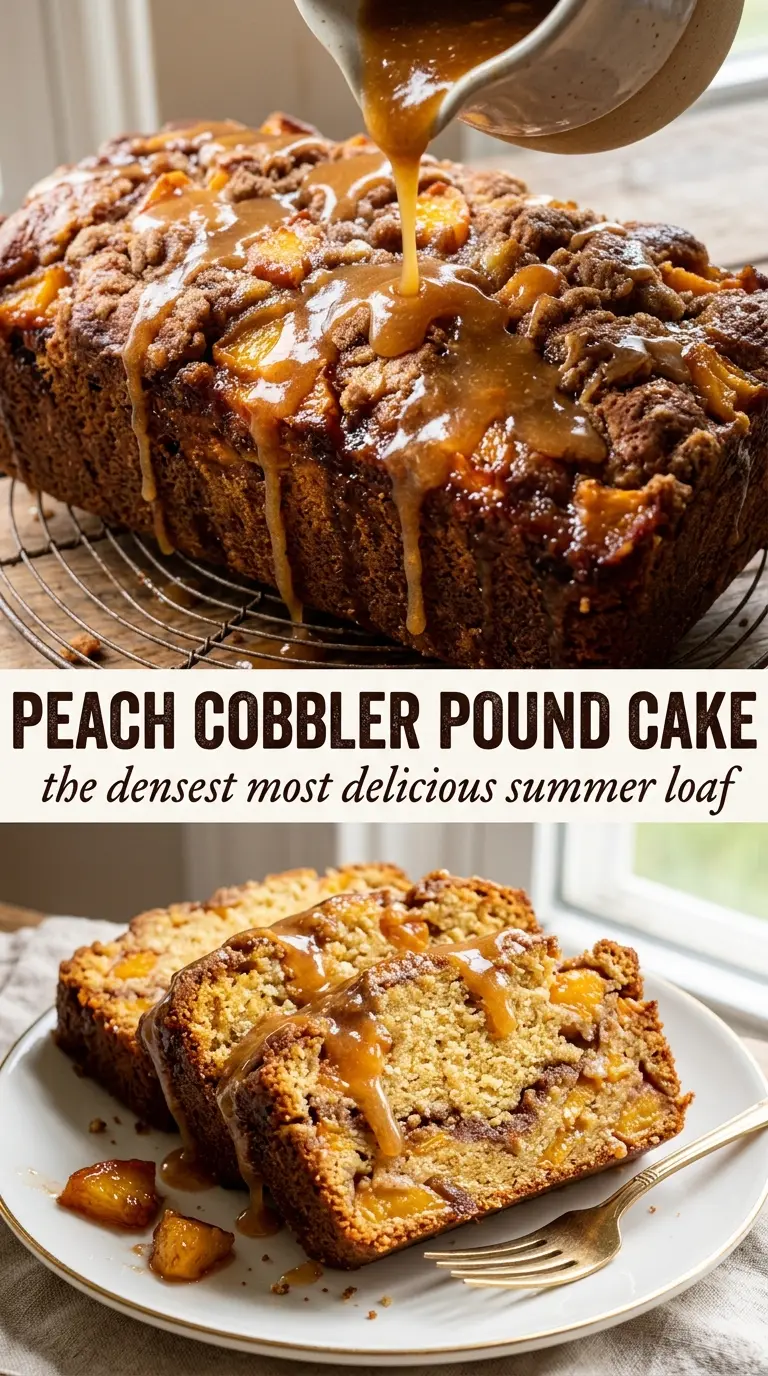
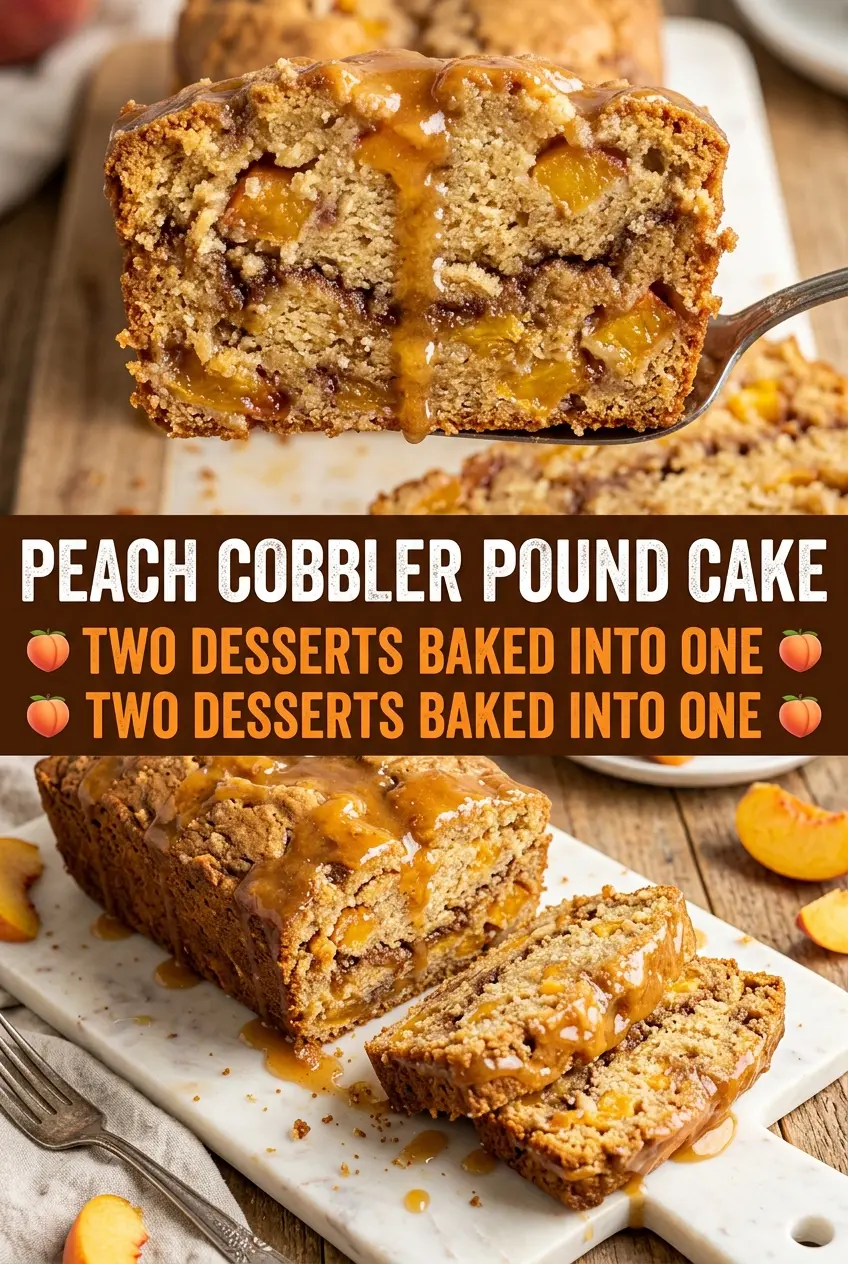
Peach cobbler pound cake brings together two desserts that already know how to make people happy: the tight, buttery crumb of a classic pound cake and the syrupy, cinnamon-kissed peach filling you’d expect from a good cobbler. The result is dense in the best way, with little pockets of softened fruit tucked through the middle and a warm glaze that settles into the crumb instead of sitting on top like a shiny afterthought.
What makes this version work is the balance. The cake batter has enough structure to hold a juicy filling without turning soggy, and the sour cream keeps the crumb plush while the butter and sugar get whipped long enough to trap air. That step matters. If you rush it, the cake still bakes, but it won’t have that fine, tender texture that makes each slice hold together cleanly.
Below, I’ve included the small details that matter most: how to keep the peaches from sinking, why the filling goes in between two layers of batter, and how to glaze the cake while it’s still warm so every slice tastes like peach cobbler in cake form.
The peach layer stayed right where it should and the cinnamon glaze soaked into the warm cake instead of sliding off. I brought it to a potluck and people kept asking if I had used fresh peaches because the flavor came through so clearly.
Save this peach cobbler pound cake for when you want a bundt that bakes up dense, buttery, and full of cinnamon peaches.
The Secret to Keeping Peach Cobbler Filling from Sinking
Peaches are the part that can trip this cake up. If you scatter juicy fruit straight through the batter, it tends to slide to the bottom and leave you with a heavy layer under an otherwise good cake. The fix is the same one I use in any fruit-filled pound cake: coat the peaches lightly with brown sugar and cinnamon, then layer them between two portions of batter so they stay suspended as the cake rises.
The batter itself also needs enough strength to hold the fruit. That’s why this recipe uses a classic pound cake ratio with plenty of butter, eggs, and flour, plus a little baking soda and baking powder to keep the crumb from turning tight and dry. The cake should be thick and smooth when it goes into the pan, not loose like a quick bread.
- Fresh peaches — Use ripe peaches that smell fragrant and give slightly when pressed. Overripe peaches can turn mushy during baking, which makes the filling watery.
- Sour cream — This adds moisture and a little tang, and it keeps the crumb soft for days. Plain full-fat Greek yogurt works in a pinch, but the cake will be a touch less rich.
- Brown sugar and cinnamon — This tiny filling mixture does more than sweeten the peaches. It draws out a little juice and turns the center into a cobbler-style layer instead of just plain fruit.
- Peach nectar glaze — The nectar carries peach flavor without thinning the glaze too much. If you don’t have it, reduce a little peach juice until it tastes concentrated, then use that.
What Each Ingredient Is Actually Doing in This Peach Cobbler
- Fresh peaches (the star fruit) — Use ripe but firm peaches. Overripe turns to mush.
- Sugar (the sweetness and sauce base) — This draws juices from peaches and creates syrup. Adjust based on ripeness.
- Lemon juice (the brightness and acid) — This prevents the filling from tasting one-dimensional. Keeps peaches from browning.
- Thickener (flour, cornstarch, or tapioca) — This keeps filling from being runny. Don’t skip this.
- Biscuit or crumble topping (the texture element) — This creates contrast with soft fruit. Biscuits are cake-like; crumbles are crispy.
- Butter in topping (the richness) — Cold butter creates flakier biscuits. Creates golden finish.
- Spices (cinnamon, nutmeg, or ginger) — These warm up peach without overpowering. Use sparingly.
- Baking temperature (375-400°F, 40-50 minutes) — Hot enough to cook fruit and brown topping without burning.
Building the Batter, Layering the Peaches, and Baking It Evenly
Creaming the Butter and Sugar Until It Turns Pale
Beat the butter and sugar for the full five minutes until the mixture looks fluffy, lighter in color, and almost spreadable. That’s not just about mixing; it’s what gives the cake its lift and fine crumb. If the butter is too cold, the mixture stays gritty and the cake bakes up dense in a bad way. If it looks greasy instead of airy, the butter was too warm, and the cake may lose height.
Adding the Eggs and Dry Ingredients in the Right Rhythm
Add the eggs one at a time so the batter stays smooth and emulsified. If you dump them all in at once, the mixture can look broken and curdled before the flour goes in. Alternate the dry ingredients with the sour cream, beginning and ending with the flour mixture, and stop mixing as soon as the batter turns uniform. Overmixing at this stage can make the crumb tough.
Layering the Filling So It Bakes in the Middle
Spread half the batter into a well-greased Bundt pan, spoon the peaches over it, then cover them with the remaining batter. Use a spoon to nudge the top layer into the corners so no fruit is left exposed. The goal is for the peaches to sit in the center band of the cake, where they soften into pockets instead of burning on top or sinking to the base.
Knowing When the Cake Is Done
Bake until the top is deeply golden and a toothpick comes out clean or with just a few moist crumbs, usually around 70 to 75 minutes. The cake should pull slightly from the sides of the pan and spring back when lightly pressed. If the top is browning too quickly before the center is done, tent it loosely with foil for the last 15 minutes. Let it cool for 15 minutes before turning it out so it releases cleanly without tearing.
How to Adapt This Peach Cobbler Pound Cake for Different Kitchens
Frozen Peaches When Fresh Aren’t in Season
Thaw the peaches first, then drain off extra liquid before tossing them with the brown sugar and cinnamon. Frozen fruit gives you the same peach flavor, but it sheds more moisture, so skipping the drain can make the middle of the cake gummy.
Dairy-Free Version That Still Bakes Like Pound Cake
Use a good plant-based butter stick and swap the sour cream for unsweetened dairy-free yogurt with some body. The texture will be slightly less rich, but the cake still holds together well and keeps that dense, sliceable crumb.
Making It Gluten-Free Without a Crumbly Slice
Use a 1:1 gluten-free baking flour that includes xanthan gum. The cake will still be tender, but it needs a little extra care when unmolding because gluten-free pound cakes can be more fragile while warm.
Storage and Reheating
- Refrigerator: Store covered for up to 5 days. The crumb tightens a little in the fridge, but the flavor stays excellent.
- Freezer: This cake freezes well. Wrap individual slices tightly and freeze for up to 2 months, then thaw at room temperature.
- Reheating: Warm slices in the microwave for 10 to 15 seconds or in a low oven until just heated through. Don’t overheat it, or the glaze will melt off and the crumb can dry out.
Answers to the Questions Worth Asking
Peach Cobbler Pound Cake
Ingredients
Equipment
Method
- Preheat the oven to 325F and grease and flour a 12-cup bundt pan.
- Toss diced peaches with brown sugar and cinnamon, then set aside.
- Beat butter and sugar for 5 minutes until very fluffy.
- Add eggs one at a time, then mix in vanilla extract.
- Mix in flour, baking soda, baking powder, cinnamon, and salt alternately with sour cream until just combined.
- Pour half the batter into the bundt pan, spoon the peach filling over it, then cover with the remaining batter.
- Bake at 325F for 70-75 minutes, until a toothpick comes out clean.
- Cool the cake 15 minutes, then invert to release from the pan.
- Whisk the glaze ingredients until smooth.
- Drizzle the warm cinnamon peach glaze over the cake so it soaks into the crumb.