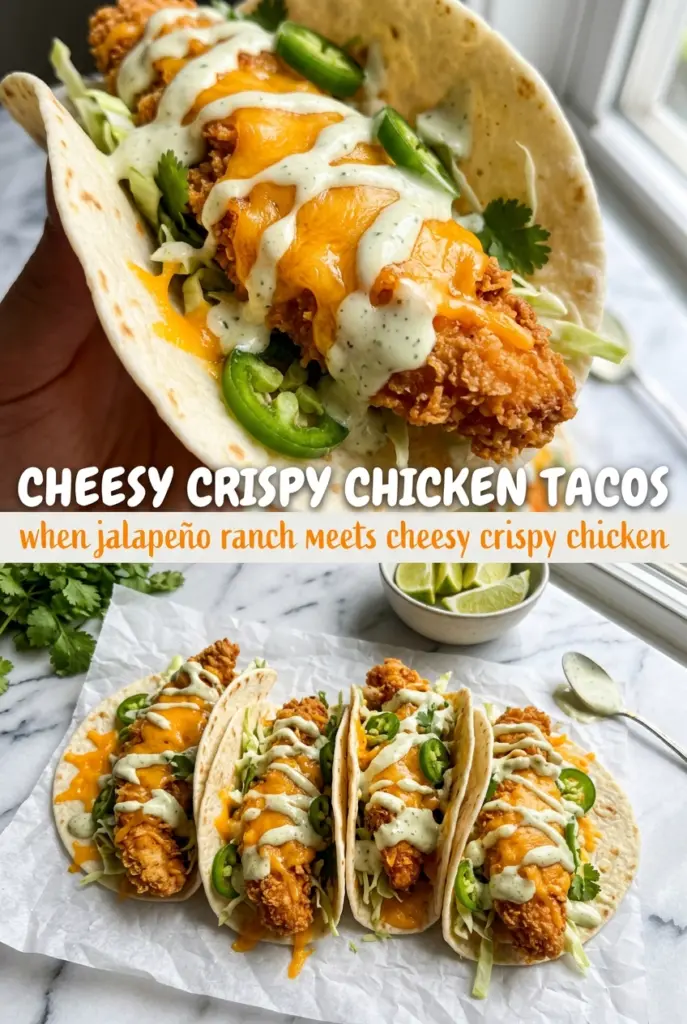
Crispy golden chicken tucked into warm tortillas with a blanket of melted cheese is the kind of taco that disappears before it reaches the table. The outside stays crackly, the center stays juicy, and the cheese does the one job it’s supposed to do here: bind everything together in a stretchy, salty layer that makes each bite hold together.
What makes this version work is the double hit of crunch and melt. The chicken gets dredged in seasoned flour after an egg dip, which gives it a thin, sturdy coating that fries up fast without turning heavy. Then the tacos get a quick turn in a hot skillet after filling, so the cheese melts inside the tortilla instead of sliding out on the plate. That last step is the difference between a taco that looks good and one that eats well.
Below you’ll find the exact frying cues I watch for, the cheese swap that still gives you a good melt, and the small timing trick that keeps the tortillas warm without softening the chicken.
The chicken came out crisp without feeling greasy, and warming the filled tacos in the skillet made the cheese melt right through the middle. My kids were grabbing them before I even got the lettuce on.
Like these cheesy crispy chicken tacos? Save them to Pinterest for the nights when you want crunchy fried chicken, stretchy cheese, and fast assembly.
The Crisp-to-Melt Problem That Makes or Breaks These Tacos
The chicken and cheese need different treatment, and that’s where most tacos like this go sideways. If you pile everything into the tortilla and try to melt it all at once, the cheese grabs the pan before it fully softens and the chicken loses its crunch from trapped steam. The fix is to fry the chicken first, then use just enough cheese inside the taco to glue the filling together without flooding it.
The other thing that matters is heat control. Oil that’s too cool gives you soggy, pale coating; oil that’s too hot browns the outside before the chicken cooks through. A steady 350°F is the sweet spot here, and frying in batches keeps the temperature from crashing when the chicken goes in.
- Frying in batches keeps the coating crisp and the oil hot enough to set the crust before it absorbs grease.
- Hot skillet finish melts the cheese inside the tortilla without overcooking the chicken.
- Small tortilla fill gives you the best texture balance. Overstuffing turns the taco into a mess before the cheese can do its job.
What Each Ingredient Is Actually Doing in These Tacos

- Chicken breasts stay lean and fry up quickly when cut small. Thighs work too, but they bring a richer, juicier bite and a slightly less clean shape inside the taco.
- Flour, garlic powder, and chili powder create the coating that turns golden and seasoned instead of bland. You need the flour here; cornstarch alone gives a lighter crust, but not the same sturdy shell.
- Egg acts as the glue between chicken and flour. Skipping it leaves patchy coverage that flakes off in the oil.
- Oaxaca or mozzarella gives you the stretch that makes this taco worth making. Oaxaca melts a little more smoothly; mozzarella is the easier grocery-store stand-in and still works well.
- Corn tortillas bring better flavor and structure than flour tortillas for this filling. Warm them first so they fold instead of crack.
- Lettuce, onion, cilantro, and lime add freshness after the hot filling goes in. They cut the richness and keep the tacos from tasting heavy.
How to Fry, Fill, and Melt Without Losing the Crunch
Coating the Chicken Evenly
Cut the chicken into bite-sized pieces so it cooks fast and stays tender. Season it first, then move it through the egg and flour so every surface gets a thin, even coating. If the flour looks clumpy or thick like paste, shake off more of the egg before dredging; too much batter turns gummy in the oil.
Frying to a Deep Golden Color
Heat the oil to 350°F and fry the chicken in small batches. You’re looking for a steady hiss when the pieces hit the oil and a deep golden crust that feels firm when you lift a piece out. If the chicken darkens too quickly, the oil is too hot; if it looks pale after several minutes, the oil needs time to come back up.
Building the Tacos for the Best Melt
Warm the tortillas, then add a little cheese first, not just on top of the chicken. That bottom layer helps anchor everything, and the top layer melts into the filling so the taco holds together when you fold it. Press the filled tacos briefly in a hot skillet for a minute or two per side until the cheese goes stretchy and the tortillas pick up a few toasted spots.
Finishing with Fresh Toppings
Add the lettuce, onion, and cilantro after the cheese has melted. If you pile them on before the skillet step, they steam and wilt instead of staying crisp. A squeeze of lime right at the end wakes up the fried coating and cuts through the richness.
How to Adapt These Tacos for Different Kitchens and Different Cravings
Gluten-Free Version
Swap the all-purpose flour for a 1:1 gluten-free flour blend. The coating will still crisp up, though it may brown a little faster, so watch the pan closely near the end of frying. Corn tortillas already fit this version naturally.
Baked or Air-Fried Chicken
If you want to skip deep frying, spray the coated chicken well with oil and bake or air-fry until crisp and cooked through. You’ll lose some of that shattering crust, but you’ll still get a crunchy exterior and a lighter finish. Add a little extra lime at the end to keep the tacos bright.
Spicier Taco Night
Add cayenne or a pinch of smoked paprika to the flour mixture if you want more heat and a deeper color. You can also toss the fried chicken with a little hot sauce before building the tacos, but keep it light so the coating doesn’t soften.
Storage and Reheating
- Refrigerator: Store the fried chicken separately from the tortillas and toppings for up to 3 days. The crust softens a little in the fridge, but it comes back with heat.
- Freezer: The fried chicken freezes well. Cool it completely, freeze in a single layer, then move to a bag or container for up to 2 months. Freeze tortillas and fresh toppings separately.
- Reheating: Reheat the chicken in a hot oven or air fryer until crisp again, then build the tacos fresh. Microwaving is the fastest way to turn the coating limp and the cheese greasy.
Answers to the Questions Worth Asking

Cheesy Crispy Chicken Tacos
Ingredients
Equipment
Method
- Cut boneless chicken breasts into bite-sized pieces, then season with salt and pepper to taste. Keep pieces roughly even so they cook through at the same rate.
- Add all-purpose flour, garlic powder, and chili powder to a shallow dish and whisk to combine. The mixture should look evenly speckled with seasoning.
- Beat eggs, beaten in a separate bowl, then dip each chicken piece in the egg and dredge in the seasoned flour. Keep coating thick enough to cling, and shake off excess.
- Heat vegetable oil for frying in a pot or deep pan to 350°F. Oil is ready when it actively sizzles around a small flour test piece.
- Fry chicken in batches for 6-8 minutes total, turning as needed until deep golden and cooked through. Drain on paper towels until the surface looks dry and crisp.
- Warm corn tortillas briefly until flexible, then place shredded Oaxaca or mozzarella cheese in the center of each. The cheese should form a neat mound that melts in place.
- Add fried chicken on top, then add more cheese and fold tortillas in half. The tacos should look stuffed with cheese at the seam.
- Warm the filled tortillas in a hot cast iron skillet to melt the cheese, about 1-2 minutes per side. When ready, the cheese will stretch at the edges and the tortillas will show light toasted spots.
- Top with shredded lettuce, diced onion, and cilantro, then serve with lime wedges. Serve immediately so the fried coating stays crisp.