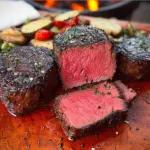
Golden-skinned chicken thighs baked in a garlicky cream sauce hit that sweet spot between cozy and impressive. The skin stays crisp on top while the sauce below turns silky, savory, and just thick enough to coat a spoon. It’s the kind of dinner that feels like you put in a lot more work than you actually did.
The trick is starting with a real sear and building the sauce in the same pan. Those browned bits left behind after the chicken are the backbone of the dish, and they keep the cream sauce from tasting flat. The other part that matters is baking the thighs skin-side up, uncovered, so the skin doesn’t steam and the sauce has time to bubble and tighten around the chicken.
Below, I’ll walk through the little details that keep the sauce smooth and the chicken juicy, plus a few smart swaps if you need to work with what’s in the fridge.
The skin stayed crisp even after baking, and the sauce thickened up into the creamiest garlic gravy around the chicken. I served it with rice, and my husband scraped the pan clean.
Save these creamy oven baked chicken thighs for the night you want crispy skin, a garlicky sauce, and one pan to wash.
The Secret to Crispy Skin in a Cream Sauce
The biggest mistake with creamy baked chicken thighs is putting raw chicken straight into the sauce and hoping the oven will sort it out. It won’t. Skin-on thighs need a hard sear first so the fat renders and the skin has a chance to crisp before the cream goes anywhere near the pan.
That sear also gives the sauce depth. When you deglaze the skillet, the broth loosens all those browned bits from the bottom, and that’s where the flavor lives. If the pan still looks pale before the cream goes in, the finished sauce will taste one-note. A good sear gives you a richer sauce and better texture on top of the chicken.
- Skin-on, bone-in chicken thighs — These stay juicy in the oven and handle the sear better than boneless pieces. Boneless thighs will work in a pinch, but they cook faster and won’t give you the same crispy top or as much flavor in the pan.
- Heavy cream — This is what gives the sauce body without breaking in the oven. Half-and-half can work, but it will be thinner and a little less stable once the cheese melts in.
- Parmesan cheese — Use finely grated Parmesan, not a coarse snowy pile that takes forever to melt. The cheese helps thicken the sauce and adds saltiness, so taste before adding extra at the end.
- Chicken broth — A small amount is enough to deglaze and keep the sauce from turning overly rich. Water will technically work, but you’ll lose the savory backbone that makes the sauce taste finished.
- Garlic and dried herbs — Fresh garlic gives the sauce its sharp base note, while the Italian seasoning and thyme keep it from tasting heavy. If your garlic is very finely minced, watch it closely so it doesn’t brown too fast in the skillet.
What Each Ingredient Is Actually Doing in This Chicken Casserole

- Chicken (the protein foundation) — Cut into uniform pieces or use breasts. Don’t overcook or it becomes dry.
- Sauce or cream (the moisture keeper) — This prevents chicken from drying. Balance richness with acid.
- Base ingredient (rice, pasta, or vegetables) — This provides substance. Choose what works with your sauce.
- Cheese (optional melting finish) — Layer some inside and top with more. Creates golden, bubbly top.
- Seasonings (salt, pepper, garlic, herbs) — Build flavor boldly. Taste before baking and adjust.
- Vegetables (if using) — Add by cooking time so everything finishes together. Softer vegetables last.
- Baking temperature (350-375°F) — This cooks chicken through without drying edges. Use thermometer for 165°F.
- Resting time (5-10 minutes) — This lets casserole set so it slices cleanly. Don’t cut too early.
Building the Sauce Without Losing the Skin
Sear the Chicken First
Heat the oil in a large oven-safe skillet until it shimmers, then place the thighs skin-side down and leave them alone for 6 to 7 minutes. You want deep golden skin that releases cleanly from the pan; if it sticks, it needs another minute. Flip and give the second side a short sear, just enough to add color without cooking the thighs through.
Make the Pan Do the Work
Remove the chicken and cook the garlic just until fragrant, about a minute. Pour in the broth and scrape the bottom of the pan with a wooden spoon so the browned bits dissolve into the liquid. That step matters because the sauce should start with a savory base, not just cream and cheese sitting in a pan.
Finish the Cream Sauce
Stir in the cream, Parmesan, Italian seasoning, and thyme, then let the sauce come together before the chicken goes back in. Keep the heat at medium or lower; if the pan is ripping hot, the dairy can separate or turn grainy. The sauce should look smooth and lightly thickened before the thighs are nestled back in.
Bake Until Bubbling and Set
Set the chicken skin-side up in the sauce and bake uncovered until the thighs reach 165°F and the sauce bubbles around the edges. Uncovered baking is what keeps the skin from softening. If the sauce looks loose when the chicken is done, give it a few extra minutes in the oven so it tightens slightly as it cools.
How to Adapt This for the Chicken You Have on Hand
Boneless Thighs for Faster Cooking
Boneless thighs cook faster, so start checking them early and pull them as soon as they hit 165°F. You’ll lose some of the built-in richness from the bones and the skin won’t stay as crisp, but the sauce still works well.
Dairy-Free Without a Broken Sauce
Use unsweetened coconut cream or a plain dairy-free cooking cream and skip the Parmesan, then add a little extra salt and a splash of lemon at the end for balance. The texture will be a little different, but you’ll still get a creamy pan sauce that clings to the chicken.
Gluten-Free as Written
This dish is naturally gluten-free as long as your broth and Parmesan are certified gluten-free. The cooking method doesn’t need any flour, which is part of why the sauce stays silky instead of pasty.
Doubling for a Bigger Pan Dinner
You can double the recipe if you use a large enough skillet or a deep baking dish with space between the thighs. Crowding traps steam, which softens the skin and keeps the sauce from reducing properly.
Storage and Reheating
- Refrigerator: Store leftovers in an airtight container for up to 4 days. The sauce thickens as it chills, and the skin will soften, but the flavor holds up well.
- Freezer: It freezes, but the cream sauce can separate a little on thawing. If you do freeze it, cool it completely first and reheat gently so the sauce has the best chance of coming back together.
- Reheating: Warm it covered in a 325°F oven until hot, or reheat slowly on the stove over low heat with a splash of broth or cream. High heat is what turns the sauce oily and can dry out the chicken before the center is warmed through.
Questions I Get Asked About This Recipe

Creamy Oven Baked Chicken Thighs
Ingredients
Equipment
Method
- Preheat oven to 400°F, then season chicken thighs generously on all sides with salt, pepper, garlic powder, smoked paprika, and Italian seasoning.
- Arrange the seasoned chicken thighs so they’re ready to sear immediately, keeping the skin dry for crisping.
- Heat olive oil in a large oven-safe skillet over medium-high heat, then sear chicken skin-side down for 6-7 minutes until the skin is deeply golden and crisp.
- Flip the thighs and sear for 3 more minutes, using the browned surface as your cue, then remove to a plate.
- In the same pan, cook garlic for 1 minute until fragrant.
- Add chicken broth and deglaze, scraping up browned bits from the bottom of the pan.
- Stir in heavy cream, Parmesan cheese, dried Italian seasoning, and dried thyme until the mixture looks smooth and uniform.
- Nestle chicken thighs skin-side up into the cream sauce so the sauce comes up around the sides without fully covering the skin.
- Bake uncovered for 25-28 minutes at 400°F until internal temperature reaches 165°F and the sauce is thickened and bubbly, with golden skin on top as the cue.
- Garnish with fresh parsley and serve while the sauce is still hot and actively simmering at the edges.