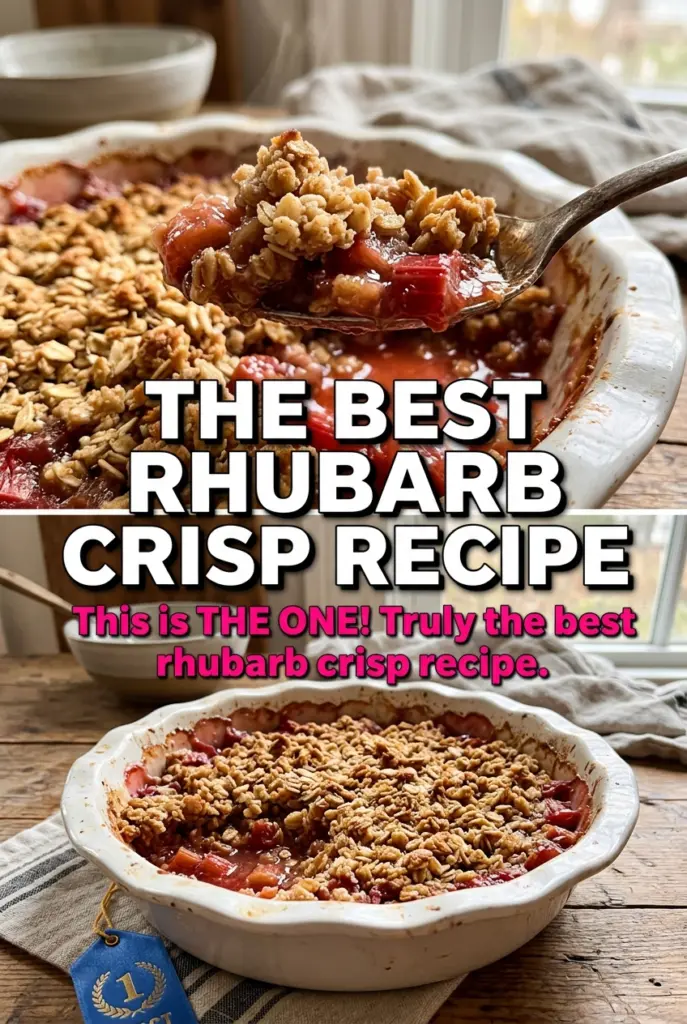
Thick, buttery oat topping and tender sweet-tart rhubarb are what make a rhubarb crisp worth baking on repeat. The best version doesn’t slump into a syrupy fruit puddle or bake up with a dry, sandy topping. It lands in the sweet spot: bubbling fruit underneath, a golden crust on top, and just enough tartness left in the filling to keep each bite lively.
The trick is treating the rhubarb like the wet ingredient it is. Sugar draws out the juices fast, and a little flour gives those juices enough body to cling to the fruit instead of running all over the pan. On the topping side, melted butter does the heavy lifting here because it coats the oats and flour evenly, which gives you those craggy, toasted bits instead of a loose streusel that never quite browns.
Below, I’ll show you why the filling needs that short rest after baking and how to keep the topping crisp even after it cools. There’s also a note on swapping in frozen rhubarb without ending up with a soupy dessert.
The topping baked up crisp instead of greasy, and the rhubarb held its shape with just the right amount of juice underneath. I served it warm with vanilla ice cream and the pan was gone in minutes.
Love that golden oat topping and tart rhubarb contrast? Save this rhubarb crisp for the first warm nights when you want dessert bubbling and crisp from the oven.
The Fix for a Watery Rhubarb Filling
Rhubarb gives off a lot of juice as it bakes, and that’s where most crisp recipes go sideways. If the filling turns soupy, it’s usually because there wasn’t enough thickener or the dish came out before the center had time to bubble hard enough for the flour to do its job. You want the filling actively boiling at the edges and in the middle, not just looking hot. That bubbling is what turns the juices glossy instead of thin.
The other thing that matters is the fruit size. Cut the rhubarb into even 1/2-inch pieces so it softens at the same rate. Big chunks stay tough, and tiny pieces collapse before the topping is finished. Even cuts give you that tender, spoonable filling without turning it into jam.
What the Oats, Flour, and Melted Butter Are Each Doing
- Fresh rhubarb — Fresh stalks hold their shape better and give you that clean tart bite. Frozen rhubarb works, but it releases more liquid, so don’t thaw it first or you’ll lose control of the filling.
- All-purpose flour — This appears in both the filling and the topping for a reason. In the filling, it thickens the juices; in the topping, it gives the oats structure so they bake into clusters instead of staying loose.
- Old-fashioned oats — Use rolled oats, not quick oats. Quick oats absorb faster and bake up softer, which makes the topping pasty instead of crisp.
- Melted butter — Melted butter coats the dry ingredients evenly and helps the topping brown into a single cohesive layer. If you use softened butter and underwork it, you’ll get dry patches that never toast the same way.
- Brown sugar — Brown sugar adds depth and helps the topping caramelize. Light or dark both work; dark gives a deeper molasses note if you like that edge.
Building the Crisp So the Topping Stays Crunchy
Coating the Rhubarb
Toss the rhubarb with sugar, flour, and vanilla until every piece looks lightly coated. The mixture will look a little wet after a minute, and that’s normal — the sugar starts pulling moisture out fast. Spread it in the dish right away so the juices don’t pool in one corner while you work on the topping.
Mixing the Topping
Stir the oats, flour, brown sugar, melted butter, cinnamon, and nutmeg until no dry flour pockets remain. The mixture should look damp and clumpy, not like wet sand. If it seems greasy, you added the butter too fast or the dry ingredients weren’t fully combined, and the final topping can bake up uneven instead of crisp.
Baking to the Right Bubble
Slide the dish into the oven and bake until the topping is deep golden and the filling is bubbling hard across the center. Don’t pull it when the edges look done if the middle is still quiet; that usually means the fruit hasn’t thickened enough yet. The 10-minute rest matters because the juices settle and thicken a bit as the crisp cools, which keeps the first serving from flooding the bowl.
How to Adapt This Rhubarb Crisp for Different Kitchens
Use frozen rhubarb without thawing
Frozen rhubarb works, but it brings extra water with it. Keep it frozen when you toss it with the sugar and flour, and bake the crisp a few minutes longer if needed so the center gets fully bubbling before you take it out.
Make it gluten-free
Use a 1:1 gluten-free flour blend in both the filling and topping, and check that your oats are certified gluten-free. The texture stays close to the original, though the topping may be a touch more delicate when it cools.
Make it dairy-free
Swap the butter for a plant-based baking stick with a similar fat content. Coconut oil can work in a pinch, but it changes the flavor and can make the topping a little more fragile once it cools.
Add strawberries for a sweeter filling
Fold in sliced strawberries for up to half the rhubarb. The crisp becomes less sharp and more jammy, and you may need a little less sugar because strawberries soften the tart edge on their own.
Storage and Reheating
- Refrigerator: Keep covered for up to 4 days. The topping softens as it sits, but the flavor stays good.
- Freezer: Bake first, cool completely, then wrap tightly. Freeze for up to 2 months and thaw in the refrigerator before reheating. Unbaked crisp tends to turn watery.
- Reheating: Warm in a 325°F oven until the filling is hot and the topping firms back up, about 15 to 20 minutes. The oven keeps the oats crisp; the microwave makes the topping limp.
Answers to the Questions Worth Asking

Irresistible Rhubarb Crisp
Ingredients
Equipment
Method
- Preheat the oven to 375°F and butter a 9x13-inch baking dish, ensuring the surface is lightly coated. This helps the rhubarb crisp release cleanly after baking.
- Toss the fresh rhubarb with sugar, flour, and vanilla extract, then spread the mixture evenly in the prepared dish. Look for the rhubarb to be evenly coated with the sweet-tart slurry.
- Combine old-fashioned oats, all-purpose flour, brown sugar, melted butter, cinnamon, and nutmeg, stirring until well mixed. The topping should look evenly speckled and clump slightly from the butter.
- Spread the topping evenly over the rhubarb mixture so it forms a thick, golden layer. Press lightly if needed so it sits over the filling rather than sliding.
- Bake at 375°F for 40-45 minutes until the topping is deep golden and the filling is bubbling vigorously. Watch for active bubbling at the edges and a browned oat layer on top.
- Let the crisp cool for 10 minutes before serving warm with vanilla ice cream. This brief rest sets the juices so each scoop holds together.