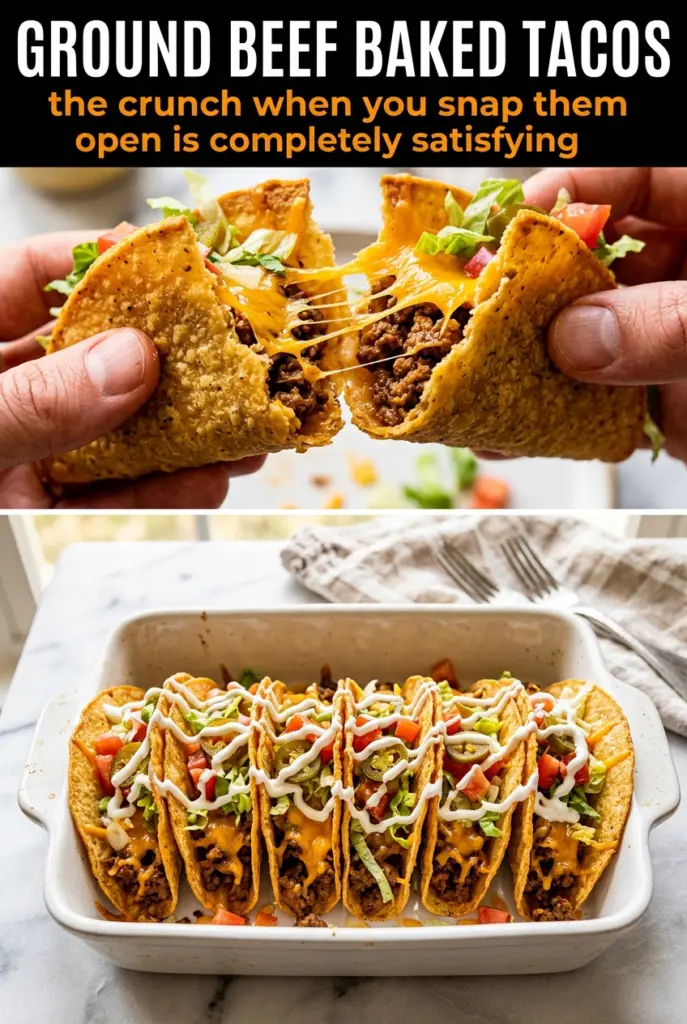
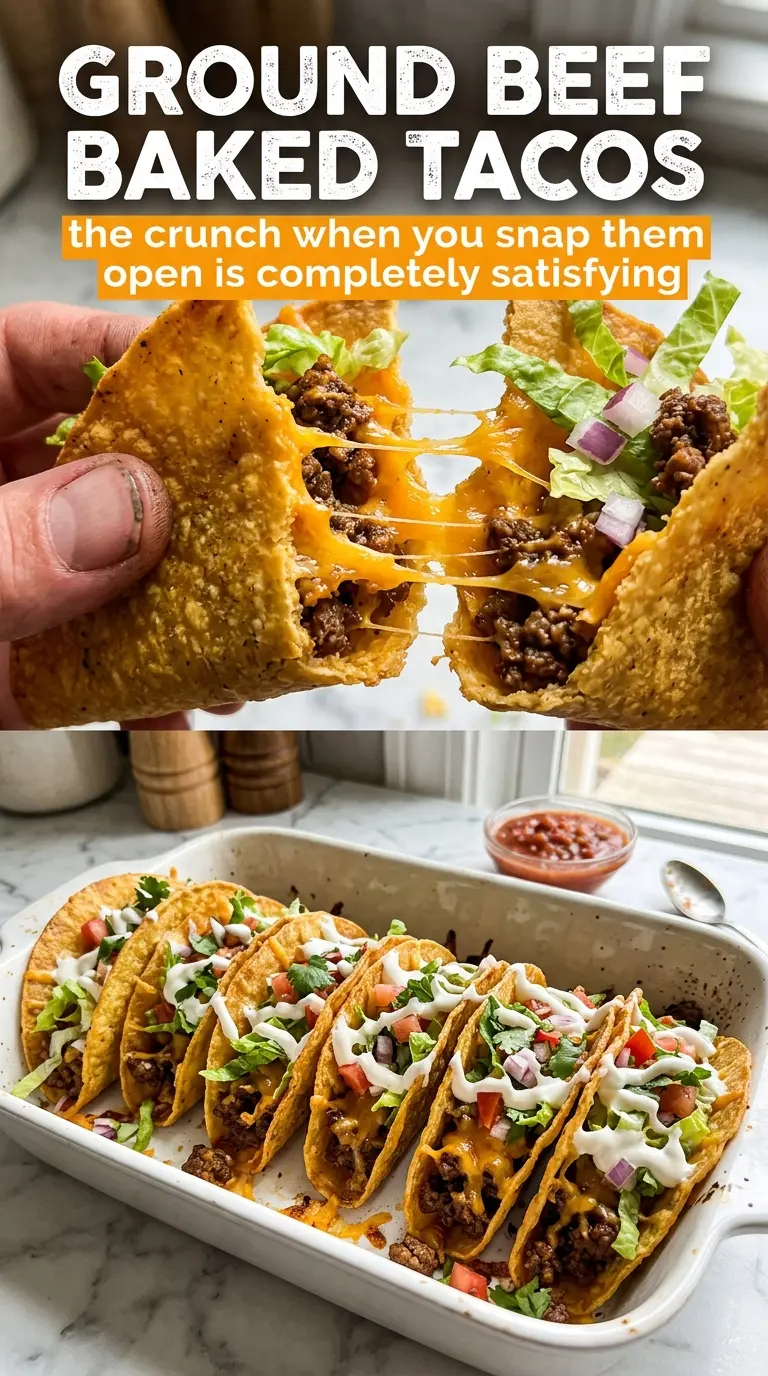
Crispy baked taco shells filled with seasoned ground beef and finished with melted cheddar turn a simple taco night into something that feels a little more put-together without adding much work. The oven does the final heavy lifting here: the shells stay crisp, the cheese melts over the beef, and you get those neat, upright tacos that hold up better than the usual skillet-and-serve setup.
The key is keeping the beef saucy but not wet. The seasoning needs a short simmer with just enough water to cling to the meat, otherwise the filling ends up dry or, worse, leaks into the shells and softens them before they ever hit the table. A baking dish that keeps the shells snug makes a big difference too, since that support helps them stay upright while the cheese melts.
Below, I’ve included the little things that matter most: how to keep the shells crisp, what to do if your taco seasoning is salty, and a couple of easy ways to adapt the filling for different diets or what’s already in your fridge.
The beef stayed juicy, the shells crisped up in the oven, and the cheese melted right over the top without making everything soggy. I used a glass baking dish and they held their shape perfectly.
Save these baked ground beef tacos for the nights when you want crispy shells, melty cheese, and an easy oven finish.
The Part That Keeps the Shells Crisp Instead of Soggy
The mistake most people make with baked tacos is overfilling them with wet beef and then wondering why the shells soften before dinner hits the table. The fix is simple: cook the beef until the seasoning clings and the pan looks nearly dry before it goes into the shells. You want the meat saucy, not loose.
The other piece that matters is support. Hard shells need to stand tightly packed in a baking dish so they don’t slump and spill once the cheese starts to melt. If there’s too much space between them, they tip, the filling shifts, and the cheese lands in the pan instead of staying on the taco where it belongs.
What Each Ingredient Is Doing in These Tacos
- Ground beef — Use a good 80/20 or 85/15 blend if you can. It brings enough fat for flavor without turning greasy, and it holds onto the seasoning better than extra-lean beef. If you use leaner beef, drain carefully and don’t skip the water in the seasoning step or the filling will taste dry.
- Taco seasoning — This is the backbone of the filling, so use a blend you like the taste of on its own. If your packet runs salty, use a little less than the full amount and add a pinch of cumin or chili powder to round it out. Homemade seasoning works too as long as it’s balanced and not too dusty.
- Water — It looks minor, but it helps the seasoning dissolve and coat every crumble instead of sitting in clumps. The goal is a glossy, lightly sauced filling that settles into the shells without flooding them. Let it simmer long enough to reduce; that’s what keeps the tacos from getting soggy.
- Hard taco shells — The sturdy store-bought shells are exactly right here because they bake back to extra crispness in the oven. Don’t swap in soft tortillas and expect the same result. If the shells crack easily in the package, line the baking dish tightly so they get support from one another.
- Cheddar cheese — Shredding your own gives the smoothest melt, but pre-shredded works fine when convenience wins. Cheddar adds the right salty pull and helps seal the beef in place while the tacos bake. A mild or medium cheddar melts more cleanly than very sharp cheese.
Getting the Beef, Shells, and Cheese to Finish at the Same Time
Brown the beef until it’s crumbly and dry at the edges
Cook the beef over medium-high heat and break it into small crumbles as it browns. You’re looking for no pink left and just a little browning on the edges, because that gives the filling better flavor before the seasoning goes in. If there’s a lot of grease in the pan, drain it off before you add anything else or the tacos can turn oily.
Season it just enough to coat, then reduce the liquid
Stir in the taco seasoning and water and let it simmer for 2 to 3 minutes. The mixture should look glossy and thick, not soupy. If the pan still has a pool of liquid, keep it on the heat for another minute or two; the extra moisture is what makes shells soften too early.
Pack the shells so they bake upright
Set the taco shells standing in a baking dish close enough that they support one another. Spoon the beef into each shell without overstuffing it to the point where the sides bow outward. A snug fit matters here because the shells are fragile once filled, and the cheese needs a stable surface to melt evenly.
Bake just long enough to melt, not long enough to dry out
Top with cheddar and bake at 350°F for 10 to 12 minutes, until the cheese is melted and the shells smell toasted. Don’t keep them in the oven until the beef starts to dry out; the filling is already cooked, and the goal is to finish the texture, not cook it further. Add the tomatoes, lettuce, sour cream, and jalapeño after baking so they stay fresh and don’t steam the shells.
How to Adapt These Baked Tacos Without Losing What Makes Them Work
Ground Turkey Instead of Beef
Ground turkey works well if you want something lighter, but it needs a little help with flavor and moisture. Use the same seasoning, then add a tablespoon of oil when browning if the pan looks dry. Turkey can taste flat if it’s overcooked, so pull it off the heat as soon as it’s no longer pink and the seasoning has tightened into the meat.
Dairy-Free Topping Swap
Skip the cheddar and sour cream and use a dairy-free shredded cheese that melts well, plus a spoonful of guacamole or dairy-free crema at the table. The tacos will still bake up crisp, but the topping won’t form quite the same melty layer over the beef. Choose a brand that actually softens in the oven instead of staying rubbery.
Extra Veggies in the Filling
Finely diced onions or bell peppers can go into the skillet with the beef if you want more texture. Cook them until they soften before adding the seasoning so they don’t release extra water in the shells. Larger vegetable pieces make the tacos harder to fill neatly, so chop small.
Make-Ahead Taco Night
Cook the beef ahead of time and store it separately from the shells and toppings. When you’re ready to eat, rewarm the beef, fill the tacos, and bake them fresh so the shells stay crisp. Assembled tacos held too long in the fridge will soften, and there’s no real way to bring that crunch back.
Storage and Reheating
- Refrigerator: Store leftover filling and toppings separately for up to 3 days. Fully assembled tacos lose their crunch fast.
- Freezer: The beef filling freezes well for up to 2 months. Don’t freeze assembled tacos; the shells turn soft and the lettuce and sour cream don’t recover.
- Reheating: Reheat the beef in a skillet or microwave until hot, then rebuild the tacos and bake them fresh. If you reheat already assembled tacos, the shells soften before the cheese gets back to the right melt.
Answers to the Questions Worth Asking

Ground Beef Baked Tacos
Ingredients
Equipment
Method
- Preheat oven to 350°F. Set up a baking dish so you can arrange the taco shells upright right after filling them.
- Brown ground beef in a skillet over medium-high heat, breaking it into crumbles as it cooks. Drain excess fat when no longer pink.
- Add taco seasoning and water to the beef, stirring to combine. Simmer for 2-3 minutes until thickened and evenly coated.
- Arrange taco shells in a baking dish, standing them upright. Divide seasoned beef among the shells, filling each to about the same level.
- Sprinkle shredded cheddar cheese over each taco. Bake for 10-12 minutes until shells are crispy and cheese is melted, with a clear golden set on top.
- Top each taco with diced tomatoes. Keep them piled while the cheese is still hot.
- Top each taco with shredded lettuce. Add it lightly so it stays crisp.
- Add a dollop of sour cream to each taco. Let it sit just long enough to soften at the edges.
- Finish with diced jalapeño on top of each taco. Serve salsa on the side so everyone can adjust the heat.