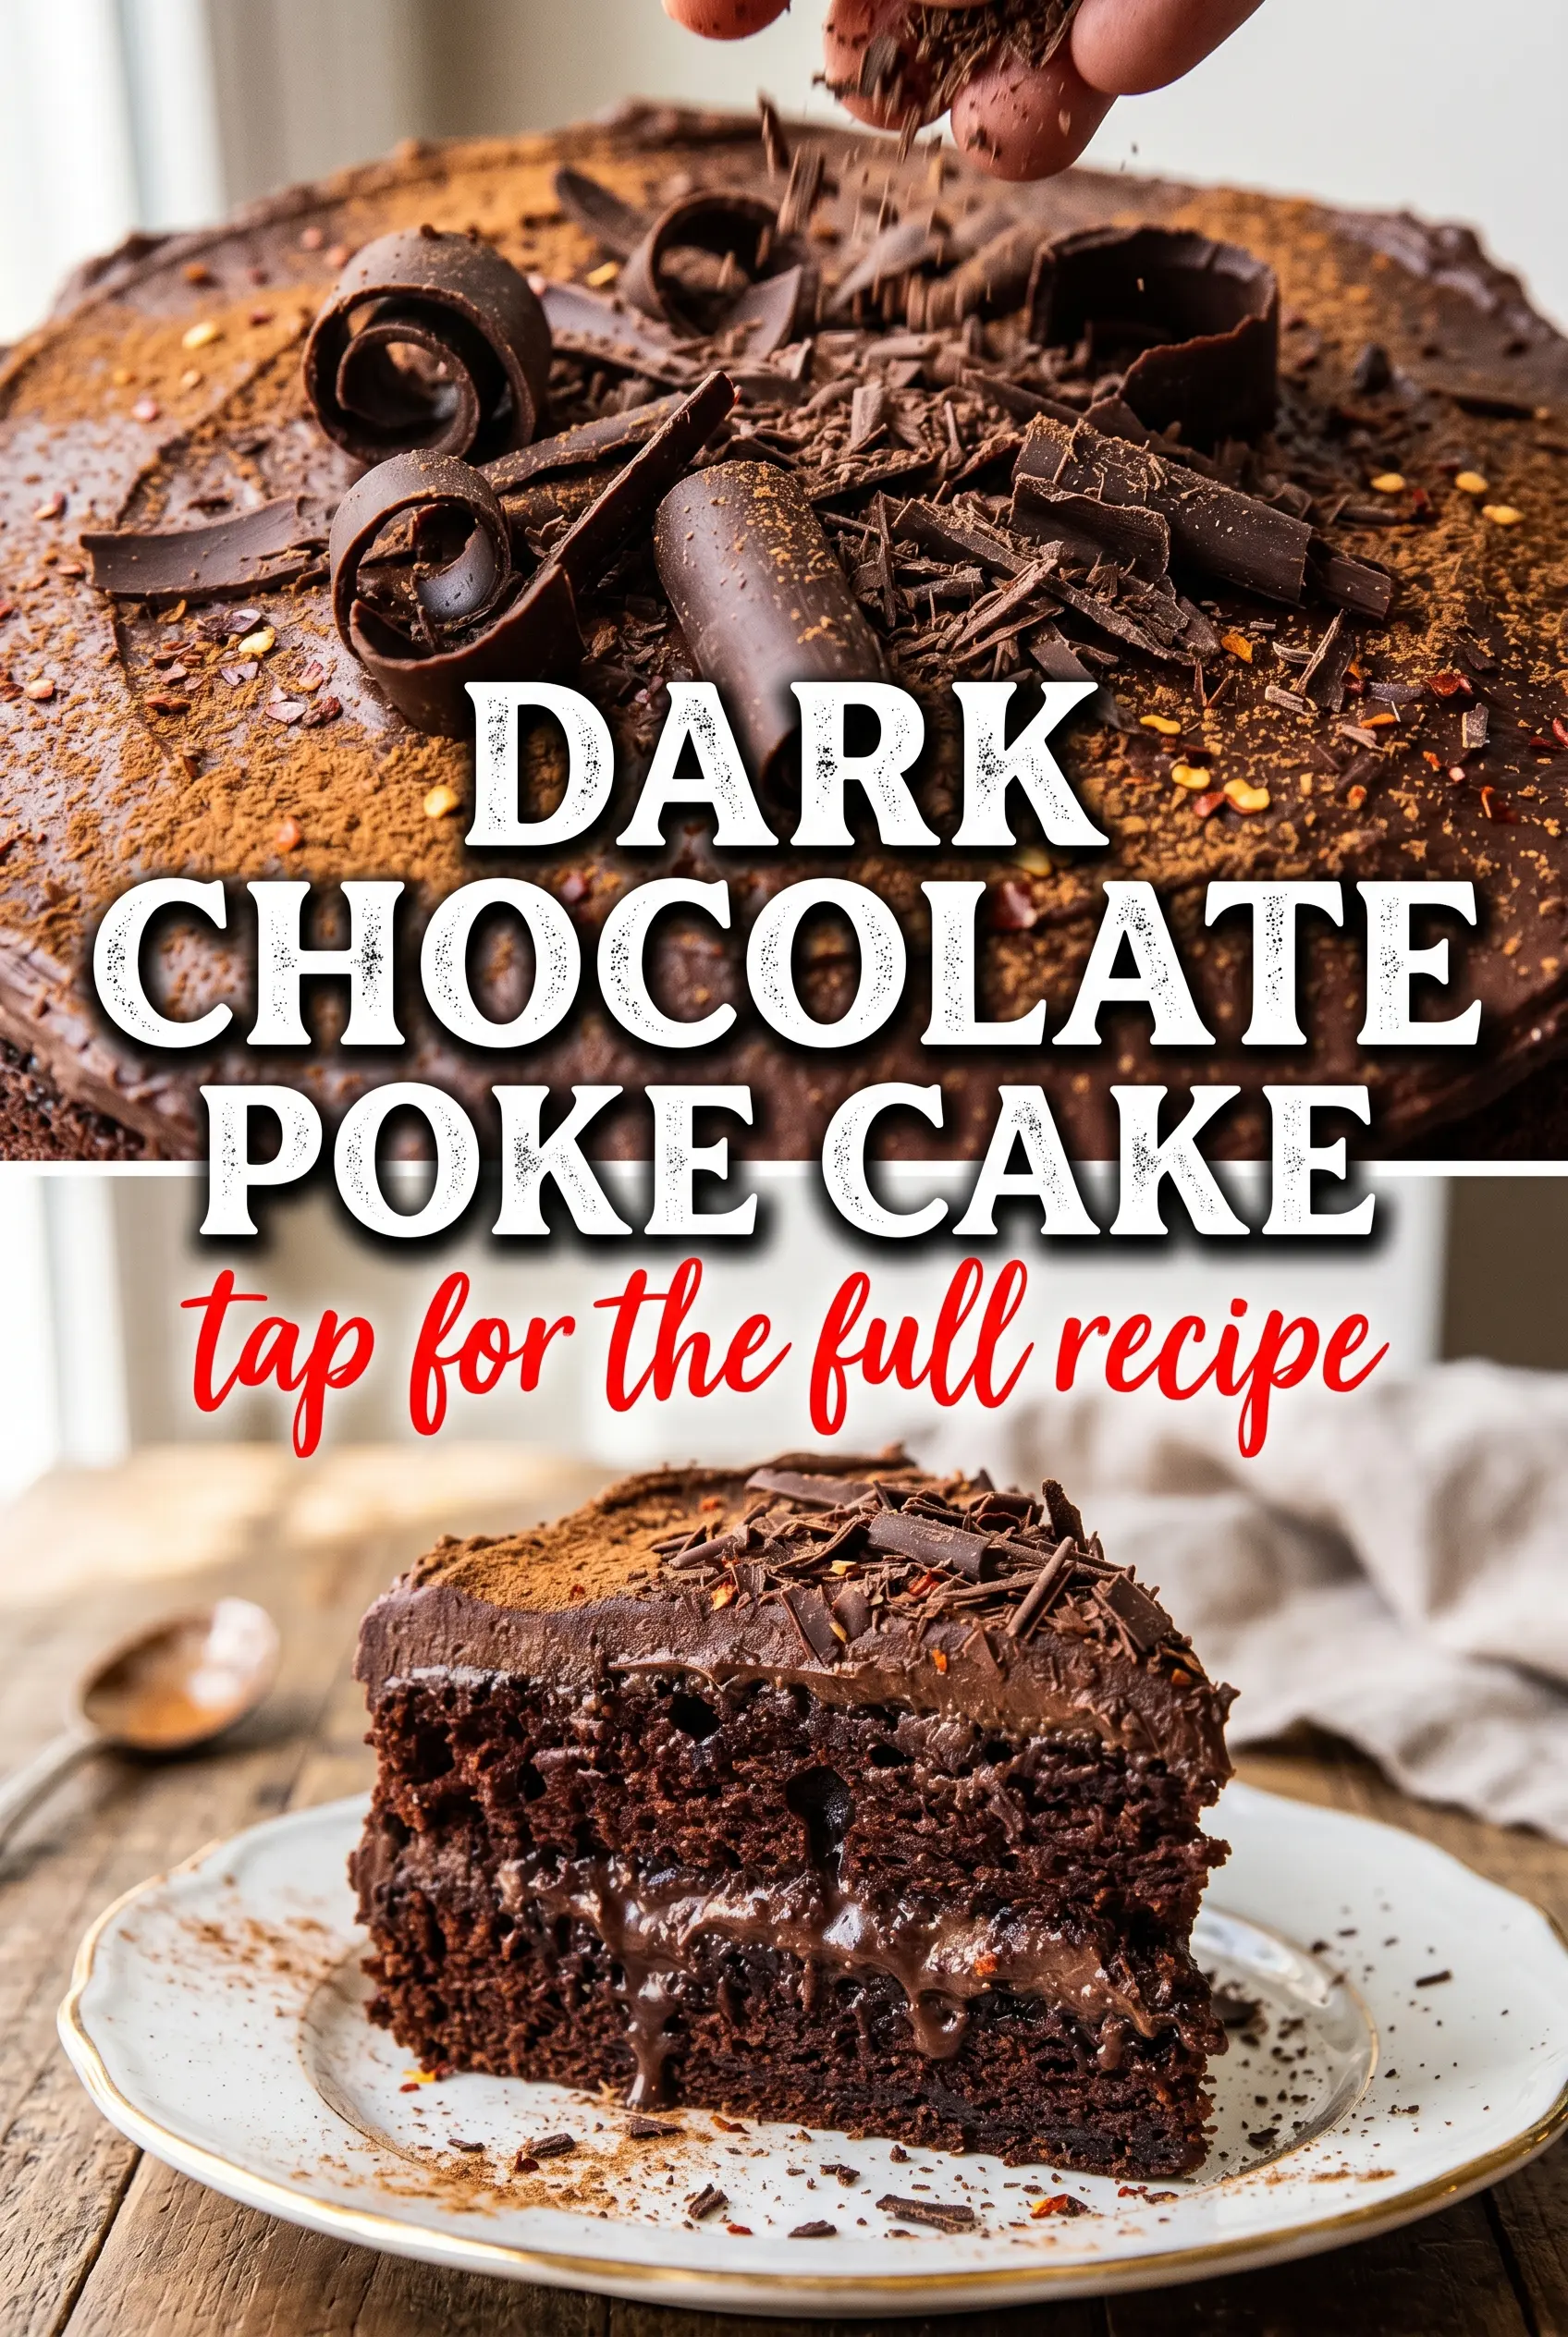
Moist chocolate cake, a warm cinnamon edge, and just enough cayenne to wake up the chocolate make this poke cake the kind of dessert people remember after the plate is empty. The sweetened condensed milk soaks into every fork-poked hole, so the crumb stays rich and tender without turning soggy. Then the whipped cream cools everything down and lets the chocolate finish linger instead of vanish in one sugary bite.
The trick here is balance. Strong coffee deepens the cocoa without making the cake taste like coffee, and the buttermilk keeps the crumb soft while the oil holds moisture for days. The cinnamon and cayenne don’t read as “spicy” in the sharp sense; they round out the chocolate and give it a little heat on the finish. That combination is what makes this version stand out from a standard poke cake.
Below you’ll find the one step that matters most for getting the soak to disappear into the cake instead of pooling on top, plus a couple of useful variations if you want to dial the heat up or keep the cake dairy-free.
The cake stayed unbelievably moist after the condensed milk soak, and the cinnamon-cayenne finish gave the chocolate a deep, warm flavor without making it spicy. My family kept going back for thinner slices until the pan was gone.
Save this Mexican Chocolate Poke Cake for the nights when you want deep cocoa flavor, a little cinnamon heat, and a glossy chocolate soak that stays moist for days.
The Soak Needs a Warm Cake, Not a Hot One
Poke cakes fail when the soak is added at the wrong moment. If the cake is too hot, the condensed milk mixture runs straight to the bottom and leaves the top uneven. If it’s fully cool, the holes don’t accept the liquid as well and the center can stay drier than the edges. Warm cake is the sweet spot: the crumb is set, but it still opens enough to drink in the chocolate mixture.
The fork holes matter too. Go all the way across the cake, not just in a neat grid down the center. You want enough openings that the soak can spread into every slice, especially near the corners where cakes tend to dry out first.
What Each Ingredient Is Actually Doing in This Cake
- Strong brewed coffee — This doesn’t make the cake taste like coffee. It sharpens the cocoa and gives the chocolate a darker, fuller flavor. If you don’t want to use coffee, hot water works, but the cake loses some depth.
- Buttermilk — The acid helps the baking soda do its job, which gives the cake lift and keeps the crumb soft. Regular milk won’t give the same tenderness unless you add a little vinegar or lemon juice to mimic the acid.
- Cinnamon and cayenne — These are what make this feel like Mexican chocolate instead of plain chocolate cake. The cinnamon brings warmth, while the cayenne adds a small, clean heat at the end. Keep the cayenne modest unless you want the spice to be obvious.
- Sweetened condensed milk — This is the soak that carries the moisture all the way through the cake. It’s thicker and sweeter than a standard syrup, which is why it settles into the holes instead of leaking out. Don’t swap in evaporated milk here; it won’t give you the same texture or sweetness.
- Whipped cream — The cool topping balances the rich base and keeps each slice from feeling heavy. Stabilized whipped cream holds up better if the cake needs to sit for a few hours before serving.
Building the Cake So the Center Stays Tender
Mix the dry ingredients first
Whisk the flour, sugar, cocoa, baking soda, baking powder, salt, cinnamon, and cayenne until the color looks even throughout. Cocoa and spice tend to clump in the corners of the bowl, and those clumps show up as bitter or spicy pockets in the finished cake. A thorough whisk here gives you a more even crumb and a cleaner chocolate flavor.
Add the wet ingredients without overworking the batter
Beat the eggs, coffee, oil, buttermilk, and vanilla together, then fold them into the dry ingredients just until the flour disappears. The batter will look loose, and that’s exactly what you want for a tender cake. If you keep stirring once the batter is combined, the cake can turn dense instead of soft and plush.
Bake until the center springs back
Pour the batter into a greased 9×13-inch pan and bake until a toothpick comes out clean and the center feels set when lightly pressed. Start checking at 30 minutes, because the difference between done and dry is only a few minutes in a cake like this. A clean toothpick matters more than a dark top, since cocoa cakes can look finished before the middle is ready.
Soak while the cake is warm
Pierce the cake all over with a fork while it’s still warm, then pour the condensed milk and chocolate syrup mixture evenly across the surface. The top may look flooded for a minute, but the liquid will sink in as the cake rests. If the soak pools in one corner, use the back of a spoon to nudge it toward the drier spots.
Finish after the cake cools completely
Let the cake cool all the way before adding whipped cream and chocolate shavings. If the cake is even slightly warm, the topping softens and slides instead of holding its shape. A chilled finish gives cleaner slices and keeps the whipped cream from melting into the glaze.
How to Make This Cake Work for Different Crowds
Turn Up the Spice
Add an extra 1/8 teaspoon cayenne if you want the heat to register more clearly after the chocolate. The cake will still taste balanced, but the finish will be sharper and a little more lingering. Don’t jump too far past that unless you want the spice to compete with the cocoa.
Keep It Dairy-Free
Use a dairy-free whipped topping and swap the buttermilk for a plant milk plus 1 tablespoon vinegar or lemon juice. The texture stays soft, though the cake loses a little of the tang that buttermilk brings. Sweetened condensed coconut milk can work for the soak if you want a fully dairy-free version.
Make It a Little Less Sweet
Use unsweetened whipped cream and cut the chocolate syrup in the soak by 2 tablespoons. The cake will still be rich and moist, but the chocolate flavor will read a little darker and less candy-like. This is the version I make when the cake is going on a dessert table with several other sweet dishes.
Storage and Reheating
- Refrigerator: Store covered for up to 4 days. The cake stays moist, and the chocolate soak actually settles in more by day two.
- Freezer: Freeze the cake without the whipped cream for up to 2 months. Wrap individual slices tightly so the topping doesn’t get smudged if you plan to frost after thawing.
- Reheating: This cake is best served chilled or at cool room temperature, not reheated. If you want to take the chill off a slice, let it sit on the counter for 20 to 30 minutes instead of microwaving it, which can make the whipped cream collapse and the crumb greasy.
Answers to the Questions Worth Asking
Mexican Chocolate Poke Cake
Ingredients
Equipment
Method
- Preheat oven to 350°F and grease a 9x13 inch baking pan with a thin, even coat so the cake releases cleanly. Set the pan aside while you mix.
- Whisk together all-purpose flour, granulated sugar, unsweetened cocoa powder, baking soda, baking powder, salt, cinnamon, and cayenne pepper until the cocoa looks evenly distributed with no dark streaks.
- Beat together eggs, cooled strong brewed coffee, vegetable oil, buttermilk, and vanilla extract until smooth and uniform in color.
- Fold the wet mixture into the dry ingredients until just combined, stopping as soon as you no longer see dry flour for a tender crumb.
- Pour the batter into the prepared 9x13 pan, then bake at 350°F for 30-35 minutes until a toothpick comes out clean in the center.
- While the cake is still warm, pierce all over with a fork so steam channels form and the glaze can soak in.
- Combine sweetened condensed milk and chocolate syrup, then pour evenly over the warm cake so the top becomes glossy and drippy.
- Let cool completely, then refrigerate for 30 minutes so the glaze sets and slices cleanly.
- Spread whipped cream over the chilled cake and top with chocolate shavings so the surface looks finished and speckled with cocoa.
- Slice and serve, aiming for moist, sauce-soaked layers visible on the plate with the chocolate drip.