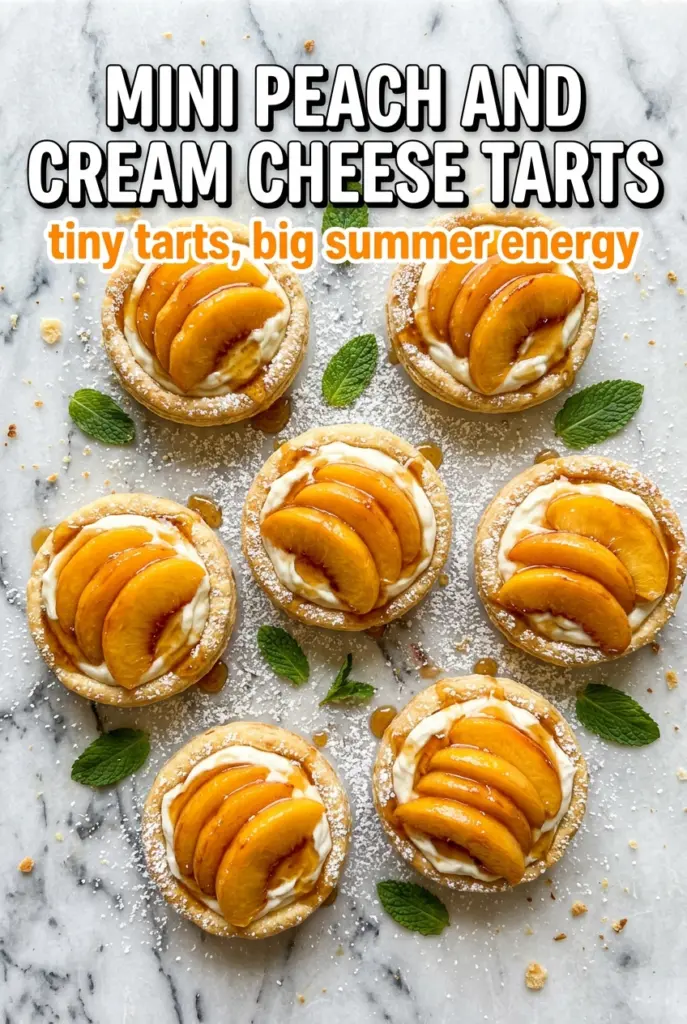
Golden tart shells filled with a smooth cream cheese base and crowned with fresh peach slices disappear fast because they hit every texture at once: crisp, creamy, juicy, and just sweet enough. The glossy jam glaze keeps the peaches looking fresh while adding a thin layer of fruit flavor that makes each bite taste finished, not fussy.
What makes these work is balance. The filling is thick enough to pipe cleanly and hold its shape, which matters when you’re making two dozen bite-sized desserts. A little sour cream loosens the cream cheese without turning it runny, and the peaches get sliced thin so they sit neatly on top instead of sliding around. Warm jam brushed over the fruit gives the tartlets that bakery-case shine without needing gelatin or a separate glaze.
Below you’ll find the small details that keep the shells crisp, the filling smooth, and the peaches looking their best until serving time. There’s also a simple swap for the shell and a few make-ahead notes that save these from getting soggy.
The filling piped in perfectly and stayed fluffy, and the peach glaze kept the slices looking fresh for the whole party. I made them in the morning and the shells still had a nice crunch by dessert.
Keep these mini peach and cream cheese tarts on hand for a dessert that looks polished, slices cleanly, and comes together with almost no baking.
The Secret to Keeping the Shells Crisp Under the Cream Cheese
These tarts live or die on texture. The biggest mistake is filling the shells too far ahead of time and letting moisture from the cream cheese soften the pastry before serving. A crisp shell needs a barrier between the crust and the filling, and in this recipe that barrier is timing: cool shells completely, pipe the filling, then top and glaze close to serving time.
The filling itself should be thick and pipeable, not loose like frosting. If it looks shiny and slack in the bowl, it will slump in the shell and lose that neat bakery-style shape. Beat it just until smooth and fluffy, then stop. Overmixing can make it airy in the wrong way and loosen the structure.
What Each Ingredient Is Actually Doing in This Dessert

- Mini phyllo tart shells — These give you the crisp, delicate base that keeps the dessert light. Store-bought shells are the easy path here and they work well, but if you bake your own pie dough in a mini muffin tin, cool them completely before filling or they’ll steam under the cream cheese.
- Cream cheese — Full-fat cream cheese gives the filling its clean tang and sturdy texture. Low-fat versions tend to soften too much and can taste thin. Let it warm to room temperature so it beats smooth without little lumps.
- Powdered sugar — This sweetens without graininess and helps the filling stay silky. Granulated sugar won’t dissolve as cleanly in a no-bake filling, and you’ll feel it on the tongue.
- Sour cream — Just a couple tablespoons loosen the filling enough to pipe, while keeping the tang that plays so well with peaches. Plain Greek yogurt can work in a pinch, but it will taste a little sharper and may loosen slightly more.
- Peaches — Use ripe but still firm peaches so the slices hold their shape. Overripe fruit turns mushy under the glaze. Peel them if the skins are tough or fuzzy; on a dessert this small, the texture matters.
- Peach jam or apricot jam — Warm jam is the easiest way to give the peaches shine and a little extra fruit flavor. Apricot jam works because it’s mild and glossy; if using peach jam, strain out any large bits if you want a smoother finish.
- Fresh mint — This is the clean, fragrant finish that keeps the tarts from tasting one-note. Use a tiny leaf or two. Too much mint can compete with the peaches instead of lifting them.
Building the Tartlets So They Finish Cleanly
Start With a Cold, Fully Cooled Shell
If you’re baking the shells yourself, let them cool all the way before anything else touches them. Warm pastry traps steam, and steam softens the bottom in minutes. Store-bought shells need the same respect: if they still feel warm from the oven or package, wait. A crisp shell should sound dry when tapped lightly.
Whip the Filling Until It Holds Its Shape
Beat the cream cheese, powdered sugar, vanilla, and sour cream until the mixture looks smooth and slightly billowy. You want it thick enough to pipe in a clean swirl. If the bowl shows little streaks of unmixed cream cheese, keep going for another minute or two. If it starts looking loose, the cream cheese may have been too warm, and chilling it briefly will bring it back.
Pipe, Top, and Glaze in That Order
Pipe a generous swirl into each shell so the filling reaches the edges and gives the peaches a base to sit on. Add the peach slices right away while the surface is still soft enough to grip them. Brush the warm jam lightly over the fruit, not the shell, or the crust can lose its snap before serving.
Chill Only After Assembly Is Finished
A short chill helps the filling set and makes the tartlets easier to serve. Don’t let them sit in the fridge for hours after glazing unless you have to; the fruit stays pretty, but the shells gradually soften. These are best within two hours of assembly, which is exactly why they work so well for a party dessert table.
Three Ways to Make These Tartlets Work for Different Kitchens
Use Phyllo Shells for the Fastest Version
Store-bought mini phyllo shells give you the crispest, quickest base with almost no work. They’re lighter and more fragile than pastry shells, which is a nice match for the creamy filling. Bake them just long enough to dry them out if they need it, then cool before filling.
Make It Gluten-Free with GF Tart Shells
Use a gluten-free mini tart shell or a baked almond-flour crust if you need a gluten-free version. The filling and topping stay the same, but GF shells can soften faster than standard pastry, so assemble closer to serving time. The flavor stays intact; only the texture gets a little more delicate.
Swap the Peaches for Another Stone Fruit
Nectarines, plums, or apricots all work here if peaches aren’t at their best. Keep the slices thin and use fruit that’s firm enough to hold a clean fan. Each swap changes the tartlets a little: nectarines taste a touch brighter, plums add more tartness, and apricots bring a deeper floral note.
Storage and Reheating
- Refrigerator: Store assembled tartlets in a single layer for up to 1 day, but expect the shells to soften after several hours.
- Freezer: These don’t freeze well once assembled. The peaches turn watery and the cream cheese filling loses its clean texture.
- Reheating: Don’t reheat assembled tartlets. If you need to work ahead, bake or prep the shells and filling separately, then assemble cold just before serving.
Answers to the Questions Worth Asking

Mini Peach and Cream Cheese Tarts
Ingredients
Equipment
Method
- Preheat the oven to 375°F and press pie dough into a mini muffin tin to form mini cups.
- Bake for 12-15 minutes until golden, then cool completely before filling.
- Beat cream cheese, powdered sugar, vanilla extract, and sour cream until smooth and fluffy, scraping the sides once as needed.
- Transfer the cream cheese filling to a piping bag or zip-lock bag with the corner snipped.
- Pipe a generous swirl into each cooled tart shell.
- Top each tart with a thin peach slice or a fan of slices.
- Brush warm peach jam lightly over the peach slices to glaze.
- Garnish with fresh mint and refrigerate until ready to serve.
- Chill for 30 minutes to help the filling set, and serve within 2 hours of assembly for best texture.