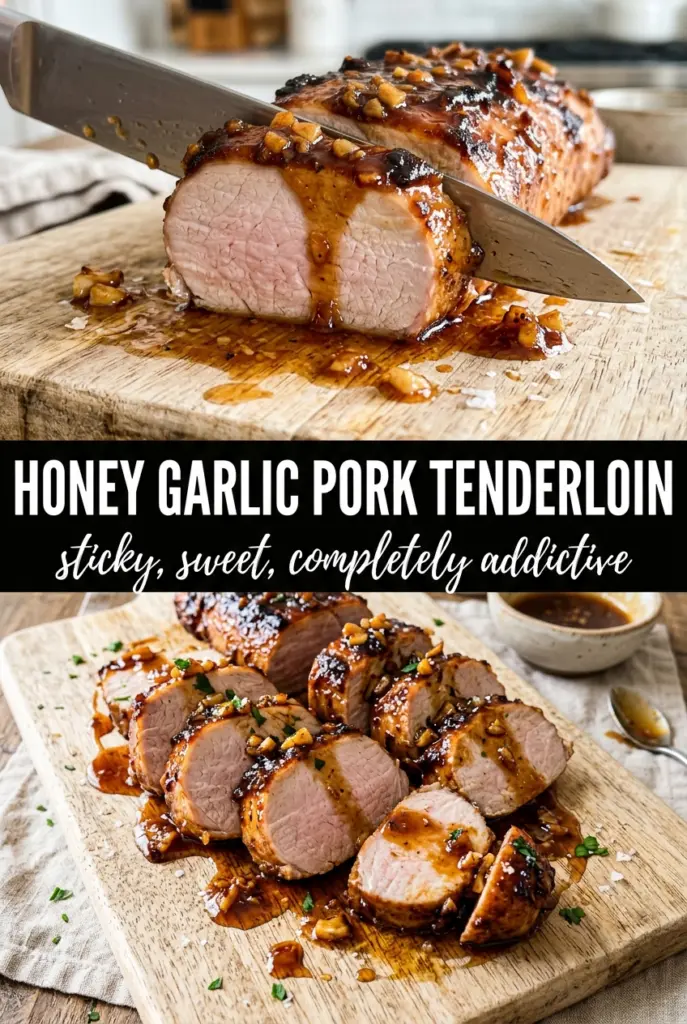
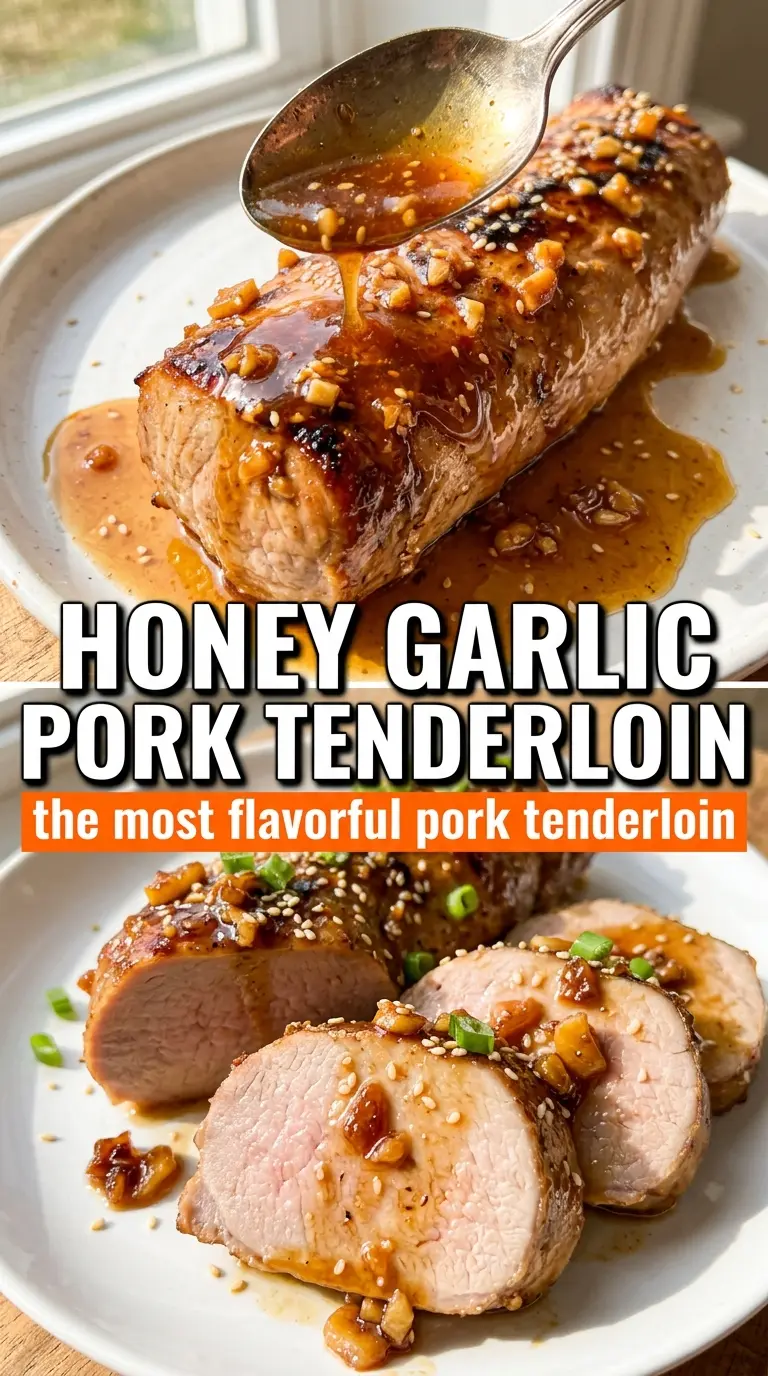
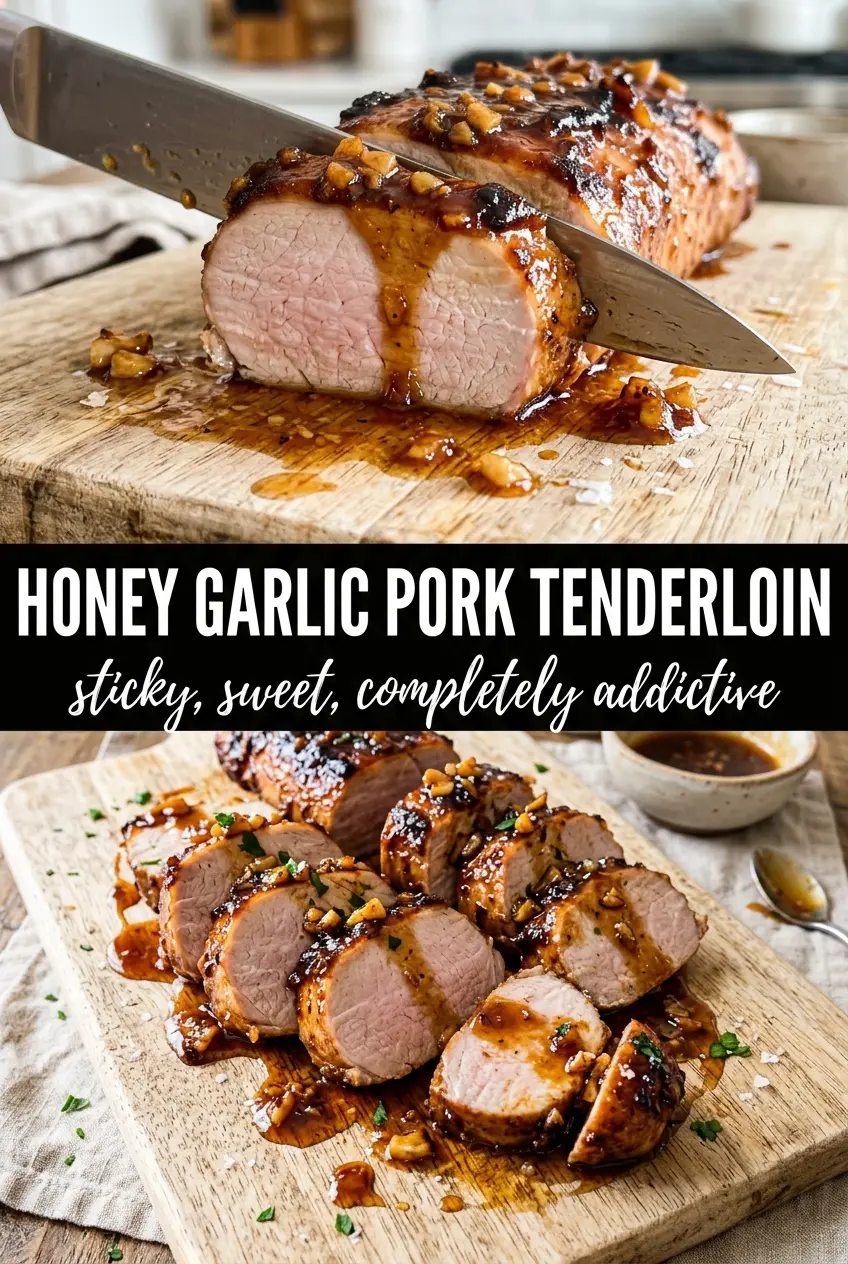
Honey garlic pork tenderloin gets that rare combination right: a sticky, shiny glaze with real caramelized edges and pork that stays juicy instead of drying out in the oven. The honey turns lacquered and dark at the edges, the garlic softens into something sweet and round, and the mustard plus vinegar keep the glaze from tasting flat or one-note.
What makes this version work is the sequence. The pork gets a hard sear first, which builds flavor fast and gives the glaze something to cling to. Then the oven finishes the tenderloin gently enough that the center stays blush-pink and tender at 145°F. If you skip the rest, all those juices run right out when you slice it.
Below, I’m walking through the parts that matter most: how to get a good sear in a skillet, why the glaze should be brushed on in two stages, and what to do if you want to swap the heat level or make it gluten-free without losing the texture that makes this dish worth repeating.
The glaze thickened up and caramelized beautifully in the oven, and the pork was still juicy after slicing. I’ve made a lot of tenderloin recipes, but this one had the best sticky edges and didn’t taste dry at all.
Pin this sticky honey garlic pork tenderloin for a fast dinner with caramelized edges and a juicy center.
The Sear That Keeps Pork Tenderloin Juicy Instead of Blowing Out in the Oven
Pork tenderloin dries out fast when it goes straight into the oven. The skillet sear is what protects you from that. It builds a browned crust in minutes, and that crust acts like a head start on flavor before the tenderloin finishes cooking more gently in the oven.
The other mistake is overcooking by guesswork. Tenderloin is lean, so the sweet spot is pulling it at 145°F and letting the carryover heat do the rest. If you wait until it looks completely firm in the pan, it has already gone too far. A little pink in the center is the sign you cooked it correctly, not the sign you missed it.
- Two pork tenderloins give you enough surface area to sear well without crowding the pan. If your skillet is small, work with one at a time so they brown instead of steam.
- Honey is what gives the glaze its sticky shine, but it burns if it cooks too long over direct heat. That’s why it goes on in two stages instead of all at once.
- Dijon mustard brings sharpness and helps the glaze cling. Regular yellow mustard won’t give the same depth.
- Apple cider vinegar keeps the glaze from tasting heavy. If you need a substitute, use lemon juice in the same amount for a brighter finish.
- Soy sauce adds salt and color. For a gluten-free version, use tamari at the same measurement.
What Each Ingredient Is Doing in This Honey Garlic Glaze
The glaze is built from ingredients that each cover a different job. Honey handles the gloss and sweetness, garlic gives the sauce its backbone, soy sauce adds the savory side, and Dijon and vinegar keep everything balanced so the finished pork tastes sweet-savory instead of sugary.
Fresh garlic matters here. Jarred garlic can taste dull once it hits the oven, and this glaze depends on that sharp, warm garlic note softening as it cooks. If you only have jarred garlic, use it, but expect a flatter result.
The sesame seeds and green onions are not decoration only. They add a light crunch and a fresh finish that keeps each bite from feeling sticky and dense. Slice the scallions thin so they scatter cleanly over the pork instead of clumping.
How to Get the Glaze Dark and Sticky Without Burning the Garlic
Start With a Dry, Well-Seasoned Surface
Pat the tenderloins dry before seasoning them. Moisture on the outside blocks browning, and browning is what gives the pork its savory edge before the glaze goes on. Salt and pepper are enough here because the glaze carries the bigger flavor. If the pork goes into the pan wet, it will sputter and the surface will steam instead of sear.
Brush on Half the Glaze First
Mix the glaze before you start cooking so it’s ready when the pork comes out of the sear. Brush on only half before the oven; that layer starts caramelizing and helps build color. Save the rest for the halfway point so the garlic doesn’t scorch on the skillet before the pork is done. If you dump it all on at once, the sugars can darken too fast and turn bitter.
Finish by Temperature, Not by Time Alone
Roast until the thickest part reaches 145°F. Oven times vary based on the exact size of the tenderloins and how hot your skillet runs, so temperature beats guesswork every time. When you pull it from the oven, the glaze should look glossy and slightly thickened, with little browned edges where it touched the pan. Resting for five minutes lets the juices settle so they stay in the meat when you slice it.
Three Ways to Adapt This Pork Tenderloin Without Losing the Sticky Finish
Make It Gluten-Free With Tamari
Swap the soy sauce for tamari in the same amount. The glaze still gets that deep savory note, but without the wheat. I’ve tested this swap often enough to know it doesn’t weaken the sauce or change the way it caramelizes.
Turn Down the Heat for a Milder Finish
Leave out the red pepper flakes or cut them in half. You’ll keep the sweet garlic glaze and the glossy finish, but the bite at the end will be softer. This is the version I use when I’m serving people who want flavor without any heat.
Swap in Boneless Pork Chops When That’s What You Have
The same glaze works on thick pork chops, but the cooking time changes. Chops cook faster and can dry out sooner, so start checking them early and pull them as soon as they hit 145°F. You’ll get the same sticky finish, just with a slightly firmer bite.
Storage and Reheating
- Refrigerator: Store sliced pork in an airtight container for up to 3 days. The glaze will thicken and the edges lose a little shine, but the flavor holds well.
- Freezer: It freezes fine for up to 2 months. Wrap tightly and freeze slices with a little sauce so they don’t dry out.
- Reheating: Reheat gently in a covered skillet over low heat with a splash of water or extra glaze. High heat dries out tenderloin fast, and the sugar in the sauce can scorch before the pork warms through.
Answers to the Questions Worth Asking
Honey Garlic Pork Tenderloin
Ingredients
Equipment
Method
- Preheat the oven to 400°F, and set an oven rack in the middle position for even browning.
- Season the tenderloins with salt and pepper all over.
- Heat the olive oil in an oven-safe skillet over medium-high heat, then sear the tenderloins for 2 minutes per side until golden.
- Mix honey, minced garlic, soy sauce, Dijon mustard, apple cider vinegar, and red pepper flakes until smooth.
- Brush half of the glaze over the seared pork, coating the surface evenly.
- Transfer the skillet to the oven and roast for 18–22 minutes, brushing with the remaining glaze halfway through.
- Roast until the internal temperature reaches 145°F, and look for a caramelized, shiny amber glaze.
- Rest the pork for 5 minutes before slicing so the juices settle.
- Garnish with sesame seeds and green onions, then slice to show the juicy blush-pink interior.