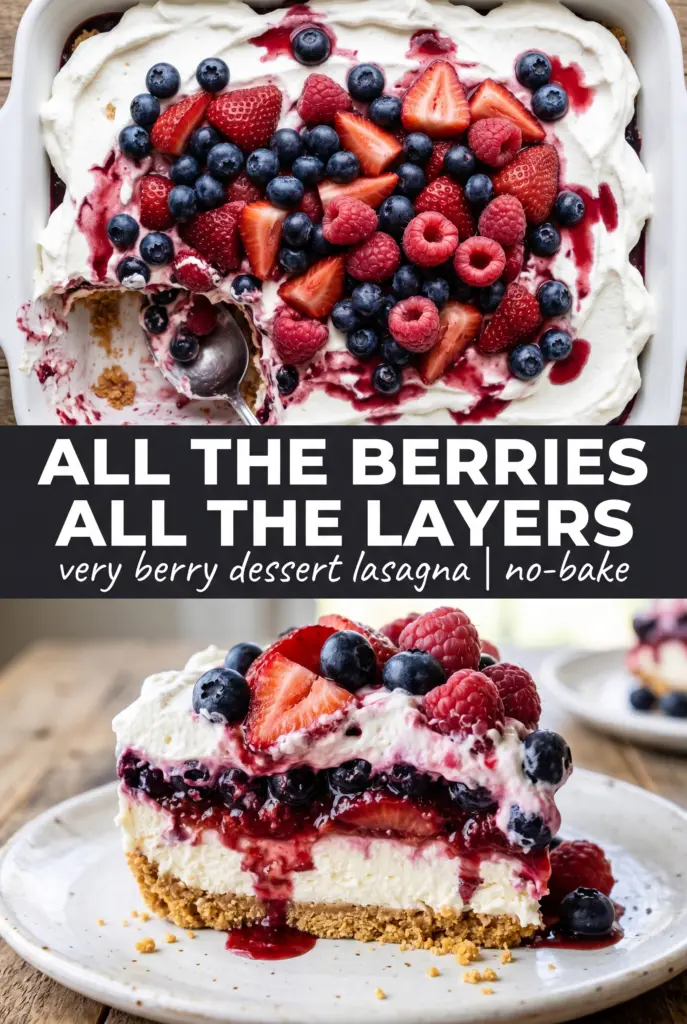
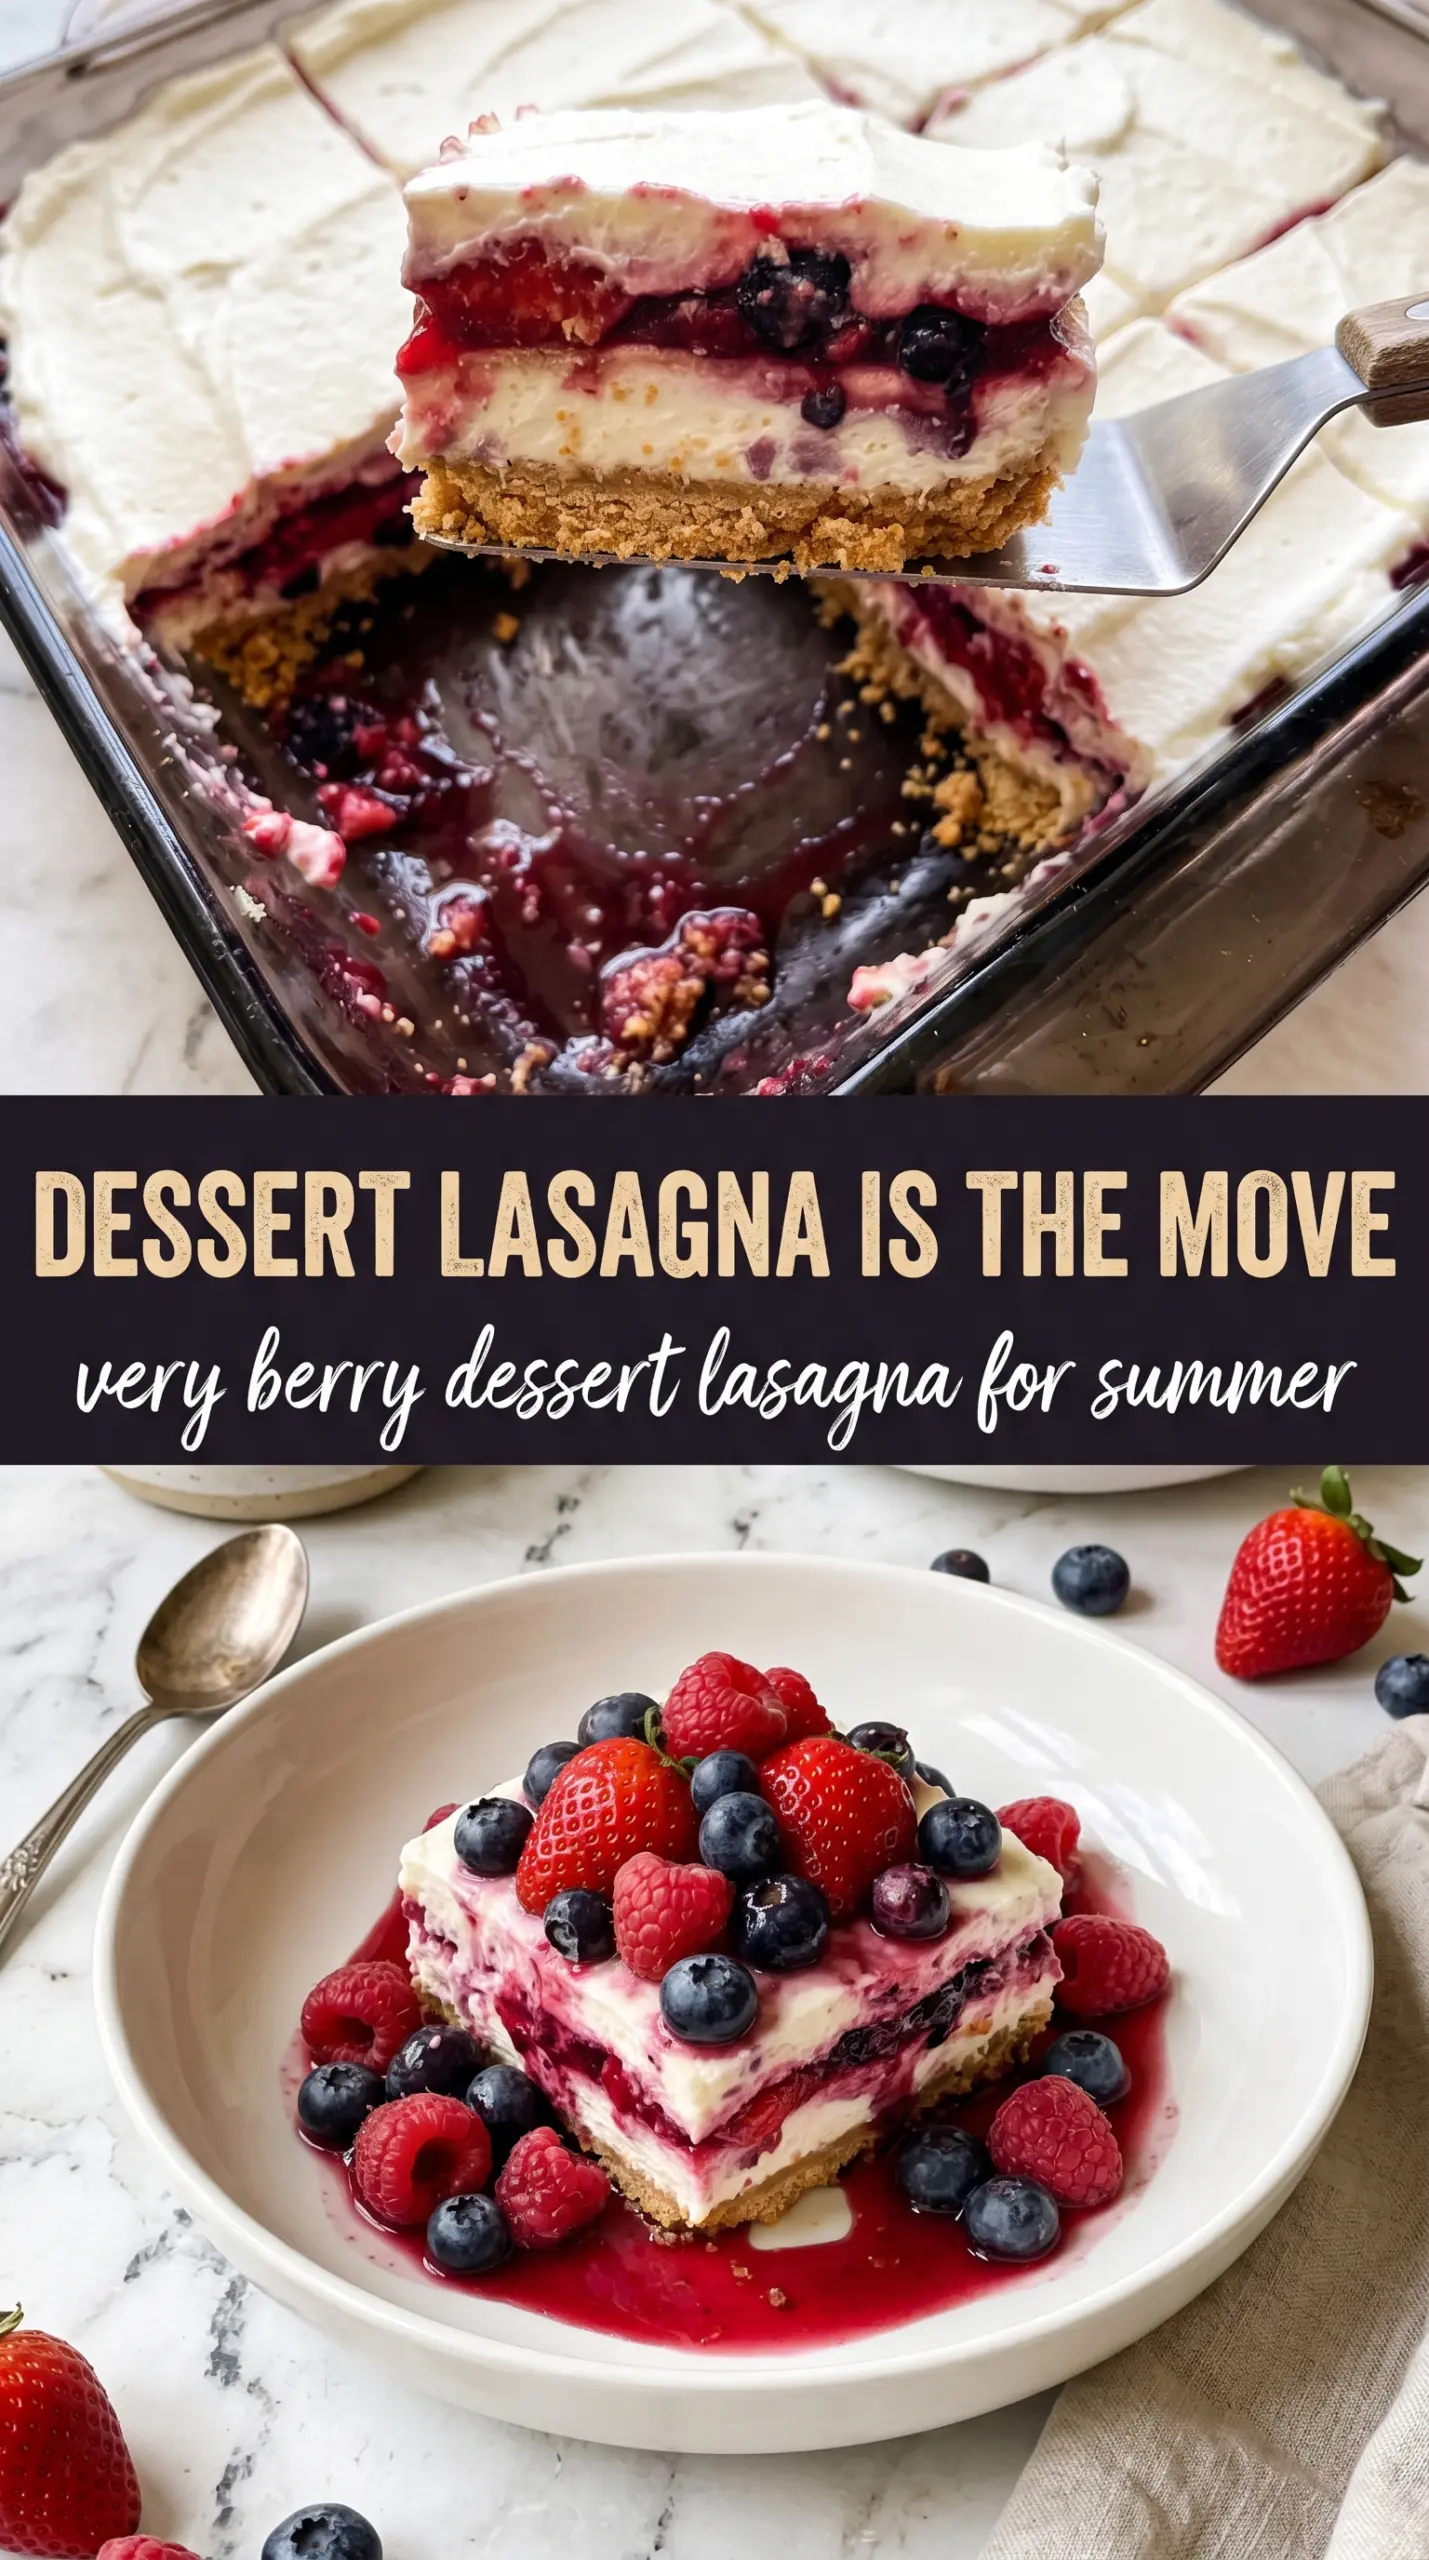
Five distinct layers make this berry dessert lasagna feel a little nostalgic and a lot more polished than the average no-bake pan dessert. The cookie crust stays firm enough to slice cleanly, the cream cheese layer adds tang and body, and the lemon pudding gives the middle a bright, soft finish that keeps every bite from tasting heavy. The fresh berries on top are what make the whole pan look finished, but they also keep the dessert tasting light and fresh.
The trick here is respecting the chill time between layers. A cold crust gives the cream cheese mixture something stable to sit on, and a thickened pudding layer keeps the top from sinking or sliding when you cut into it. Using instant pudding instead of cooked pudding matters too — it sets fast, stays smooth, and won’t turn the dessert soggy while it chills.
Below, I’ve included the small details that make the layers stay clean, plus the one substitution I reach for when I need to adjust the fruit or the base without losing that tall, sliceable look.
The layers set up beautifully and the crust stayed crisp even after chilling overnight. I used the lemon pudding like you suggested, and the berries on top made every slice taste bright instead of overly sweet.
Save this very berry dessert lasagna for the kind of gathering that needs neat slices, creamy layers, and a bright berry topping.
The Chill Time Is What Keeps the Layers Separate
The biggest mistake with a layered no-bake dessert like this is rushing the assembly. If the crust is still loose, the cream cheese layer can drag it up and leave crumbs in the filling. If the pudding is still soft, the top layer sinks and the finished slices slump instead of standing tall. Each layer needs just enough time to firm up before the next one goes on.
That’s why this dessert works best when you treat the refrigerator like part of the recipe, not a suggestion. Twenty minutes for the crust gives the butter time to reset. Four hours at the end gives the whole pan enough structure to cut into clean rectangles. If you skip the full chill, the flavor will still be there, but the neat stacked look won’t be.
What Each Layer Is Doing in the Pan
- Golden Oreos — These bring a vanilla-cookie flavor that plays nicely with berries and lemon pudding. Regular chocolate cookies would fight the fruit, and graham crackers won’t give the same buttery, custardy feel. Crush them finely so the crust packs tightly and slices cleanly.
- Cream cheese — This is the layer that gives the dessert its backbone. Full-fat cream cheese gives the best texture; low-fat versions can turn loose once the dessert warms up on the counter. Soften it fully before mixing or you’ll end up with small lumps that never disappear.
- Instant pudding — Use instant, not cooked pudding. Cooked pudding is too loose for a layered dessert like this and can weep into the cream cheese layer. Lemon is my first choice because it makes the berries taste brighter, but vanilla works if you want a softer, more classic flavor.
- Whipped topping — This lightens both the cream cheese layer and the top. Homemade whipped cream can work for the topping, but it won’t hold as long in the fridge, especially if you’re making the dessert a day ahead. If you swap it, whip it to firm peaks and serve the dessert the same day.
- Fresh berries — Fresh fruit matters here because frozen berries release juice and turn the top messy. Slice the strawberries thin so they sit flat and don’t slide off when you cut the pan.
Building the Pan So It Slices Cleanly
Pressing the Crust Firmly
Mix the crushed Golden Oreos with melted butter until every crumb looks evenly coated, then press the mixture into a 9×13 dish with the bottom of a measuring cup. The crust should feel compact and even, not sandy. If it’s pressed loosely, the first slice will crumble apart before you even get to the filling.
Whipping the Cream Cheese Layer Smooth
Beat the softened cream cheese with powdered sugar and vanilla until it looks silky and no streaks remain. Fold in the whipped topping gently so the layer stays light but still holds its shape. If the cream cheese is cold, stop and let it soften more; beating hard on a cold block just leaves tiny lumps that show up in every slice.
Setting the Pudding Before the Top Goes On
Whisk the pudding with cold milk for the full two minutes, then let it sit for a minute or two until it thickens slightly before spreading. That small pause helps it stay in place instead of thinning out over the cream cheese layer. Spread it in an even layer with a spatula, working to the corners so each slice shows all three middle layers clearly.
Finishing With Berries That Stay Put
Spread the top layer of whipped topping all the way to the edges, then arrange the strawberries, blueberries, and raspberries on top. Dry the berries first so they don’t bleed into the cream layer and smear when sliced. For the cleanest look, chill the dessert uncovered for the last 20 minutes before serving so the top firms up slightly.
How to Adapt This Dessert for Different Crowds and Diets
Make It Gluten-Free
Swap the Golden Oreos for a gluten-free vanilla sandwich cookie with a similar filling and texture. You want a cookie that crushes into fine crumbs and holds together with butter, not a dry crumb mix that falls apart the second you cut it.
Use Vanilla Instead of Lemon
If you want a softer, more classic flavor, use vanilla instant pudding in place of lemon. The dessert turns a little sweeter and less bright, which works well when your berries are extra ripe or when you’re serving kids who prefer milder desserts.
Swap the Fruit for What You Have
Blackberries, sliced kiwi, or diced peaches all work if they’re firm and not overly juicy. Keep the total amount about the same so the topping doesn’t get crowded and slide around when you cut into it.
Storage and Reheating
- Refrigerator: Store covered for up to 3 days. The berries stay freshest on day one, and the cookie base softens a little more each day.
- Freezer: I don’t recommend freezing this dessert. The whipped topping and fresh berries lose their texture, and the filling can turn watery after thawing.
- Reheating: No reheating needed. Serve it straight from the refrigerator for the cleanest slices; if it gets too cold and firm, let it sit out for 10 minutes before cutting so the layers don’t crack.
Questions I Get Asked About This Recipe

Very Berry Dessert Lasagna
Ingredients
Equipment
Method
- Mix finely crushed Golden Oreos with melted butter until the crumbs look evenly coated, then press firmly into the bottom of a 9x13 dish. Refrigerate for 20 minutes to set, and look for the crust to feel firm when pressed.
- Beat softened cream cheese with powdered sugar and vanilla extract until smooth, then fold in 1 cup whipped topping. Spread the mixture over the chilled crust and smooth to an even layer.
- Whisk instant pudding with cold milk for 2 minutes until thickened, then spread it over the cream cheese layer. Stop whisking when it holds soft ridges.
- Spread 2 cups whipped topping evenly over the pudding layer, covering edge to edge. Smooth the surface so the berries sit flat.
- Arrange sliced strawberries, blueberries, and raspberries in rows or a scattered pattern across the top. Use a layered look so all three berry types are visible.
- Cover and refrigerate for at least 4 hours until all layers are set, then slice into rectangles and serve cold. The top should hold its shape and the slices should cut cleanly.